



Posts
58
Joined
7/8/2010
Location
San Diego, CA, USA

Edited Date/Time
12/30/2014 10:00pm
I finally got around to totally restoring my 2004 KTM 450 EXC. It had many off-road miles with several Colorado 400 rides, as well as many motocross trips . I had to stay off the bike for a year after my heart attack due to blood thinners, so I squeezed in the time during this SX and MX season to get it done. It was a lot of fun until the end when I was ready to ride, but the bike wasn't! It took a little longer than expected to finish it., but isn't that always the case?.

I didn't take many photos of the initial teardown.

But you get the idea.


The engine had just gotten a complete rebuild and only had three hours on it, and the lower end was all good, as I am pretty anal about oil and filter changes.

A repurposed cardiac monitor stand makes a great frame holder. I was originally going to have it painted.
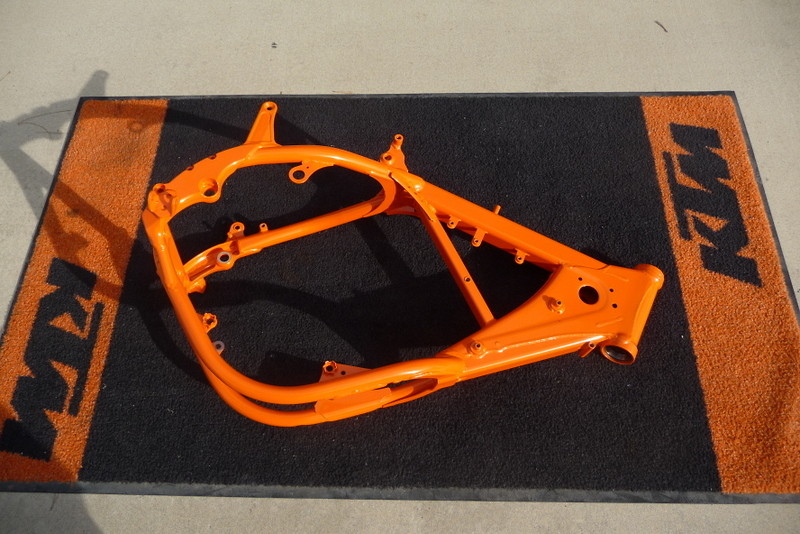
Changed my mind and had the frame powder coated.

I soda blasted the engine to make it look new.

Engine and frame matched up nicely. Yes, the ignition cover got replaced later!

Cleaned up the electronics, all terminals cleaned and dielectric greased.

Suspension had to be setup for my weight loss this year. Easier to lose forty pounds on the body than on the bike!

Carb got a soda blasting and rebuild. Soda blasted the radiators too.

Everything was either replace, cleaned and polished. The stabilizer was buffed back to a chrome finish. I made this custom cover for the stabilizer stem to keep water out, and coated the inside with grease.

Even the kill switch and starter switch mounting straps got buffed. You want your doctor to have attention to the details!

Graphics coming together. Thanks DeCal Works!

All master cylinders and calipers were rebuilt, clutch too.

Swingarm and Subframe were wire brushed, then used Brillo pads, Scotch pads and elbow grease to shine it up. Soda blasting didn't make it shine enough. All the bushings were replaced.

Plastic and airbox replaced.


Fabricated this vent hose bracket to route things out of the way. One large and one small zip tie did it all.

Hose clamps replaced with stepless ear clamps. No leaks so far. To be complete, added the OEM clear vinyl tank protectors to the front and rear frame backbone.

All new hardware. I know, the engine plug would look better if it were custom!

Plastic and graphics nearing completion.

More polishing. Careful to line up the pinstripes on the graphics.

Another use for stepless clamps and zip ties.

The obligatory Living Room shot!
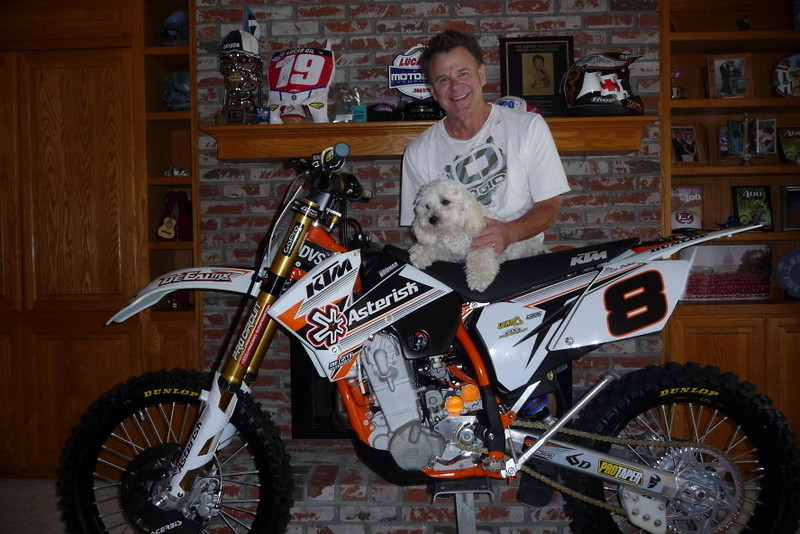
And the dog, not impressed!

And finally, lots of close-ups for all you detail oriented people.


Love the reflection on the clutch cover. I spent way too much time polishing, but it was worth it!
Thanks to Decal Works for the great graphics, Pro Circuit for the suspension changes and ProTaper for the bars, pegs and throttle. It rode like a new bike! I hated to get it dirty! Now, I have to make sure it stays looking new. It does have a street registration and license, but it is staying in moto form for a while. Hope you enjoyed the show!
Here is my previous version when it was street legal in 2008!

I didn't take many photos of the initial teardown.
But you get the idea.
The engine had just gotten a complete rebuild and only had three hours on it, and the lower end was all good, as I am pretty anal about oil and filter changes.
A repurposed cardiac monitor stand makes a great frame holder. I was originally going to have it painted.
Changed my mind and had the frame powder coated.
I soda blasted the engine to make it look new.
Engine and frame matched up nicely. Yes, the ignition cover got replaced later!
Cleaned up the electronics, all terminals cleaned and dielectric greased.
Suspension had to be setup for my weight loss this year. Easier to lose forty pounds on the body than on the bike!
Carb got a soda blasting and rebuild. Soda blasted the radiators too.
Everything was either replace, cleaned and polished. The stabilizer was buffed back to a chrome finish. I made this custom cover for the stabilizer stem to keep water out, and coated the inside with grease.
Even the kill switch and starter switch mounting straps got buffed. You want your doctor to have attention to the details!
Graphics coming together. Thanks DeCal Works!
All master cylinders and calipers were rebuilt, clutch too.
Swingarm and Subframe were wire brushed, then used Brillo pads, Scotch pads and elbow grease to shine it up. Soda blasting didn't make it shine enough. All the bushings were replaced.
Plastic and airbox replaced.
Fabricated this vent hose bracket to route things out of the way. One large and one small zip tie did it all.
Hose clamps replaced with stepless ear clamps. No leaks so far. To be complete, added the OEM clear vinyl tank protectors to the front and rear frame backbone.
All new hardware. I know, the engine plug would look better if it were custom!
Plastic and graphics nearing completion.
More polishing. Careful to line up the pinstripes on the graphics.
Another use for stepless clamps and zip ties.
The obligatory Living Room shot!
And the dog, not impressed!
And finally, lots of close-ups for all you detail oriented people.
Love the reflection on the clutch cover. I spent way too much time polishing, but it was worth it!
Thanks to Decal Works for the great graphics, Pro Circuit for the suspension changes and ProTaper for the bars, pegs and throttle. It rode like a new bike! I hated to get it dirty! Now, I have to make sure it stays looking new. It does have a street registration and license, but it is staying in moto form for a while. Hope you enjoyed the show!
Here is my previous version when it was street legal in 2008!
The Shop
Luxon 4-Post Bar Mounts
$189.95 - $239.95
DeCal Works Huge Plastic Inventory of UFO and Polisport kits.
buy more bikes... post more rebuilds
Time to keep that jewell in the garage as a show, and buy a new one! ;-)
Shane
Oh, the bike looks great too.
Thanks for all you do.
H
Pit Row
http://www.vitalmx.com/community/main
Where did you get them hose clamps? Do they need a special tool???
Post a reply to: Doc B's KTM Rebuild