


2008 YZ125 rebuild with R-Tech restyle plastics

DDMX18
Posts
94
Joined
4/3/2013
Location
AU
Edited Date/Time 10/29/2018 6:42am
I've been meaning to post up my build ever since i put up a couple of photos of my latest built in the kick ass two stroke topic. Well here goes.

I started out with a fairly well used 2008 YZ125. The bones appeared pretty good but seemed to be suffering from a good dose of neglect. So i pulled the trigger on the bike and got to work.


I was planning on putting all new plastics ect on it so the cosmetic stuff didn't really bother me. What i did find that the frame and engine were pretty badly corroded. This wasnt going to be an easy polish with the scotch brite and WD40.


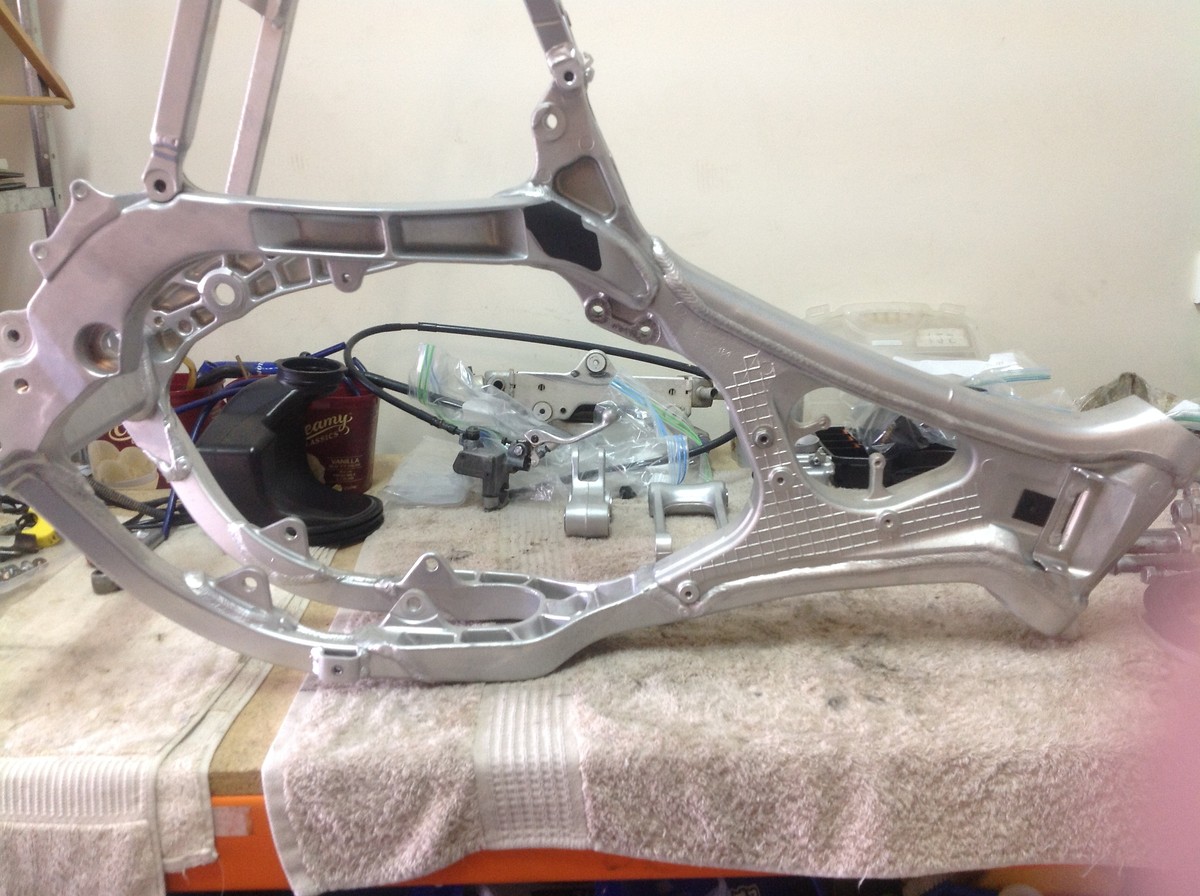
I was planning on rebuilding the motor anyway, so went with the wet media blasting approach to get all the aluminium back up to an almost as new finish. Here's the frame and the engine cases back.


|
DDMX18
Posts
94
Joined
4/3/2013
Location
AU
12/5/2016 7:49pm
I also had the carby, linkages, calipers done.


I got to work ordering parts, including all the engine seals and bearings. Unfortunately the head and cylinder were toast so that was an added expense.


DDMX18
Posts
94
Joined
4/3/2013
Location
AU
12/5/2016 7:53pm Edited Date/Time 12/5/2016 7:53pm
The parts list kept increasing, but i didnt want this to be just another rebuild, i wanted something a little special. So i went with A60's, laced to stock media blasted hubs, new bearings and seals, excel spline drive nipples, Dunlop MX52's - (we are pretty much clay hardpack in Australia) motion pro lite rimlocks, Renthal sprocket and I also had a braking batfly rotor laying around so threw that on too.


DDMX18
Posts
94
Joined
4/3/2013
Location
AU
12/5/2016 7:56pm
Probably the single biggest expense was the suspension. MCD Racing in Australia went all out, Kashima coated forks, Ti-cn coated lowers and shock shaft, hard anodised lugs and lower shock along with a X-Trig adjuster, new bearings, bushes, bump rubber seals and oil


DDMX18
Posts
94
Joined
4/3/2013
Location
AU
12/5/2016 8:00pm
Once the bank was empty............... i started putting it all together, GPI radiators, and i wasn't going to mate those trick forks to stock clamps so went with an X-Trig set up. In the process i threw on a set of Works connection titanium footpegs and had the footpeg carriers re-zinced along with a few other items.


The Shop

DDMX18
Posts
94
Joined
4/3/2013
Location
AU
12/5/2016 8:01pm
The stock clutch basket and hub were ok, but i put i a new Hinson clutch plate kit and finished it off with a Hinson clutch cover.


DDMX18
Posts
94
Joined
4/3/2013
Location
AU
12/5/2016 8:14pm
Well here is the finshed product. I think in the end we saved the cases and gearbox, frame, swingarm and not much else. All new R-Tech plastics with custom graphics from TeenCee. New radiators, radiator louvres, handlebars, grips, DID ERT2 chain mated to Renthal sprockets, new seat foam and seat cover from Motoseat, lightspeed carbon chain guide, new brake pads, throttle tube, cables, bearings and seals throughout including swingarm, shock and headset, hammerhead shifter and brake lever, pro taper clutch lever, Boyesen igniiton cover, basically a new engine and forks.....and i'm sure there is more.


HenryA
Posts
3784
Joined
12/29/2011
Location
Stockholm, SE
12/6/2016 1:47am
What a build!!! Amazing, it turned out perfect!
Helder
Posts
1044
Joined
5/16/2015
Location
AU
12/6/2016 2:26am
Looks awesome mate!!
Motofinne
Posts
11547
Joined
1/4/2014
Location
FI
12/6/2016 2:47am
Stunning!
nicko-31
Posts
411
Joined
12/8/2014
Location
USA
12/6/2016 6:38am
Very nice !! Do you have any work done to the cyclider ?
mxracer10
Posts
10
Joined
12/7/2016
Location
Columbus, MS, USA
12/7/2016 7:53am
Bike looks awesome! Where/who makes the tank and shrouds?
12/7/2016 1:31pm Edited Date/Time 12/7/2016 1:31pm
mxracer10 wrote:
Bike looks awesome! Where/who makes the tank and shrouds?
R-tech
AKA Race tech
Sidecar
Posts
1727
Joined
1/29/2015
Location
GB
12/7/2016 10:07pm
Sweet build.
CC13
Posts
1
Joined
12/14/2016
Location
Calgary, CA
12/14/2016 10:56am
Build looks great!

How did those R-Tech plastics fit? I definitely prefer them over the UFO restyle ones.
12/15/2016 6:16am
Holy cow! That's so sexy that it moved.
Fresh
Posts
722
Joined
5/22/2015
Location
AU
4/14/2017 5:45am
DDMX18 wrote:
Probably the single biggest expense was the suspension. MCD Racing in Australia went all out, Kashima coated forks, Ti-cn coated lowers and shock shaft, hard anodised...
Probably the single biggest expense was the suspension. MCD Racing in Australia went all out, Kashima coated forks, Ti-cn coated lowers and shock shaft, hard anodised lugs and lower shock along with a X-Trig adjuster, new bearings, bushes, bump rubber seals and oil


Can you give me a rough cost for this suspension work?
4/14/2017 9:18am
FYI your axle blocks are backwardsLaughing Laughing
They can go on in either direction. Allows to change wheelbase a bit depending on chain length.
PJRAUS
Posts
1531
Joined
5/28/2016
Location
AU
5/21/2017 12:37am
Awesome job, incredible looking bike!
I'm just about dribbling.....Id wanna put it in the living room and just sit there drinking beer looking at it....I quit drinking though and I have a 2006 model yz 125 I picked up a few weeks ago myself.
Just gonna ride it as us for a fair while though before doing a rebuild
swatdoc
Posts
1095
Joined
6/29/2014
Location
Temecula, CA, USA
5/21/2017 2:56am
Nice!!!!!
5/21/2017 3:45am
That bike is perfect. Not overstated, but looks great and has a bunch of parts which should make it great to ride. I think you have blown more on your forks than i plan to spend on my entire 49th anniversary build.
5/21/2017 4:46am
Beautiful job mate! So clean, great photos too Woohoo
Have you got a case saver fitted? Can't see one in the pics...
houston
Posts
2
Joined
6/7/2017
Location
Houston, TX, USA
6/7/2017 11:09pm
Can you explain exactly what you did to clean the engine and frame like you did? Did you take it to a shop or was this a DIY method? What's the difference between what you did and soda blasting?
swatdoc
Posts
1095
Joined
6/29/2014
Location
Temecula, CA, USA
6/8/2017 12:51am Edited Date/Time 6/8/2017 12:52am
Looks like vapor blasting. Does miracles. These are my 1979 XR500 cases/cylinder/head that had over 35 years of grunge

houston
Posts
2
Joined
6/7/2017
Location
Houston, TX, USA
6/8/2017 12:54am
swatdoc wrote:
Looks like vapor blasting. Does miracles. These are my 1979 XR500 cases/cylinder/head that had over 35 years of grunge[img]https://p.vitalmx.com/photos/forums/2017/06/08/199404/s1200_IMG_1066.jpg[/img]
Looks like vapor blasting. Does miracles. These are my 1979 XR500 cases/cylinder/head that had over 35 years of grunge

Wow that looks amazing. So soda blasting is dry & vapor blasting is wet with some sort of solution? Is this something I can DIY or do I need to take it to a shop?
swatdoc
Posts
1095
Joined
6/29/2014
Location
Temecula, CA, USA
6/8/2017 1:02am
It's kinda like a sandblasting cabinet with water added. Definitely specialized shop and not DIY unless u wanna make a big investment
PJRAUS
Posts
1531
Joined
5/28/2016
Location
AU
6/15/2017 12:47am
I just can't stop looking at this 125, it's such a beautiful thing!
I wish my 125 would transform itself into a mirror image of it!
Now...where the hell did I leave my magic wand?
PJRAUS
Posts
1531
Joined
5/28/2016
Location
AU
6/15/2017 5:09am
Just one question, why does the seat not mate up nicely with the tank, right at the end of the seat?
Leaves an unfortunate gap that somewhat spoils an otherwise gorgeous bike.
Is it the r tech tank or is the new seat foam and cover to blame?
1
KVA_536
Posts
91
Joined
4/5/2017
Location
Alto, MI, USA
10/29/2018 6:42am
PJRAUS wrote:
Just one question, why does the seat not mate up nicely with the tank, right at the end of the seat? Leaves an unfortunate gap that...
Just one question, why does the seat not mate up nicely with the tank, right at the end of the seat?
Leaves an unfortunate gap that somewhat spoils an otherwise gorgeous bike.
Is it the r tech tank or is the new seat foam and cover to blame?
Thats a great catch! I am starting a '06 build next month, and I am trying to figure out what route to go for a new tank and plastics. Does anyone know if you have to run R-Tech plastics only when you have the tank? This seems to be the only option I found for a black tank.

Post a reply to: 2008 YZ125 rebuild with R-Tech restyle plastics

The Latest