


Posts
1018
Joined
7/12/2014
Location
GB

Edited Date/Time
4/23/2019 10:54pm
Thought I'd start a thread for my 2015 Suzuki RMZ450 build. Although its a modern machine and in good condition, I am completely stripping and rebuilding the bike, modifying a lot of parts along the way, changing the forks out and using carefully selected bolt on parts, along with a big selection of Ti/Aluminum nuts and bolts. The RMZ450 is a great 'base' bike, but is lacking behind a little as everyone is well aware. I plan to bring it up to date with the competition and then some. My budget is fairly restricted, this build won't be anything unobtainable to the average guy. All of my parts and components are a result of hours of internet scrolling and research to find the best deals and buys.
The Bike
Here it is, my 15 RMZ450. Purchased 2nd hand in May of 2015, I am the 2nd owner. The 1st owner, a guy with more money than sense, decided to try his hand at motocross and bought this bike brand new from the dealer. He also went ahead and fitted the following:
- Full Yoshimura System
- Neken Clamps
- Full ZETA bling kit (brake caps, axle blocks, stem nut etc)
- Complete black plastic kit and Team Two Two graphics
- Renthal Intellilevers
- Renthal Bars
- Red Rad Hose Kit
- Carbon Fork Wraps
- Front Disc Guard
After doing at most 10 hours on the bike, he decided motocross wasn't for him and put the bike on eBay. I saw the advert the same evening and picked the bike up the next day for £4500... happy days!

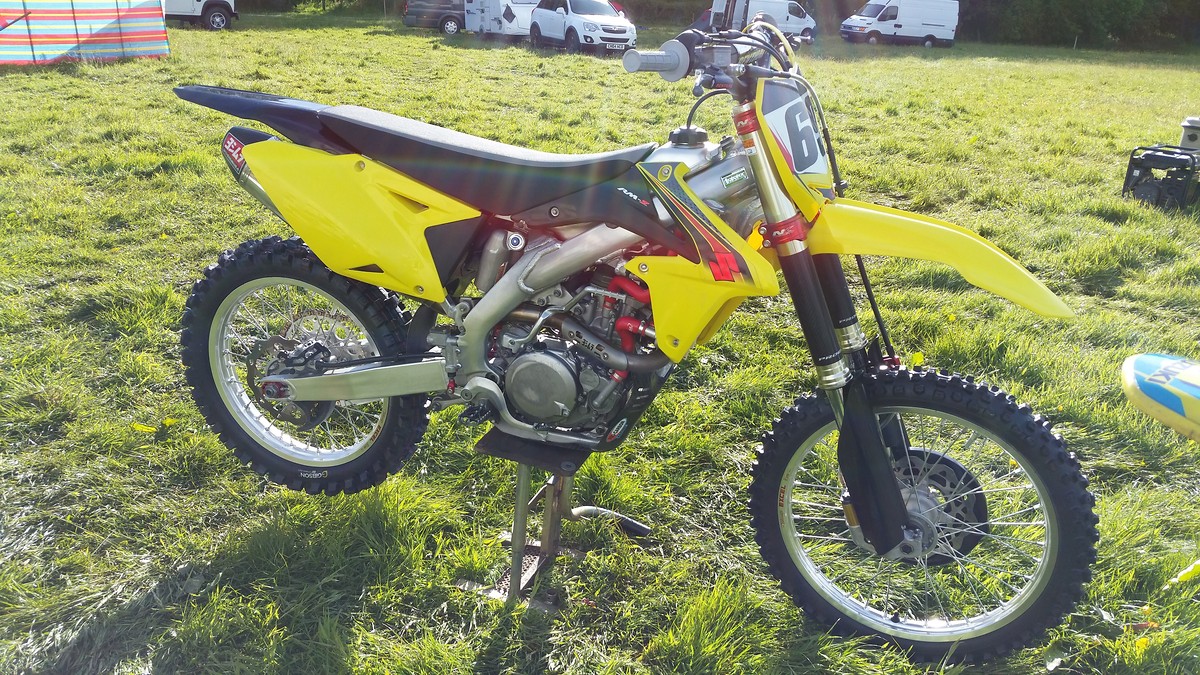
The Bike
Here it is, my 15 RMZ450. Purchased 2nd hand in May of 2015, I am the 2nd owner. The 1st owner, a guy with more money than sense, decided to try his hand at motocross and bought this bike brand new from the dealer. He also went ahead and fitted the following:
- Full Yoshimura System
- Neken Clamps
- Full ZETA bling kit (brake caps, axle blocks, stem nut etc)
- Complete black plastic kit and Team Two Two graphics
- Renthal Intellilevers
- Renthal Bars
- Red Rad Hose Kit
- Carbon Fork Wraps
- Front Disc Guard
After doing at most 10 hours on the bike, he decided motocross wasn't for him and put the bike on eBay. I saw the advert the same evening and picked the bike up the next day for £4500... happy days!
Over the past 18 months I have done a fair bit to the RMZ.
- Suspension revalve, SKF seals and lighter rear shock spring
- Rekluse EXP clutch system (EXP disc and springs not full kit)
- Apico Alloy throttle tube
- Renthal 999 Bend Fatbars
- Titanium Yoshimura Header Pipe
- Oversize 270mm Front Rotor Kit
- Neken SFS Oil/Air Damped Top Clamp
- RM250 Air Filter Cage
If anyone wants more info on the mods above then let me know and I will elaborate, but to save massive posts I will keep things simple to start with!
First port of call is to totally strip the bike to the frame. Each and every part will be cleaned and inspected and worn parts will be replaced where required. The frame will be cleaned up and lightly polished, I'm going to clean up the casting marks and smooth off various parts such as the stock triple clamps, linkages, caliper carriers etc.
Being a 2 stroke guy, I have no issues with the power of a stock 450 engine. So engine wise I am going to keep the bike standard and just stay on top of my maintenance. I do however plan on getting it remapped to smooth out and utilize the RM filter cage and Yoshimura pipe.
I was lucky enough to get a sweet deal on a Showa A Kit fork for the bike. I have been using these on my RM250, but will get them re sprung and re-valved for the RMZ.
I am going to put a lot of focus into making this bike handle perfectly, I am a big believer in getting suspension right before anything else so I plan on doing lots of testing with different set ups, engine mount mods and more until I am 100% happy with the handling of the bike.
One of my main issues with the bike is the weight, coming off a 250 2 stroke the 450 feels and rides heavy. I've always been mad about reducing weight on my bikes and already have a pretty huge Ti bolt collection which I've used on my 250. The 250 has been stripped of all Ti for use on the RMZ.
I have also been slowly purchasing more Ti bit by bit, if you source good suppliers and spread out the purchases then Ti bolts can be very affordable for the average guy like myself.
Ti and aluminium bolts will be a large part of this build and I will go into detail on where and what I've used as the build progresses.
And finally what build wouldn't be complete without a killer new plastic and graphic combo. I am already in talks with some graphics companies in the UK and have some good design ideas in mind.
FYI ZeroSixGFX do some quality custom graphic kits at a pretty good price.
The Shop
DeCal Works Huge Plastic Inventory of UFO and Polisport kits.
Luxon 4-Post Bar Mounts
$189.95 - $239.95
One of the first things I did was get to work on the stock triple clamps. I'm really keen to test triple clamp set ups, not to be a fan boy but if stock RMZ clamps are good enough for Roczen and the JGR Suzuki boys then they sure are good enough for me.
I started off by removing all the casting marks from the triple clamps and have played around with finishes and found one I'm happy with.
Be warned, this is a massive job to do right. I'm probably 3 hours into the clamps and they still aren't done. I am a bit of a perfectionist but to even get them to an acceptable finish takes a lot of time and dedication. Personally I think its well worth it!
To save weight, I removed the bar clamp cross brace and smoothed it off to make it look as though it was never there. I then removed cast marks and lettering from the upper and lower clamps. I did this quite crudely as it will all be covered by the bar pad.
I then replaced all the bolts and 2 nuts with Ti.
For the main through bolts, I bought standard M10 Ti bolts and then filled the flange of the bolt into a hex to fit into the lower bar clamp
Here is the final result!
This weight includes Ti M10 bolts which are 10mm longer than stock to allow me to experiment with bar heights via aluminum bar spacers
Upper Engine Mount Bolts
Stock
Ti (have been previously fitted hence the copper grease)
Lower Front Engine Mounts
Stock
Ti
I'm super pleased on these 3 Ti engine mount rods and nuts.
I was able to do this for just over £30. How? ... I used M10 Ti nuts sourced from China (awesome quality), and for the rods, I purchased 3x 150mm Ti rods with M10 threaded ends (£7.42 each). I then removed 5mm off the length and machined the centre, unthreaded portion of the bar to 9mm diameter for clearance, just like the stock ones.
These things look super trick! Cant wait to pair them up with some polished engine mounts.
There will be around 1mm of bar overhang out of the nuts when fitted
And finally, I have decided to go down the lock wire route for securing the front sprocket, so I purchased a cross drilled Ti bolt to use instead of the rather industrial stock set up
Individually these savings are quite small, but I have only just started to scratch the surface in terms of weight savings. The RMZ is littered with oversized and overbuilt bolts. I aim to switch as many as possible to Ti or Aluminium where suitable.
I used 'Blitz' which is a generic alloy wheel cleaner that I got off ebay. Worked really well at removing all the stains and brightening the aluminium. I coated the frame, then rubbed over with red scotchbrite. I did this 3 times.
Slotted in the A Kit forks for the time being, along with the front wheel, which is a 2C hub laced to a Saxxas rim. Oversize brake disc held on with some really nice button head Ti bolts.
To my amazement the polished clamps, with modified bar clamp set up and Ti bolts, weighed virtually the same as the Neken set up that I had previously been running. That includes the SFS oil/air damped top clamp which is far lighter than I expected it to be!
I will be testing both set ups back to back to see if I can tell much of a difference and see which feel I prefer. It's good to know either set up wont be adding any weight.
Rear wheel complete. 2C hub laced to a Saxxas rim. 50 tooth RFX steel sprocket (for longevity during winter months). Finished off with Ti nuts/bolts
Finished the modifications to the engine clamps as well, very happy with how they turned out. Cleaned off all the casting marks, filled and smoothed off. I replicated the Heads and Threads Suzuki UK team and drilled the mounts in the same fashion that they did. Glass bead blasted them to finish them off.
I'm going way further with this build, mainly because I have a better budget to work with. Instead of most of the money going on replacing worn/old parts, with this build it can go on improvements and weight savings.
You're dead right, as soon as this bike is built it will be getting taken to the filthiest, muddiest practice tracks in the UK for me to pound out laps on and get up to speed for the season. Obviously I'll remove all the nice parts, plastics and use my stock wheels to save it getting totally wrecked.
But as I am documenting all my work, I don't feel as though it is wasted time. I will always have proof of the spec I built the bike too and I cant wait to get it finished and see how it turns out!
Pit Row
The parts I blasted on my RM250 lasted quite well, I'd say I got half way through the season before they started to look past their best. Luckily I have fairly easy access to a blast cabinet so worst case I can always just whip the parts off and freshen them up.
Engine is back from my engine guy, genuine top end rebuild done. Also got a new Factory Effects FP1 seat cover fitted which looks ace.
I have been in contact with SPS racing in the UK, I am leaving the shock and A Kit forks with them to be serviced and set up. The shock wont have too much work done but the forks will need a complete re-spring and re-valve.
They are also going to dyno and re-map the bike. Colin at SPS is very familiar with RMZ's having supported some top UK riders on RMZ's recently. Spoke in depth about what I am looking for in terms of power and delivery so really looking forward to seeing the results from that.
Finally underway with the graphics kit. I'm going to base the kit around one of the JGR designs as I absolutely love the look and think it will fit my bike really well. Basically going with the JGR style colour scheme but with different logos, and less of them for a cleaner look. Excited to see how it turns out!
I installed a new gold CZ chain and made it 1 link longer than I previously ran. This puts the rear wheel quite far back in the swingarm, which is said to be very beneficial for added stability. Aligned the rear wheel via titanium adjusters screws/nuts.
Samco hoses arrived! Fitted those, along with the rads. The quality and fit is awesome, so much better than the ones they replaced.
Also fitted the exhaust, currently I have only polished up the silencer and mid section. I need to get the header pipe blasted again ideally. So I will do this along with the clutch cover and other parts. The clutch cover is definitely letting the bike down at the moment! Still on the look out for a Hinson.
Also fitted is a Ti clutch cover bolt kit, new Zeta oil filter cover (glass bead blasted) and a pink rad overflow hose.
I've seen many pro's altering flex characteristics via the engine mounts and when I spotted this mod on a few of the RMZ's on the Heads and Threads team in the UK I thought I would give it a go.
Coming off of steel frame 2 strokes, I've always found the RMZ to be a lot stiffer and more rigid in feel so figured this would be a great mod to try. Plus it's free!
It was a little heart breaking, the weather has been dire here in the UK this past week so the bike got way more muddy than I'd have liked it too!
No worries though, gave it a thorough strip and clean. Quick whip around again with the scotchbrite and it will be right back as it was.
Ignore the old plastic kit, just chucked it on for run-in
Can't wait to get the freshly serviced and tuned suspension in and re-map it on the dyno!
Machined 2mm off the head of each bolt to help with clearance as Ti bolts can often be quite tall at the head.
45 grams lighter so not a bad little saving.
I will definitely get a set of Ti pegs sometime in the future but not sure about Ti mounts, any idea where I can get these?
The mapping was surprisingly good right from the off, but Colin richened it up a little at lower throttle openings to smooth out the delivery and reduce initial bite. Then leaned out a touch from then on to generate maximum HP and torque.
See the dyno graph below.
53.1HP and 34.4 ft/lbs of torque
These are the ti pegs from 24mx, branded "twenty". They are (from what I can tell) the exact same peg as the raptor pegs. I got these for 1000 sek (about £90) they did this price twice last year, once during the year and again for black Friday sale, normally they are 1500 sek. I have fastway pegs on at the moment, as they came with the bike, and I'm scared to put these on and tear up my boots. You could also cut the cross section out of these if you want to make them like the raptor enduro peg (which I think Cooper Webb runs) if you want to save more weight.
I also have the guts seat foam, I couldn't believe how much lighter the seat was.
I could do a comparison of weight to a standard seat if you want, as I have a 2013 rmz in the shed also (for sale)
I never really thort about trying to save weight on my bikes, but your thread and a few others have really got me interested.
Post a reply to: 2015 Suzuki RMZ450 Build - 2018 Update