

Posts
253
Joined
11/3/2013
Location
BE

Edited Date/Time
11/3/2019 2:21am
Hi all ! With the 2001 Ricky Carmichael MXdN build being done it's time to move to another build !

Some months ago i came across the internet a picture of a mini vintage dirtbike that immediately pulled my attention !
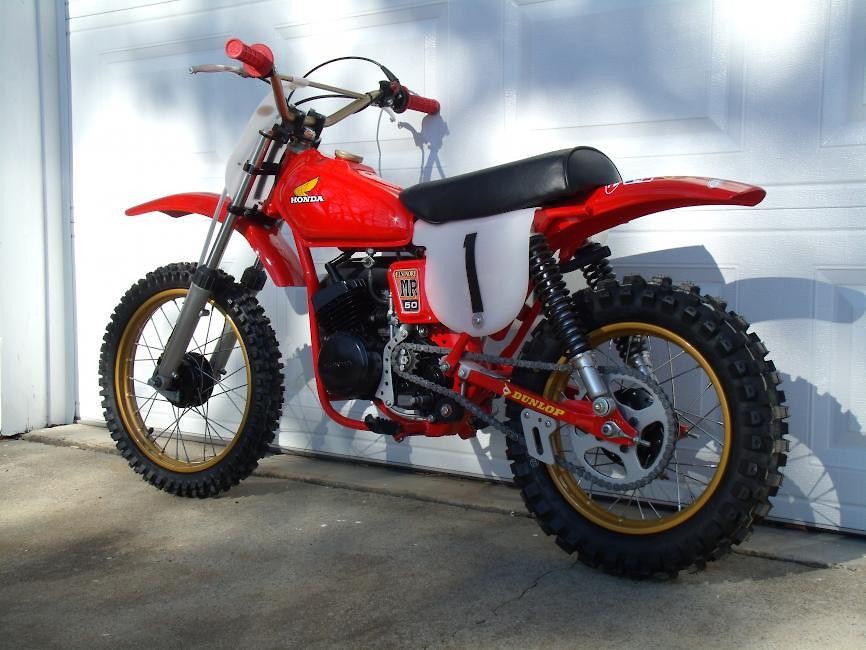
After some research i found out this little bike was a Honda MR50 built and customized by Terry H.
It was at that moment i decided to do something similiar with a MR50, make it look like vintage works bike !
After some more research i found out that MR50's only were available from 1974-75 in USA, Canada and Australia ! So here in Belgium/Europe these little MR50's are very rare.
I found one for sale in the U.K. across the channel, all original and 95% complete, i immediately bought it and picked it up. I know it's not perfect condition but still it's all original.

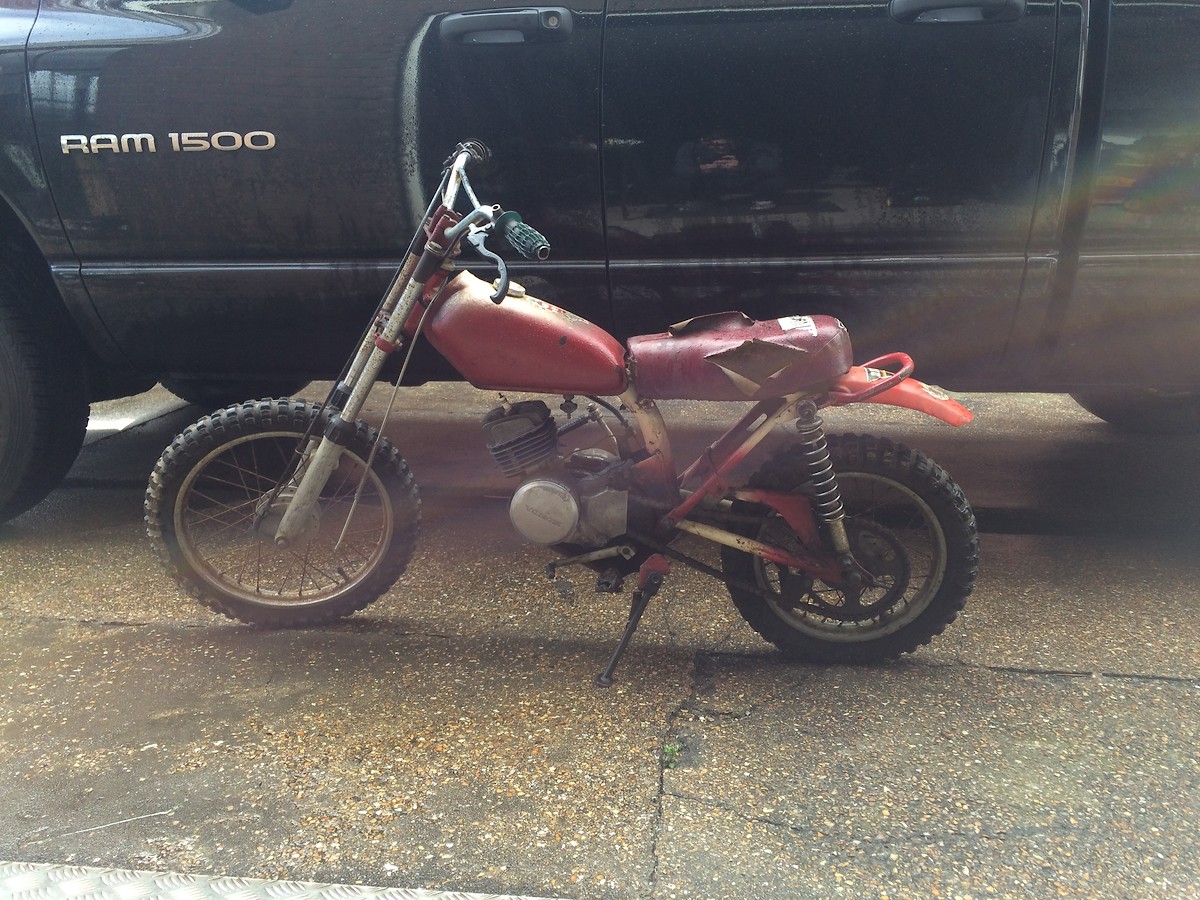
Then some weeks later i found another one for sale in The Netherlands, totaly f*cked and screwed up ! Missing alot of the major parts… At that moment i decided to buy that one too and use that one for the project.


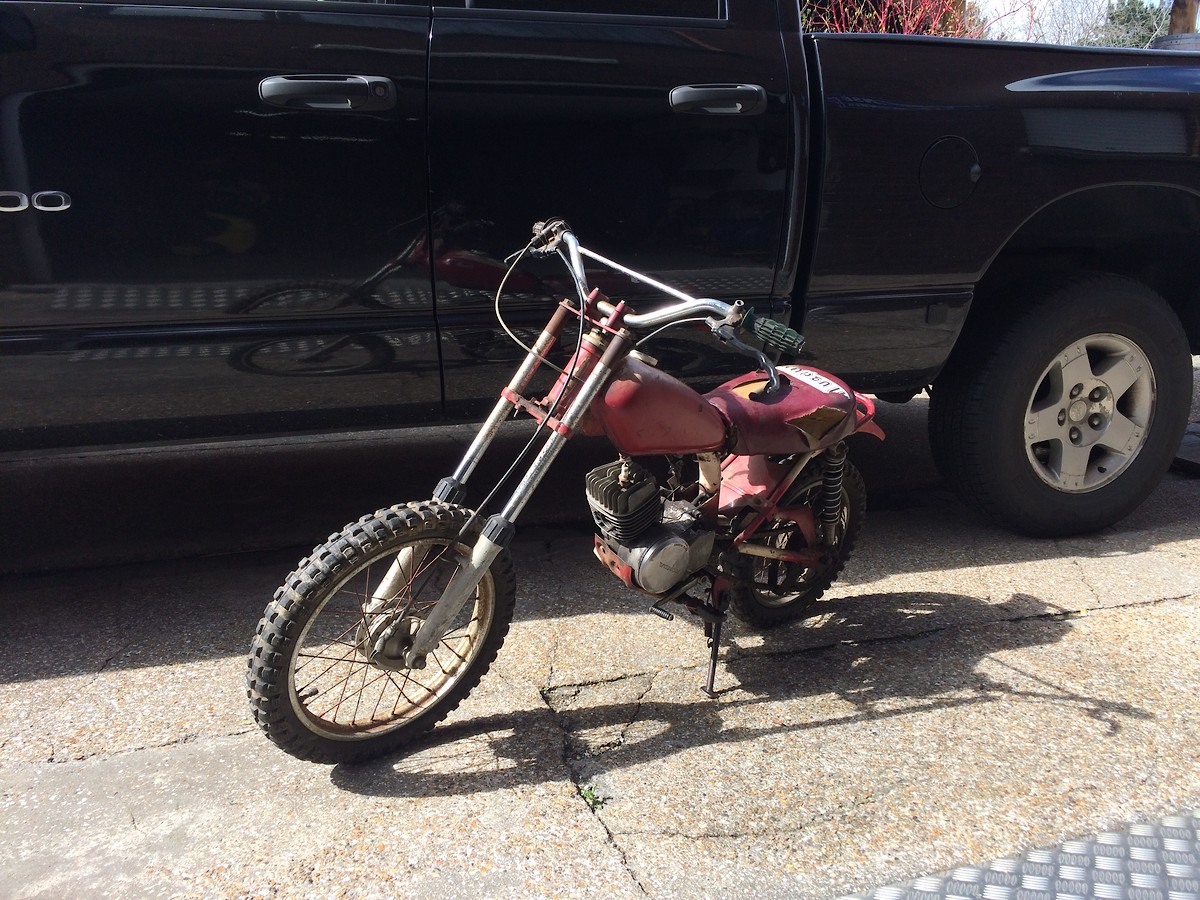
To be honest, the first MR50 i bought was too nice and too original to rebuild it into something completely not original ! So it's stored away in my mancave for now and will probably restore it back to showroom condition in some years.
Enough talking and let's get to the actual project !
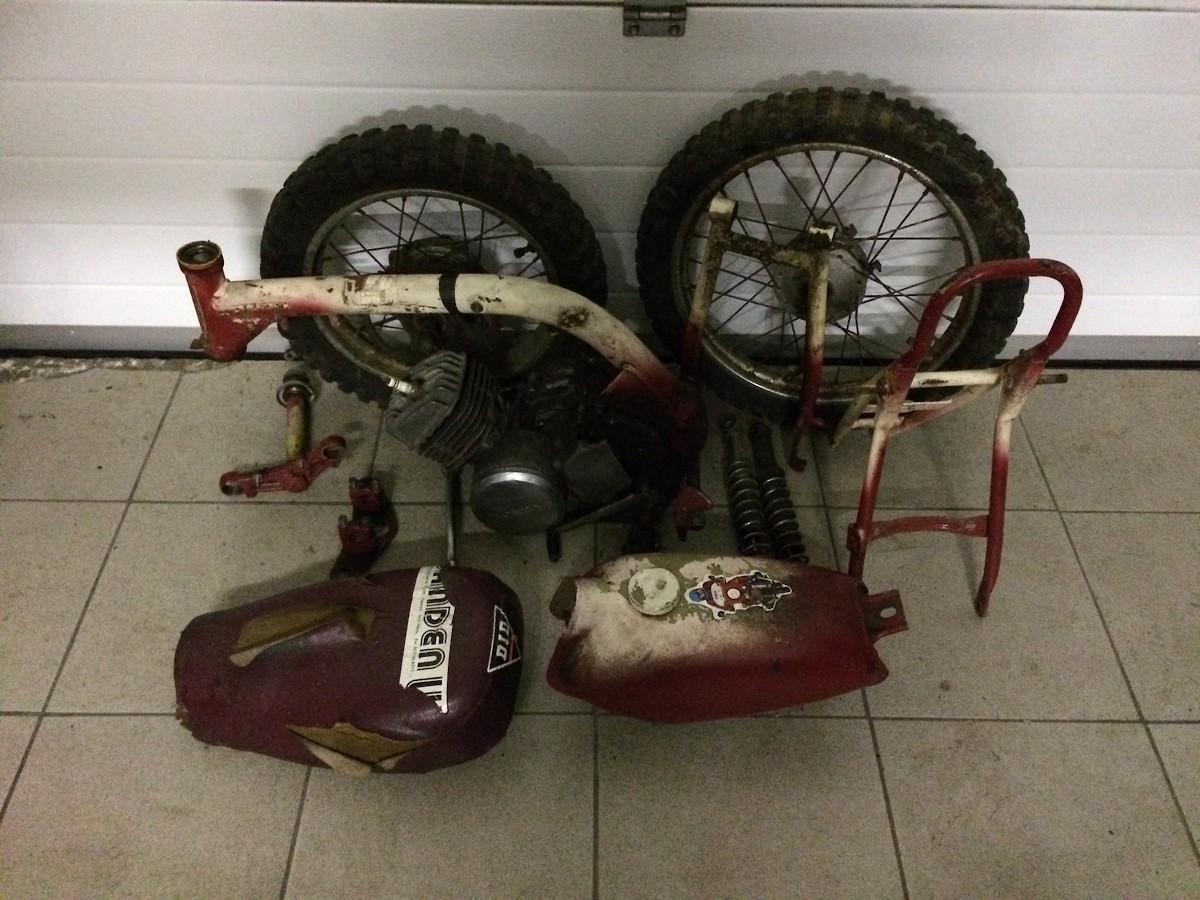
Everything stripped.
Started with restoring the forks. Cleaned and degreased all the internal parts and lower fork legs.


Then glassbead blasted the old paint off the lower legs and repainted them in a dark grey color.
Pair of fork gators, fresh oil and new seals and they perform like new. Luckily there was no rust underneath the chroming at the pieces that slide through the seals. Rechroming takes up to a year in Belgium so that is something to be done later on !

The seat and pan were in pretty poor condition ! The metal seat pan had some rust on it, after sandblasting i repainted the seat pan in black and got a new seat cover off Ebay. Used a fuel line as protection for the seat pan edge not to cut through the seat cover.


I kind of screwed up the chassis from this bike when trying modifying it, so had to buy another frame on Ebay ! Everything went well the 2nd attempt, the extra tubes are meant to make the bike look like the big bikes with a full frame. Still need to weld eveything together.

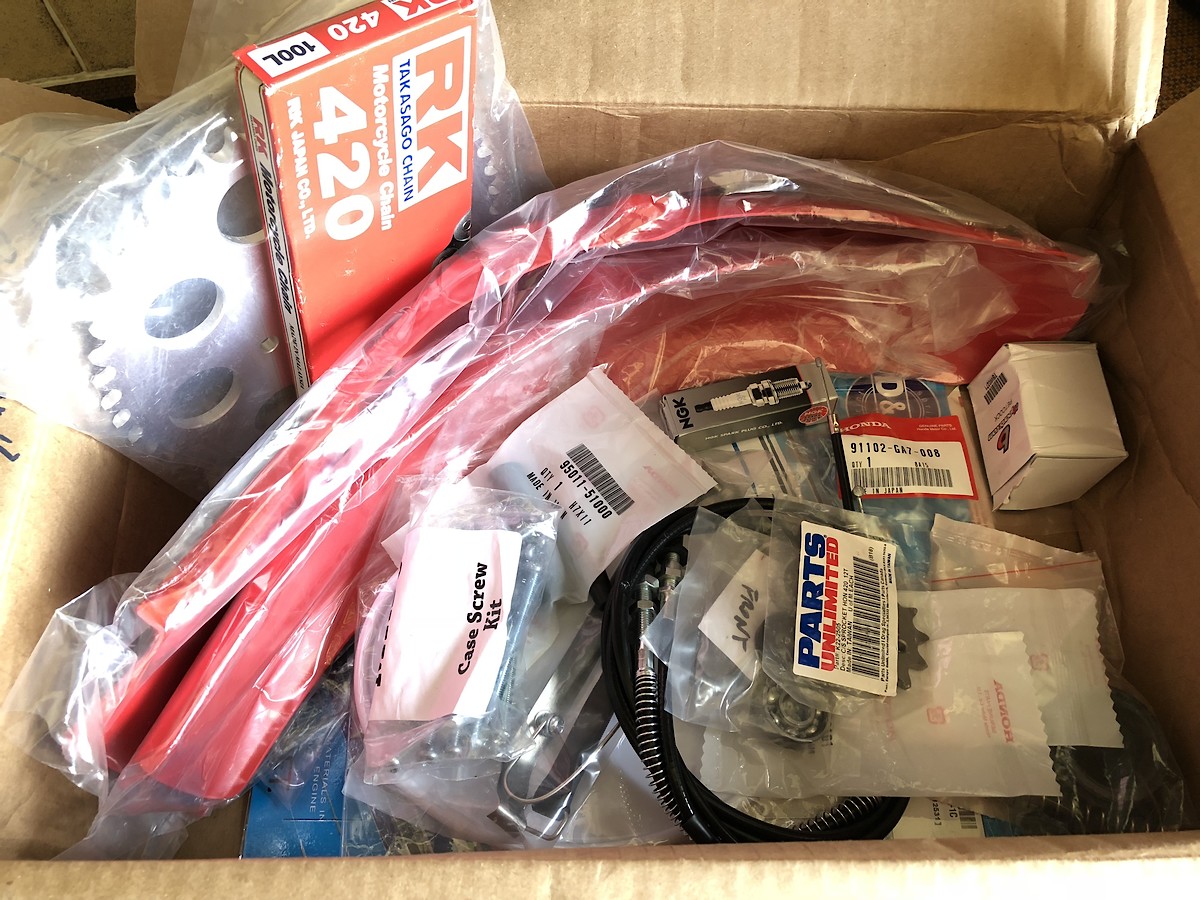
Received my parcel from RE-MX.COM with all of the major restorations parts needed !
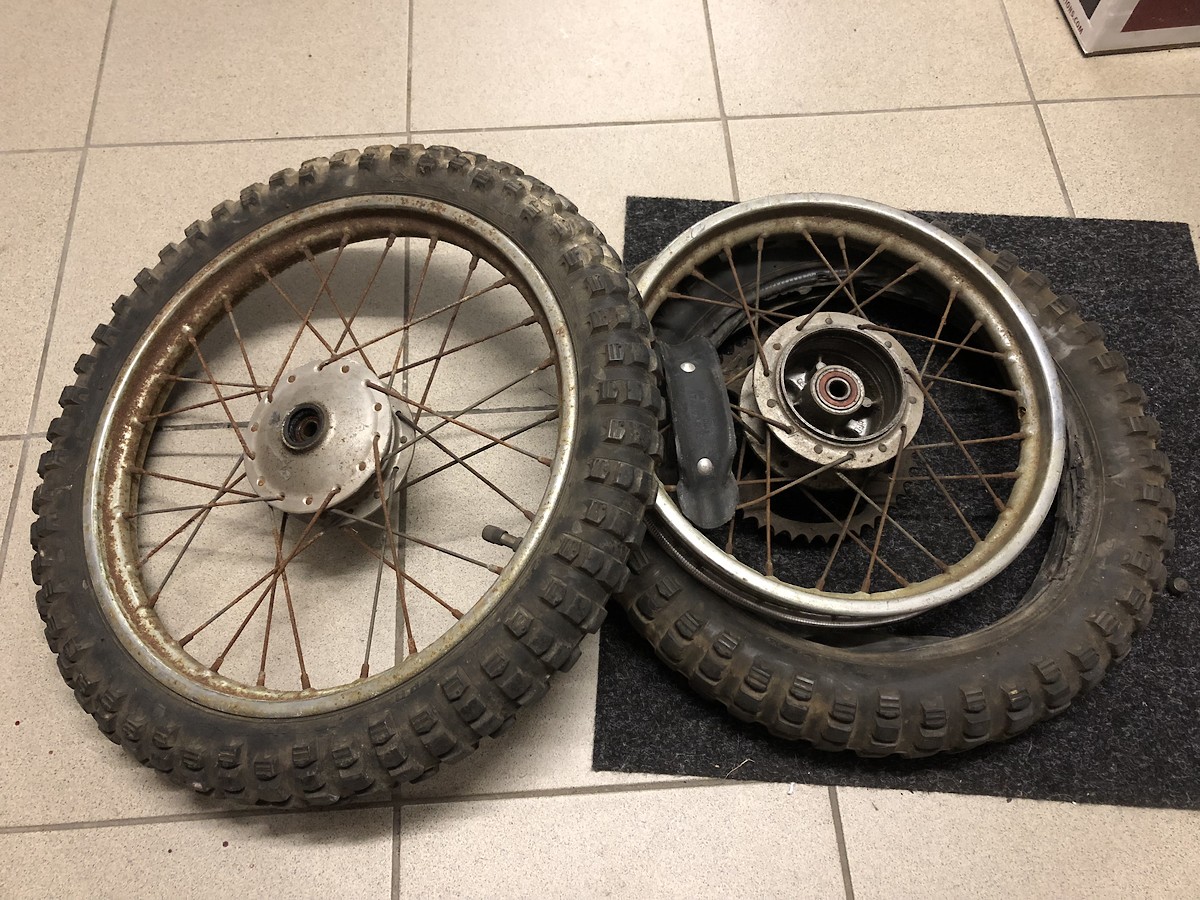
The wheels were in pretty poor condition too. The chroming was just completely shot and the original tires were just rotten away ! Had to cut all the spokes to make the hubs free.
 .
.

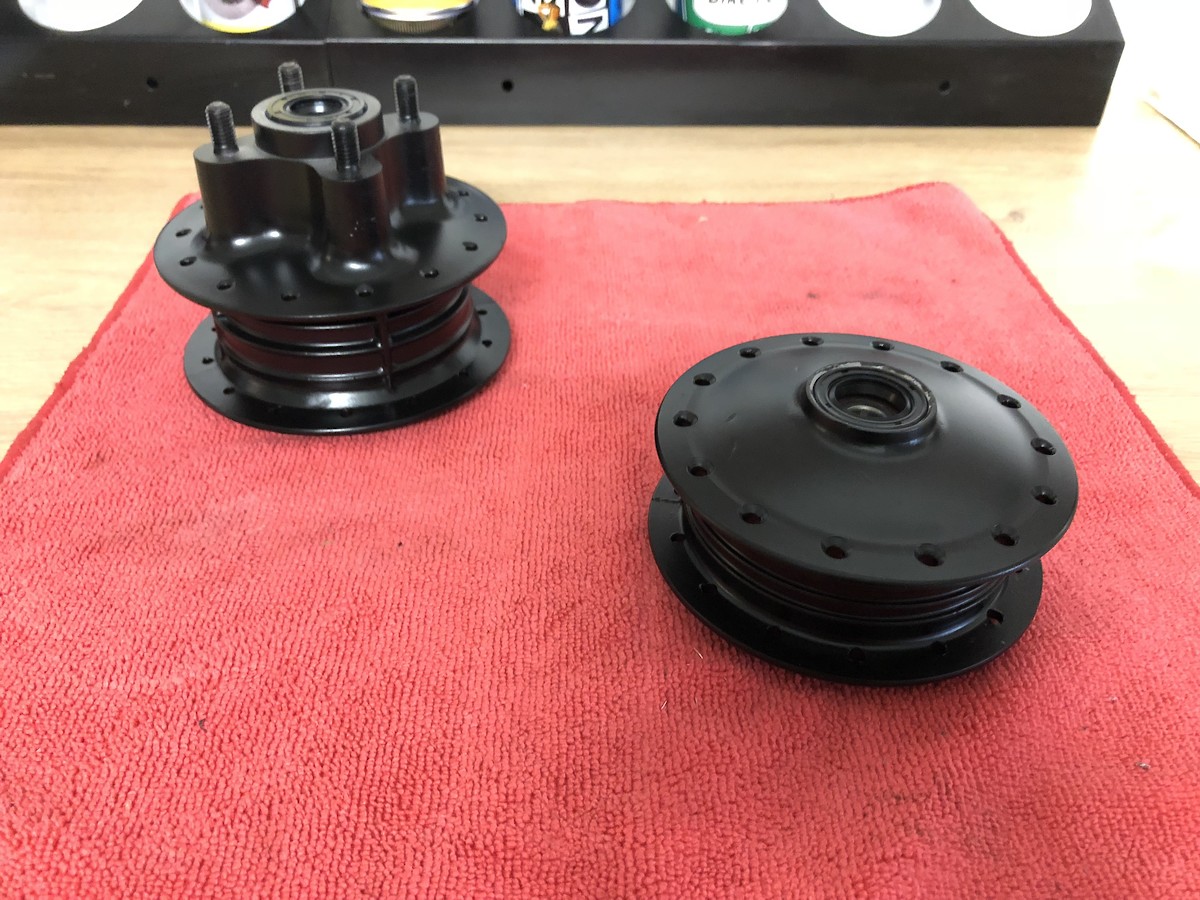
Fresh glassbead blasted hubs and painted black with new bearings and seals in.
Got new spokes and nippels and the rims were sandblasted to get rid of the rust and chrome, and after that they got a anti rust treatment and powder coated into a gold looking color.
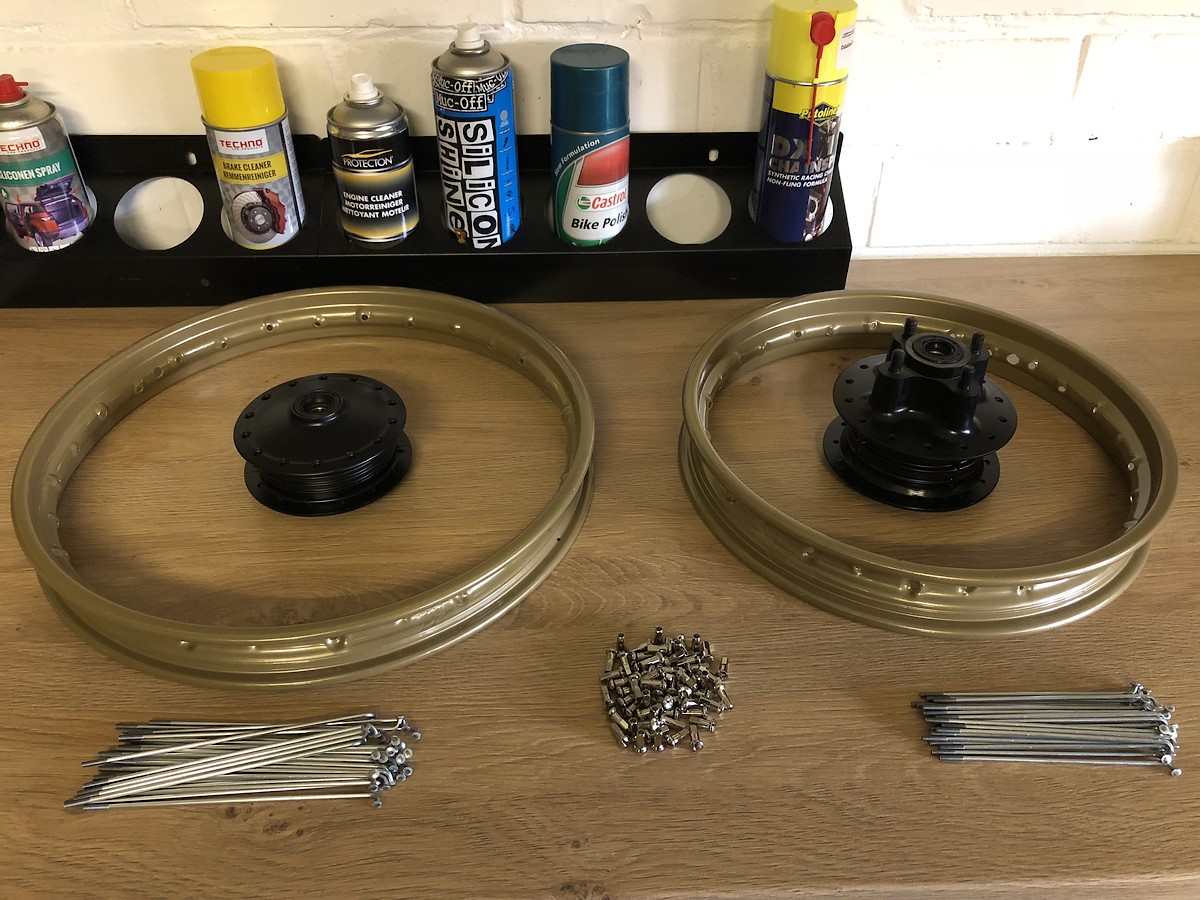
Knowing how the wheels looked before, i'm one happy kid seeing this result !

Started stripping the engine.
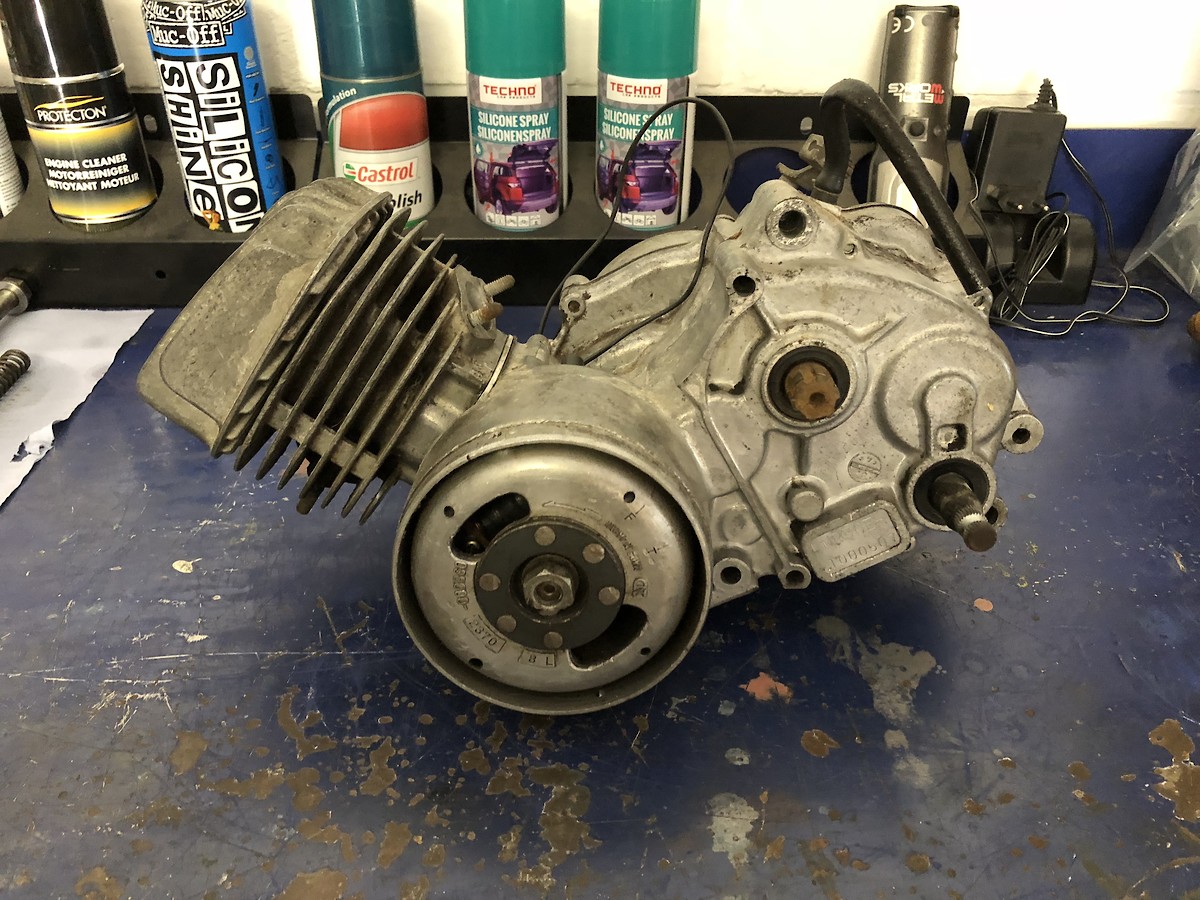
The impact screw driver is probably the best 20 bucks ever spent ! Those philips bolts would just stripped out without a impact screw driver.

Everything stripped. The top end of this bike was a complete disaster ! Can you see the spacer someone made between the cylinder and cases, this wasn't a good sign ! The cylinder wall is rusted and bored out to 40.95 which is basically the 4th and last oversize Honda makes pistons for. Some amateur that previously owned this bike had a wrong piston in there and to make it work they screwed up the cylinder ports, put a spacer underneath the cylinder to raise it and they took material away from the cylinder head to make it sit lower on the cylinder and they also screwed the dome of the cylinder head. All off this to make a piston work that is not made for a MR50 !
So i bought a good used standard size (40.0mm) cylinder and cylinder head of Ebay which is going to save this engine and save me headaches..


More is coming up in the next weeks !
Some months ago i came across the internet a picture of a mini vintage dirtbike that immediately pulled my attention !
After some research i found out this little bike was a Honda MR50 built and customized by Terry H.
It was at that moment i decided to do something similiar with a MR50, make it look like vintage works bike !
After some more research i found out that MR50's only were available from 1974-75 in USA, Canada and Australia ! So here in Belgium/Europe these little MR50's are very rare.
I found one for sale in the U.K. across the channel, all original and 95% complete, i immediately bought it and picked it up. I know it's not perfect condition but still it's all original.
Then some weeks later i found another one for sale in The Netherlands, totaly f*cked and screwed up ! Missing alot of the major parts… At that moment i decided to buy that one too and use that one for the project.
To be honest, the first MR50 i bought was too nice and too original to rebuild it into something completely not original ! So it's stored away in my mancave for now and will probably restore it back to showroom condition in some years.
Enough talking and let's get to the actual project !
Everything stripped.
Started with restoring the forks. Cleaned and degreased all the internal parts and lower fork legs.
Then glassbead blasted the old paint off the lower legs and repainted them in a dark grey color.
Pair of fork gators, fresh oil and new seals and they perform like new. Luckily there was no rust underneath the chroming at the pieces that slide through the seals. Rechroming takes up to a year in Belgium so that is something to be done later on !
The seat and pan were in pretty poor condition ! The metal seat pan had some rust on it, after sandblasting i repainted the seat pan in black and got a new seat cover off Ebay. Used a fuel line as protection for the seat pan edge not to cut through the seat cover.
I kind of screwed up the chassis from this bike when trying modifying it, so had to buy another frame on Ebay ! Everything went well the 2nd attempt, the extra tubes are meant to make the bike look like the big bikes with a full frame. Still need to weld eveything together.
Received my parcel from RE-MX.COM with all of the major restorations parts needed !
The wheels were in pretty poor condition too. The chroming was just completely shot and the original tires were just rotten away ! Had to cut all the spokes to make the hubs free.
.Fresh glassbead blasted hubs and painted black with new bearings and seals in.
Got new spokes and nippels and the rims were sandblasted to get rid of the rust and chrome, and after that they got a anti rust treatment and powder coated into a gold looking color.
Knowing how the wheels looked before, i'm one happy kid seeing this result !
Started stripping the engine.
The impact screw driver is probably the best 20 bucks ever spent ! Those philips bolts would just stripped out without a impact screw driver.
Everything stripped. The top end of this bike was a complete disaster ! Can you see the spacer someone made between the cylinder and cases, this wasn't a good sign ! The cylinder wall is rusted and bored out to 40.95 which is basically the 4th and last oversize Honda makes pistons for. Some amateur that previously owned this bike had a wrong piston in there and to make it work they screwed up the cylinder ports, put a spacer underneath the cylinder to raise it and they took material away from the cylinder head to make it sit lower on the cylinder and they also screwed the dome of the cylinder head. All off this to make a piston work that is not made for a MR50 !
So i bought a good used standard size (40.0mm) cylinder and cylinder head of Ebay which is going to save this engine and save me headaches..
More is coming up in the next weeks !
The Shop
One of my friends that owns a car restoration garage sends all his chroming parts to Poland. Cheap, but very good quality and only takes a month.
What is the name of company in The Netherlands ?! I might be interested.
I’ll do my best to entertain you guys.
The cases will be glass blasted though because they will be painted in heat-proof black afterwards.
I prefer to have a more rough surface to paint on, that’s why it will be regular glass blasted.
At the moment i’m thinking to make my own DIY vapor blast setup.
Ga zo door
go to micron in Tilburg , I think 100 euro for 2 legs.
Please, press the "Quote Last Post Only" button next time !
Pit Row
Got the cylinder, cylinder head and intake manifold in last week. All bought off Ebay and shipped to my friend (Tokyo_Tiddler). He collected everything and shipped it to me, thanks again Mike if you read this !
The cylinder is really in almost new condition, not a single cooling fin broken, no rust, and no years and years of dirt caked on it ! The bore is still perfectly on 40.00 which is the standard size bore and the cross hatching is there.
Couldn't have bought a better one for sure ! On Ebay, every single cylinder has at least 1 fin broken, rust, bored out and caked with dirt… So pretty happy with the almost perfect cylinder i have
I was also missing the intake manifold on this bike, so that is also sorted out now.
The cylinder was already fairly clean, but decided to throw it into the ultrasonic parts cleaner. Look at the difference. When you think something is clean, the ultrasonic cleaner gets it next level clean. Don't worry, after cleaning, the cylinder got blowed dry and soaked the barrel with WD40 to prevent it from rusting !
2 days ago a new ignition coil turned up in the mail.
Moving further with the brake system. This is how it all looked before.
Glass bead blasted and prepped to be painted in the same black color as the hubs.
Along with some other parts that got blasted.
Footpeg pins and chain adjusters got thrown away due to too much corrosion and wear.
Some cleaned and painted parts. The brake pedal got painted in the same grey color as the lower fork legs and the throttle tube housing got painted black.
Got the airbox painted aswell and a new air boot fitted.
One of the challenges was to find a tahitian red color to match the color of the fenders.
And the first and only spray can i bough matched the fender enough to be satisfied, so that saved me alot of time !
(don't mind the old bolts in the airbox, new ones on the way !)
The wheel axles, this was one big mess too ! The front axle requires 1 spacer and 2 washers, obviously the spacer wasn't the correct one, the inner diameter is way larger compared to the outer diameter of the axle + the lenght of the spacer wasn't correct to, that's why there are 4 washers on the axle instead of 2 ! The nut on the end isn't original too and a new OEM one is discontinued by honda, but i'll find a NOS OEM crown nut for sure.
The correct washers and wheel spacer are on it's way.
Later on when checking the parts fiches and looking to photos of how new OEM spacers look like, i noticed that the spacer in the front is an original spacer, but meant for the rear axle !
As for the rear axle, this one had 2 home fabricated spacers, but it did have the original crowned nut.
So like said before one of the rear spacers was at the front, so i was still missing one of the rear spacers. The one missing is discontinued by honda but i found one on Ebay and bought it right away.
The bottom axle is for the swing arm.
The engine cases are at the shop right now because the crank bearing on the right side spins freely in the engine case. When i get the engine cases back, they will get glass bead blasted and painted heat proof black. Then i can start reassembling the engine.
The crank is also at the shop because it needs a new rod, pin and needle bearing.
Some parts i'm expecting to get in the mail next week:
- bunch of new OEM parts
- brand new OEM honda standard size piston
- complete carburetor ( i was missing the carburetor, but this morning i finally found a complete one for sale on Ebay)
The renovated parts and accessories are like new.
To the OP: killer build!! more pics and updates please!!!
Some months ago i received the OEM parts i ordered at CMS. Rebuilding with new OEM parts was the way i wanted to go. NOS OEM standard size piston, and new OEM crank pin and needle bearing etc..
I also got in the carburetor i was missing. After an ultra sonic clean it came out fairly clean.
The left one is from my other MR 50, the one on the right is the one i bought on Ebay and will be used on this project. Somehow the ultra sonic cleaner did a better job on the left one.
The frame got some attention too, the tubes got welded in and i cut some old unnecessary brackets off that were holding the chain slider and chain protecter. I will weld in new tabs on the swingarm for an custom made chain slider and there will be custom tabs welded on the subframe to be able to mount custom made side number plates.
The engine got disassembled completely to check the internals for worn parts. Months ago i brought my cases to a machine shop because the right crank bearing spinned freely in the case, so they bored the cases out and placed a bushing in there. The inner diameter of the bushing is made for OEM bearing size, that way the engine is still at OEM specifications. A bushing was placed on both sides of the crank cases to make sure the left side is on same spec as the right.
The cases got glass bead blasted and washed in the parts washer to prepare it for painting.
Everything nicely taped off
Painted heatproof gloss black.
The paint job turned out great !
All the internal parts got ultra sonic cleaned. Pretty pumped to see all the internal parts are still in good shape. Only the top end was pretty screwed on this engine and the crank bearing was rusty, other than that no major problems got found on this 45 year old engine.
Fresh rebuild crank, new pin and needle bearing.
Bottom end assembled, only thing left to do is prepare the clutch cover for painting and assemble all the clutch components.
The fuel tank had some rust in it, i got everything removed with some acid. I also ordered a epoxy kit to protect the inside of the gastank for corrosion and protection for the gasoline. I haven't done the epoxy step yet but will be done next week.
At the moment the chassis and fuel tank are in the powder coat shop and should be coated by next Friday ! That means i can finally start to assemble the bike and have it look like a bike again.
Stay tuned !
Got the frame, gas tank, sub frame and swingarm back from powdercoating and started assembling the bike.
I decided to keep the custom made spacers the previous owners made to raise the front as i wanted this bike to be higher compared to a stock honda MR50.
Polished and cleaned up the axles as they didn't look too well before..
I finally came to bead-blasting and painting the clutch cover so i could finish up the engine.
OEM standard size piston was installed as the cylinder still was perfectly at standard size bore.
Also found a perfect condition used clutch pull rod on Ebay as mine was bend and rusty.
Nothing beats the look of a freshly rebuild engine with shiny new philips screws !
I moved the bike into the house and assembled it there, when it's finished it will end up in the man cave inside the house anyways.
Installed the OEM shocks to support the bike while the longer shocks were on it's way. The bike looked like a chopper here due to the front end being lifted.
The new plastics, seat and gastank installed.
Front and rear brakes installed and the airbox.
I went from 260mm OEM shocks to 320mm shocks, 310mm would have been a little more perfect i think for this bike..
Rebuild engine installed, couldn't be more happy how this turned out. It really looks close to how it's bigger brothers CR125 & CR250 from the same era looked back in the days.., just a little smaller and way cooler than how a original unmodified MR50 looks.
This project came a long way since march 2018, so pretty pumped to see it finished soon. Next to do is figure out a custom made or modified exhaust pipe and the ignition of this engine, hopefully i can get a spark out of it !
I finally had all the electrics installed and all the controls like clutch cable, gas cable, brake and clutch lever etc..
Got a new spark plug and spar plug cap installed. Was a very happy kid to see all the 45 year old electrics still work fine and delivers a nice spark to the spark plug !
This is how the bike sits right now and is finished for 95% i'd say..
I still need to make custom numberplates and make a custom exhaust pipe, other than that i still need to buy a piece of fuel line, a vent hose for the engine, clamps for the carburetor and need to find a way to seal the carburetor as i threw away the old seals that the carburetor had ! A carburetor seal set is discontinued so i will need to find another solution.
When the bike is completely finished, i'll make sure to deliver some professional photographs of the bike outside !
Post a reply to: Honda MR50 works minibike