

Posts
756
Joined
11/3/2014
Location
Chantilly, VA
US

Edited Date/Time
9/12/2021 2:55pm
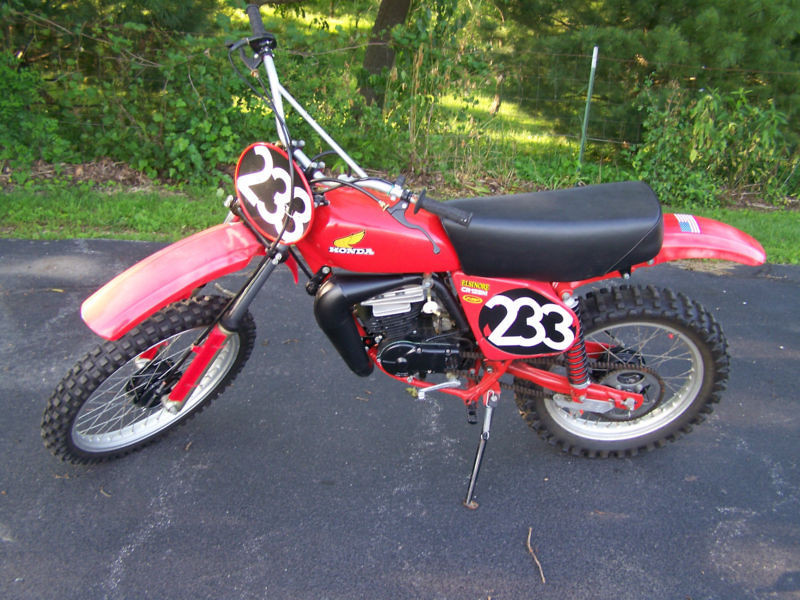
When I joined this forum a couple of months ago I was teething with the whole process of posting topics and didn't realize you can't remove photos (if someone knows how then please let me know). Back then I started a topic about my 76 CR125 Moto-X-Fox build. I now wish I could remove the topic as I put some pics of my 83 CR250 in there that really don't belong. That said I decided to start fresh with this bike topic and just focus on the 76 Elsinore. Below is photo of the bike when I got it last year.
Other than the Moto-X-Fox proto-pipe and the extended air fork kit, the bike was pretty close to stock. Over the course of the next few months I converted the bike to look like the one I rode back in the late 70s (with a few choice parts I couldn't afford back then). For the motor I decided to use a GEM reed intake. Now, I have heard all the stories about these reed cages but since I had one available I said what the hell, please porting has changed a bit since those days and I had the cylinder bench ported and we are using fiber reeds (just got the cylinder back from porting/blasting). I am also using a DG head, 34mm carb and Mototek ignition so I'm hoping this bike will be AHRMA competitive (at least that's the plan). Also, as an added bonus the old owner found the original title (I don't I have seen one of these since the 70s...). I should have the motor together either this weekend of the next. Mike


Other than the Moto-X-Fox proto-pipe and the extended air fork kit, the bike was pretty close to stock. Over the course of the next few months I converted the bike to look like the one I rode back in the late 70s (with a few choice parts I couldn't afford back then). For the motor I decided to use a GEM reed intake. Now, I have heard all the stories about these reed cages but since I had one available I said what the hell, please porting has changed a bit since those days and I had the cylinder bench ported and we are using fiber reeds (just got the cylinder back from porting/blasting). I am also using a DG head, 34mm carb and Mototek ignition so I'm hoping this bike will be AHRMA competitive (at least that's the plan). Also, as an added bonus the old owner found the original title (I don't I have seen one of these since the 70s...). I should have the motor together either this weekend of the next. Mike
On the front, I would make sure I have 9 inches of travel and just enough clearance to not rub the fender when compressed. Post up a better photo of the lower triple clamp please. When you had those set up for the 76-78 frame, did you invert the lower triple clamp or leave it in the standard position most other bikes use? The clamping area on the lower clamp turns down. Flipping it over allows for more suspension travel with less clearance required between the tire and fender allowing the bike to sit lower. Requires a little machine work. I had Rick Horvat in Ohio do mine back in 2002 or so. He's still around so maybe look him up.
On the rear, do the same. Set the rear travel to 9 inches and leave just enough clearance to not rub the rear fender when bottomed out. That may require a little fabbing on the Cross-Up swingarm to move the lower shock mount back further towards the axle. That will make the bike sit better and make the Fox Air shocks look better on the little CR. My one big regret on my Steve Wise replica was that I did not modify the frame to lay the shocks down further like Cliff White did on Steves bike. Something about the Fox Airs being too upright on the CR125's just make them look a little ugly. Layed down steep, they look super trick.
Now, about that seat. With 9 inches of travel on that bike you may not be able to touch the ground. Swapping to the 74-75 seat foam will get you closer to where you want to be(unless you are really tall). The 74-5 foam may require a little trimming to make it not angle up in the rear. Get a good upholstery guy to cut a small wedge from front to rear out of the middle of the foam to bring the rear down to where it looks "right".
These are strictly my opinions and may not be anything you agree with. Like they say, your mileage may vary...lol.
I'm actually right at 10" on the travel so I might have to have Thor shorten the shocks an inch next time I'm at his shop. I can also drop the forks an inch. Thor built these foks for me one night while we we sitting around having a beer at his place and he put Race Tech Gold valves in them so should be pretty comfortable and really soak up the big stuff. I also put a tall Renthal Fat bar on the bike to get the right feel (standard bars while tall did not feel right). I think the lower triple is right side up but I'll take photos of the triple clamp tomorrow and post.
I'm actually responding to your comments as I read them, so it sounds like I can lose the needed 1" of travel at the rear by moving the shock mounts back (these are all great ideas as i plan to race this bike). I currently touch the ground (balls of my feet) so while not flat footed, I think it's comfortable enough to ride. My big issue is that I want to avoid bottoming. I plan to lose about 10lbs before i start riding this bike (so I should be right at 162lbs), but the unknown at least to me is can the Fox shoxs/Simons forks be set up to avoid bottoming (this should put Thors skills to good use as I plan to give him daily updates at the races). The other thing I plan to do is to only race this bike at select events (so while I miight be at MX Rewind with this bike, I don't plan to race it there as the hills are just to big). This bike will only be raced at tracks with on flat ground…besides, pistons cost money and I raced my 1980 YZ125 at MX Rewind in 2012 and passed he same guy like 3 times and he still got around me (he was about 145lbs…so hills are out with this bike). The only other issue or concern I have is with the axles. Both axles are steel, but a few years ago I bent the front and rear axles on my 78 CR250 (at 164lbs), so I am in search of custom axles.. I almost forgot, I also arched the front and rear brakes (so this baby does stop).
I have also ridden early CR125's without a reed with crazy porting for a piston port only design and they are screamers. For a locked right wrist rider, they can work very well. That is not entirely my style, so the reed offers a lot of off-throttle and mid-range responsiveness you will never see on a piston-port only set-up. At WOT the reed may restrict some flow, but it was an easy compromise to make. Never loaded up my Honda with the reed fitted and a 34mm Mikuni feeding it.
Sorry it took me a day or so to get back to you (I had to put my 98 RM265 top end back on yesterday (this is my modern bike)). Below are the photos you requested of the lower triple clamp. To me they look right side up, but I am no expert on Simon forks for sure. Also, yes those are bolts I am using for the steering stops as I replaced the Pins (one was bent). Thanks so much for your help with this project. Mike
AHRMA361,
Below are photos of the piston, which has holes drilled into. I had Eric Gore do the work as Eric is very familiar with the G.E.M reed cage. When I purchased this reed cage I could not figure out how to remove the reeds (they were bolted together by what looked like a super tiny hex or allen bolts, which I had never seen before). I went ahead and sent it to Eric and he got it apart and now its ready to mount. I also told Eric that I wanted the power a bit wide, but it maybe that I only end up with low end, I'll just have to see when I get it back together. And by the way, thanks again so much for all your help and sending the photos and all (I really appreciate it). Mike.
The Shop
Side view with the 17 1/4 Fox Air shocks layed down on a Thor swingarm and stock mounts on the frame. Stock 1975 seat foam and cover as you can see slopes down toward the tank a little. Could stand to be a bit lower in the rear of the foam.
Steve Wise and Cliff White next to his 125. You can see the steep angle of the rear shocks looks way better and the seat foam cut down flatter. Also, his petcock was moved to the right side of the tank to make room for the custom pipe they ran. One day I'll build another one!
I actually rode a 76 CR125 that was very similar to the one I'm building now as well as RM's back in the day. The Suzuki I spent time on back then was a 79 RM125, which motowise was only slightly strong then my heavily modified 76 CR125, but the suspension on the RM was just worlds better, but motorwise not all that different. Of course that was like 36 years ago so my memories might be slipping a bit, but I also spent some time on a friends 79 KX125 back in 79 and I owned one when I first got into vintage racing back in 2004, and that bike had a reed valve and I remember it was way stronger than the piston port bikes off the line (had a healthier bottom end), so I'd say the reed valve should make a diffrence off the line with how the motor hits. But truthfully, this whole build (especially the motor) using the G.E.M. intake is purly experimental for me. I trust Eric's work and he is no stranger to this intake/bike so I'm keeping my fingers crossed and looking for a fast and competitive bike.
I just dug up a photo of me at my first ever vintage race (Rausch Creek, PA) in 2004 and now it's all coming back, if you notice in the photo there are a couple of Elsinore's behind me, and in the 125 Ultima class I held off a guy on an 83 CR125 until the 5th and final lap…i got him at the start, but i was probably taking all the good lines and holding him up as he was an Expert at the time I was an Intermedate, but he was the only one to get around me so that reed valve motor was strong down low (results that day 3 holeshots and two overalls in GP 125 & Ultima 125).
Mike
So your steering steam pinch bolt is now on the left side (mine is on the right in the above photos i sent). Also, I found a company that makes complete seats with the seat foam and cover mounted to their custom seat pan for the 74-78 CR125s for like $100.00, so I'm going to give them a call and find out what they charge to reshape the seat. Thanks, Mike
Nice, where on the frame did you mount the skateboard wheel chain tensionor to?
No worries, as I am just grateful you posted the pic of your awesome bike. I was dreaming about that bike back in the day...and your photo was good enough for me to figure out how you mounted the tensioner, which these bikes need once you increase the suspension travel/use a longer swingarm (the Protec chain tensioner is not enough as the increased travel causes the chain to hit the lower frame). Thanks again so much for sharing the photo your awesome bike which helped me figure how to remedy this issue. Mike
The airbox is by Geoff Morris out of Australia and it's lighter than the stocker and while I haven't measured it, i'm pretty sure it's a little smaller in diameter as well. The other advantage to this airbox is that because it is slightly smaller, it's going to buy me a little space with the G.E.M. intake which is gonna be a tight fit. Mike
13/53 gearing, sprockets made by Sprocket Specialists 520 conversion. I had considered using the standard 428 sprockets as the bigger 520 conversion has been known to rob HP, but the bike is carrying more weight with me on it, so I aired on the side of caution and decided to use the 502 conversion in spite of the HP loss. But, I did some compensating for the HP loss with the motor work and I changed the rear tire to a smaller lighter 4X18, which a lot of people don't think of, but it does help with HP (less mass/lighter weight. Mike
Pit Row
I hope you matched the cylinder to the reed block opening with some minor grinding on the cylinder intake. That is key to making it perform well. If you ground the case and trimmed the vent, it will swivel to the left side easily to change the jets.
I run a VM34.Mikuni on mine. Can't tell from the picture what size carb you are running. I have some jetting baselines for 1000 ft elevation with a period FMF pipe, DG extruded radial head, ported cylinder etc. if you need it.
I have some NOS reeds for that block if you ever need any.
Nice Job Mike!
Eric Gorr did the port work and he took the reed cage apart and blasted it and I provided him the instructions that came with the G.E.M. intake. I also used a liberal amount of gasket sealer as I have had standard intakes leak here so I should be good. The cylinder is ported and the head matched. The carb is VM34 and I would love to get your jetting specs. I started with a 310 main and 35 pilot with the clip in the middle of the needle and a 2.5 slide. Mike
Yes your photos were very helpful and much appreciated (thanks so much). In fact, I initially installed the reed cage upside down so I went back to your photos and figure ti out. Thanks again so much!
Here is what I run for jetting: VM34 Mikuni 300 Main (290 used occasionally) 45 Pilot (yes 45!) 6DH4 needle 2.5 Slide
Cutaway. You didn't mention what needle you are using. Start with needle in the middle and go from there!
I started with a 320 Main, lots of plug chops, went to a 310 more chops, 300 had best power and plug color.
p.s. Don't know if it is due to your up pipe configuration mandating it, but it appears your cylinder head is on backwards.
Thanks for the jetting specs and I'll let you know how it turns out. I am in the mid-atlantic at sea level.
Thanks for those jetting tips! They all seem pretty right premixing 32:1, except the pilot (I think I need to go down to a 40), but other than that the bike pulls like mule. If I had an issue it would be the exhaust note, which is really deep (doesn't sound like a 125 until you get into the mid to top). This is an obvious side effect of the Proto-pipe. But, one good plus is that I will never have to lube my chain again for sure. Mike
I tried all sorts of pipes on my bike and it ran best by a large margin with a period FMF cone down pipe. The DG was good mid but not on top. Protopipe was good mid, less on top than the DG down pipe. All those combo's were jetted individually and were best with a smaller main (290 or 285)
A friend used a Mugen up-pipe and silencer on his piston-port engine, and it screamed as well. AHRMA Nazi's didn't care for it though.
Best of luck at the races!
With the 45 pilot, the pipe dripped with oil when I took it off the bike and plug while looking good at the core (mock brown) still shows signs of being rich on the tip. I tried the 40 and the bike started without the choke (this tells me its rich on the pilot). However, once started I could not get it to idle (even with the idle screw turned all the way in? i did get it to icle witht he 45? Yet, with the 40 pilot I was able to get it to stall when i turned the air screw in, but could not find the high rev turning the air screw all the way out? This is weird. I've done a leak down and have no air leaks so I'm going to put the 45 pilot back in and lean the needle one position and see if that helps. I know it runs pretty good in the middle and on top with the 45 pilot, but it could run a littlle better in the midde I think I'm guessing i'm never goingto get it run good down low, but like you said, they wantt to be screamed all the time. If I can get it to work somewhat decent then I'll race it this weekend with any luck. Mike
Here's the link for the seats:
http://www.motorcycleseatsdirect.com/Honda-1973-1974-1975-cr125-elsinor…
Mike
Here's a before and after of the first decal
And here is the new one
Post a reply to: 76 Honda CR125 Elsinore Build