

Posts
1532
Joined
5/28/2016
Location
AU

Edited Date/Time
5/24/2019 2:37am
Ok...who needs flaggers? Done a lot of flagging and it can be hard to pay attention to your zone...easy to be having your back turned and miss an incident and be late with your flag...plus its always hard to get flaggers, its a tedious and un appreciated job...can also be a bit dangerous
On the other hand...it is pretty easy to spot incidents from a wider and more remote vantage point..we've all been in the spectator area and seen something the flagger has missed...just how it works...
So here is how to make a cheap and cost effective flashing light warning system.
Here is all you need..
A remote 12 volt switch with remote controller which can be found on ebay...mine cost $9.25 Australian each...a flashing light...get good ones ...( more on that later ) , batteries for your remotes..a 23 batteries for this remote, some wire..I just used speaker cable ,a 12 volt socket with battery clips..cheap as on ebay ..and a 12 volt battery..an old car battery will be fine.
Here is the switch i bought on ebay..
https://rover.ebay.com/rover/0/0/0?mpre=https%3A%2F%2Fwww.ebay.com.au%2…
Remove the battery clips from your 12 volt socket and solder them onto the ends of about a metre of speaker..cable dont use heavy gauge cable..the ends have to go into very small screw terminals on your remote switch. The ends of the wires coming out of the 12v socket need to be stripped and tinned to go into the terminals of the remote switch, likewise the other ends of your speaker cable that is attached to the battery clips.
Also a short single peice of speaker cable stripped and tinned both ends , both ends go to terminals on the remote switch..it is what's called a jumper..
Here's how it looks all fitted up..


Here is a shitty wiring diagram that I drew..
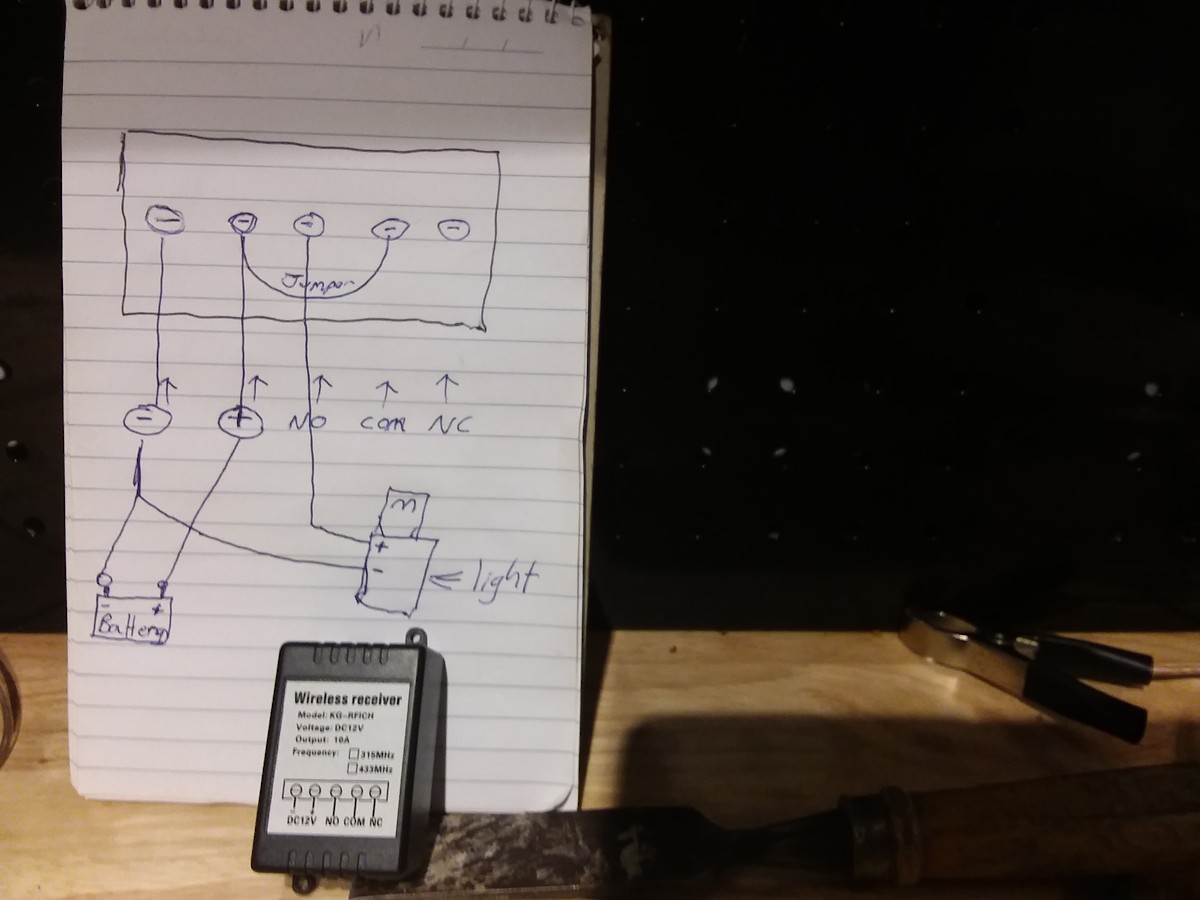
The negative wires from both your battery and your light go to the switch terminal marked negative.
The positive wire from your battery and one end of your jumper wire go to the positive terminal on the switch
The positive wire from your light goes to the switch terminal marked NO
The other end of your jumper wire goes to the switch terminal marked COM..
Thats it..
You will see a tiny push button switch on the circuit board of your remote switch..this is the coding button.
Put a battery in your remote control.
Connect your wired up switch to a 12 v battery
push and hold the coding switch..a red led will light up on the board..then hold down the button on your remote control...your remote is now coded to that switch and that switch only.
Test by pushing your remote button on and off..each time you push, the led on the board wil flash...
Plug your flashing light into the 12 v socket and test..its one push on the remote for on..push again to turn off..
If youve done it right it will work.
You will need to trim up the plastic cover for the remote switch to accommodate the wires sticking out, once youve done that..put the cover on and duct tape it up to make it water proof.
Next make an appropriate stand for your light..it should have a magnetic base ,then go install it at the appropriate point....the switches on our track are duct taped to track markers right beside the upramps of the jumps..the lights are unplugged and brought in with the batteries when not in use..the switch and wiring stays attached to the track marker..
Heres how it looks at our track..


Ok..now..most important! Dont get sucked into buying cheapo flashing lights on ebay..apparently there are flashing lights...and there are flashing lights. They need to be highly visible in bright sunlight.
3 different lights in the photo below..
Bought the first light on the left from a electronics store..asked to see it working and it was good...$45
Saw what looked to be the same thing on ebay at 2 for $35..the one on the far right...wrong! Absolute shit! Just a few leds at the base and that poxy reflector cone..totally useless, flat out seeing it in the dark!
The one in the middle..the track boss bought that from a shop but didnt try it before he bought it..its not good enough and you could miss it as a rider...$35
The one on the left works great in bright sunlight...you wont miss it as a rider
you can clearly see the differences between them..in short you get what you pay for, so try b4 you buy..do not skimp on the lights!

Here is a shitty tablet video of the system in use..im a long way from those lights and its hard to see them flashing in daylight from so far away..but when you approach those lights as a rider , you cant miss them!
In fact you might have to choose the 1080p option to even see them in this video
So follow these simple instructions and Bob's your non gender parents sibling! You will have a very cheap and absolutely effective warning system..no more need for flaggers..
Your milage might vary..
At our track we will need about 5 lights in total and one observer will be able to see all danger areas covered by the lights without having to even turn his head..your track may not work that way..
Anyway..Im just a dumbarse sheep shearer with a strong back and no brains..just putting this out there for those who might find it useful..
On the other hand...it is pretty easy to spot incidents from a wider and more remote vantage point..we've all been in the spectator area and seen something the flagger has missed...just how it works...
So here is how to make a cheap and cost effective flashing light warning system.
Here is all you need..
A remote 12 volt switch with remote controller which can be found on ebay...mine cost $9.25 Australian each...a flashing light...get good ones ...( more on that later ) , batteries for your remotes..a 23 batteries for this remote, some wire..I just used speaker cable ,a 12 volt socket with battery clips..cheap as on ebay ..and a 12 volt battery..an old car battery will be fine.
Here is the switch i bought on ebay..
https://rover.ebay.com/rover/0/0/0?mpre=https%3A%2F%2Fwww.ebay.com.au%2…
Remove the battery clips from your 12 volt socket and solder them onto the ends of about a metre of speaker..cable dont use heavy gauge cable..the ends have to go into very small screw terminals on your remote switch. The ends of the wires coming out of the 12v socket need to be stripped and tinned to go into the terminals of the remote switch, likewise the other ends of your speaker cable that is attached to the battery clips.
Also a short single peice of speaker cable stripped and tinned both ends , both ends go to terminals on the remote switch..it is what's called a jumper..
Here's how it looks all fitted up..
Here is a shitty wiring diagram that I drew..
The negative wires from both your battery and your light go to the switch terminal marked negative.
The positive wire from your battery and one end of your jumper wire go to the positive terminal on the switch
The positive wire from your light goes to the switch terminal marked NO
The other end of your jumper wire goes to the switch terminal marked COM..
Thats it..
You will see a tiny push button switch on the circuit board of your remote switch..this is the coding button.
Put a battery in your remote control.
Connect your wired up switch to a 12 v battery
push and hold the coding switch..a red led will light up on the board..then hold down the button on your remote control...your remote is now coded to that switch and that switch only.
Test by pushing your remote button on and off..each time you push, the led on the board wil flash...
Plug your flashing light into the 12 v socket and test..its one push on the remote for on..push again to turn off..
If youve done it right it will work.
You will need to trim up the plastic cover for the remote switch to accommodate the wires sticking out, once youve done that..put the cover on and duct tape it up to make it water proof.
Next make an appropriate stand for your light..it should have a magnetic base ,then go install it at the appropriate point....the switches on our track are duct taped to track markers right beside the upramps of the jumps..the lights are unplugged and brought in with the batteries when not in use..the switch and wiring stays attached to the track marker..
Heres how it looks at our track..
Ok..now..most important! Dont get sucked into buying cheapo flashing lights on ebay..apparently there are flashing lights...and there are flashing lights. They need to be highly visible in bright sunlight.
3 different lights in the photo below..
Bought the first light on the left from a electronics store..asked to see it working and it was good...$45
Saw what looked to be the same thing on ebay at 2 for $35..the one on the far right...wrong! Absolute shit! Just a few leds at the base and that poxy reflector cone..totally useless, flat out seeing it in the dark!
The one in the middle..the track boss bought that from a shop but didnt try it before he bought it..its not good enough and you could miss it as a rider...$35
The one on the left works great in bright sunlight...you wont miss it as a rider
you can clearly see the differences between them..in short you get what you pay for, so try b4 you buy..do not skimp on the lights!
Here is a shitty tablet video of the system in use..im a long way from those lights and its hard to see them flashing in daylight from so far away..but when you approach those lights as a rider , you cant miss them!
In fact you might have to choose the 1080p option to even see them in this video
So follow these simple instructions and Bob's your non gender parents sibling! You will have a very cheap and absolutely effective warning system..no more need for flaggers..
Your milage might vary..
At our track we will need about 5 lights in total and one observer will be able to see all danger areas covered by the lights without having to even turn his head..your track may not work that way..
Anyway..Im just a dumbarse sheep shearer with a strong back and no brains..just putting this out there for those who might find it useful..


Each remote in our system is coded to an individual switch that activates that specific light..the remotes and switches work exactly the same way as a garage door opener..except they can do it from up to 1000metres away.
You can code as many remotes as you want to a single switch if you want spares or to give control given to multiple overwatch personelle..
This shit isnt rocket science by any stretch..watch the video..3 separate switches for 3 separate lights
MA would never go for it and will continue to make people bring flaggies.
MA would never go for it as you say...they are just a bunch of cockheads ..we have absolutely nothing to do with the useless parasitic cunts at this track..we are with the AMA..
The Shop
Great system PJ and if it was isolated lights would be the winner.
We have a seperate light for each blind spot with a separate remote for each light..just hit the button on the remote that cintrols the llight you want to turn on..
https://www.facebook.com/AMA-Moto-Parks-713588868975159/
then run them off a 12v Motorcycle battery, with a solar charger,
the first lot where hard wired, with cables to a high point,
the second set where run wireless, with some type of home alarm set up,
edit : even a black board behind the light would make it stand out more
It's the same concept as indoor karting where 1 worker essentially watches the entire track and controls the speed/stops cars as needed.
Win win win
Really doing it this was is cheap...assuming you can get hold of some old car batteries for nothing..the dearest part for me is the flashing light..$45 ..as I stressed..get good ones, not cheap shitty ones...the remote and switch..$9.20.. the 12 volt socket with battery clips...about $5...
So really...with a gimme battery, my cost is about $60 per individual unit...we will need a maximum of 5 at our track ...so fo $300 , to forever solve the flagger issue? Its a no brainer!
You should put your club onto this if they are having any issues with their present system...these little remote switch with remote combos are ridiculously effective...they work from so far away, you wouldnt even be able to see where the light actually is..
Awesome little gadget..
also being able to turn all lights on at once to create a full course yellow as such is a good thing when you need to stop races,
edit, our early lights had a rotating light, (it was early 00's) but the LED's where much better on the later versions,
My end result was more expensive, but also much more refined. I still think the costs were low considering the what it takes to run a track, and potential to save money/hardship in the long run.
Post a reply to: Cheap, simple warning light system for your track. How to ..