

Posts
180
Joined
2/16/2016
Location
Waynesburg, PA
US

Edited Date/Time
6/21/2022 6:55am
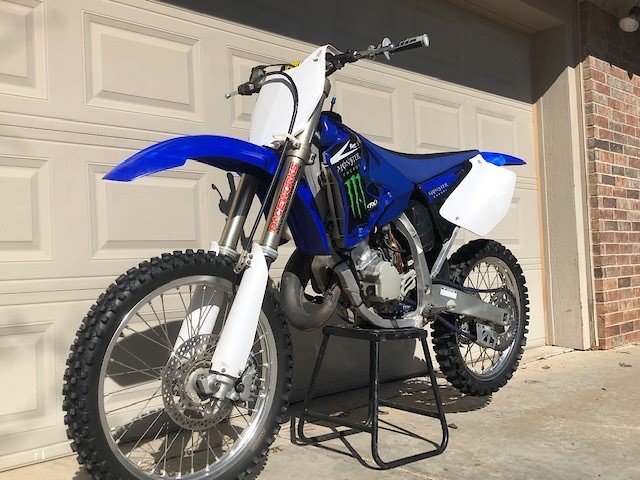
This weekend brought us the beginning of what I hope is the best build so far. I picked up this 2006 in North Houston Texas last weekend on trade for my 2012 KTM 125SX. There was nothing wrong with the KTM machine, but I have been wanting to build an aluminum frame YZ for some time now. Yes, I realize its not a unique topic, but this will hopefully be a different outcome from others that our kind have seen in the past both recent and distant.
I find it funny thinking back to my early days of competitive motocross back home in Southwestern Pennsylvania because my friends and I could think of nothing more than the new 2006 Honda CRF250R armed with the first dual exhaust system. My Dad had graciously blessed me with one of these red and silver beauties one cold February night before the 2nd round local arenacross series. For those of you local to the rolling, often muddy, hills of the tristate area, this was the notoriously dangerous event held in the low ceiling livestock show barn of the Waynesburg Fairgrounds. That bike was all the rage stemming from the Honda ads that ran through what was my junior year of high school at that time. Better cornering and balance was attributed to the dual cans that could easily be damaged beyond repair as I would soon learn following my first "first turn pileup" in the 250C class that June. All that being said, I regularly lined up next to and paid no attention to a few of what is now sitting in my garage with the potential of becoming a work of art that others will drool over, offer to trade for, or straight up buy.
Like many other aspects of my 30 years, I'm glad to have grown up in the early days of the four stroke inductions all the while cutting my teeth on a mostly stock 2001 Honda CR125R that I never truly appreciated let alone actually learned to ride. I'm sure there are many of us out there that glean some small(ish) level of pride from rolling up to the track armed with two wildly different eras of moto strapped down. The challenge of jumping from easy power of my 17 450 to the smooth free spin of well tuned 125 is comparably satisfying to that of what I assume others derive from the swish of a well executed free throw or the ping of perfect 300 yard drive.
Alright, if you've made it this far I owe it to you to shut up and get to the pictures. From here on out this will be a pic-heavy log. I'll keep the days gone by to a minimum. Thanks for following! All thoughts are welcomed!!!
Day 1: Saturday 1/19/2019
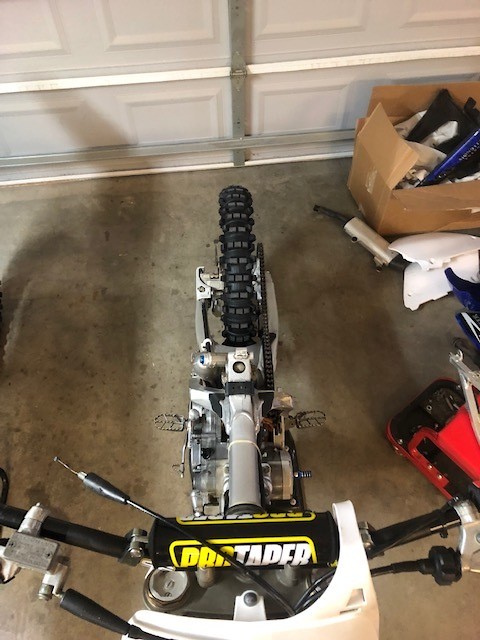
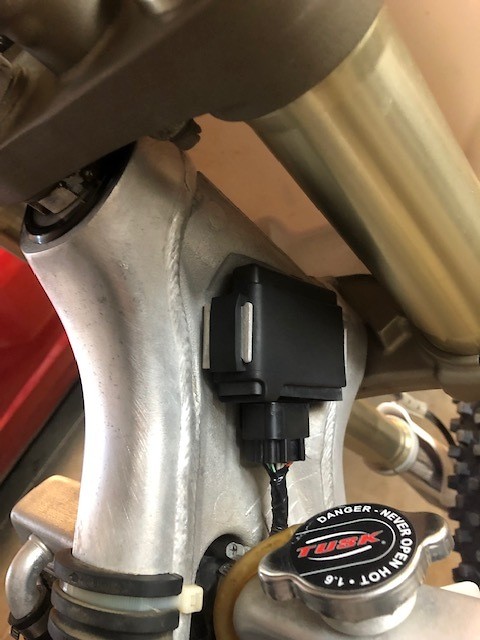
Here are the initial pictures of what I am working with:
1.
2.
3.
4.
5.
6.
7.
Here are the visible issues/views I have identified at this point:


Coming up next...
-suspension shipped out to Factory Connection for the works
-radiators shipped to ICW in North Carolina for repair and bracing
-seat cover will be installed to get that out of the way
-wheels are coming soon
-restyled body has proven challenging, but here is the plan
1. 2018-19 Cycra Power Flow Front Fender from a 250F/450 (black)
2. Restyled shrouds (black on blue tank)
3. Cycra Stadium style front number plate to go with fender (black)
4. FMF Factory Fatty and Shorty Silencer
5. JD Jetting Kit
6. Renthal Twinwalls (blue)
7. ASV 5 kit
8. Honda CRF250/450 front master cylinder adaptation (simply replacing) {performed on my 2003 in past build}
9. Renthal Diamond Soft Grips
10. Dunlop MX3S tires
11. Mototasinari Reed Block
12. Frame cleaning (possible coating)
13. Swingarm and linkage repair (unbelievably neglected)
14. Renthal Chainwheel Drive Kit (blue)
15. Yamaha OEM topend kit
16. Tusk Billet Throttle Tube
I find it funny thinking back to my early days of competitive motocross back home in Southwestern Pennsylvania because my friends and I could think of nothing more than the new 2006 Honda CRF250R armed with the first dual exhaust system. My Dad had graciously blessed me with one of these red and silver beauties one cold February night before the 2nd round local arenacross series. For those of you local to the rolling, often muddy, hills of the tristate area, this was the notoriously dangerous event held in the low ceiling livestock show barn of the Waynesburg Fairgrounds. That bike was all the rage stemming from the Honda ads that ran through what was my junior year of high school at that time. Better cornering and balance was attributed to the dual cans that could easily be damaged beyond repair as I would soon learn following my first "first turn pileup" in the 250C class that June. All that being said, I regularly lined up next to and paid no attention to a few of what is now sitting in my garage with the potential of becoming a work of art that others will drool over, offer to trade for, or straight up buy.
Like many other aspects of my 30 years, I'm glad to have grown up in the early days of the four stroke inductions all the while cutting my teeth on a mostly stock 2001 Honda CR125R that I never truly appreciated let alone actually learned to ride. I'm sure there are many of us out there that glean some small(ish) level of pride from rolling up to the track armed with two wildly different eras of moto strapped down. The challenge of jumping from easy power of my 17 450 to the smooth free spin of well tuned 125 is comparably satisfying to that of what I assume others derive from the swish of a well executed free throw or the ping of perfect 300 yard drive.
Alright, if you've made it this far I owe it to you to shut up and get to the pictures. From here on out this will be a pic-heavy log. I'll keep the days gone by to a minimum. Thanks for following! All thoughts are welcomed!!!
Day 1: Saturday 1/19/2019
Here are the initial pictures of what I am working with:
1.
2.
3.
4.
5.
6.
7.
Here are the visible issues/views I have identified at this point:
Coming up next...
-suspension shipped out to Factory Connection for the works
-radiators shipped to ICW in North Carolina for repair and bracing
-seat cover will be installed to get that out of the way
-wheels are coming soon
-restyled body has proven challenging, but here is the plan
1. 2018-19 Cycra Power Flow Front Fender from a 250F/450 (black)
2. Restyled shrouds (black on blue tank)
3. Cycra Stadium style front number plate to go with fender (black)
4. FMF Factory Fatty and Shorty Silencer
5. JD Jetting Kit
6. Renthal Twinwalls (blue)
7. ASV 5 kit
8. Honda CRF250/450 front master cylinder adaptation (simply replacing) {performed on my 2003 in past build}
9. Renthal Diamond Soft Grips
10. Dunlop MX3S tires
11. Mototasinari Reed Block
12. Frame cleaning (possible coating)
13. Swingarm and linkage repair (unbelievably neglected)
14. Renthal Chainwheel Drive Kit (blue)
15. Yamaha OEM topend kit
16. Tusk Billet Throttle Tube
Poll
#twostroketuesday
Here is the latest eye candy for today's update. More parts photos to come later this afternoon. Although it looks like UPS lost my Cycra stadium plate last night.
FMF Factory Fatty, Shorty, and Renthal Twinwalls (parts in box CRF Master Cylinder, Moto Tasinari Reed Block, and a few other odds and ends)
I am especially pumped and pleasantly surprised on the appearance of the ASV C5 kit. I prefer the shortly levers since I already had to have one finger reattached thanks to the long factory blades we all ran back in the day. Not about to repeat that trip to the ER. Anyhow, things will continue to progress as cleaning takes place and I throw the new top end in the motor (OEM, nobody panick). Factory Connection should be receiving my rifle case cradling the most tired set of SSS forks and shock I have ever seen. I sent my radiators to ICW on the east coast for the works bracing and repair. Just waiting on wheels, shrouds, side plates, rear fender, and the dreaded linkage/swingarm bearings.
Keep following for more lively updates beginning Friday.
BTW, a set of graphics has been ordered...
Needless to say, it took quite a bit of wire wheeling to get the buildup off that the powerwasher and degreaser couldn't touch. I'm not completely satisfied at this point and plan to see how acetone works in the hard to reach areas with a toothbrush and respirator.
It goes without saying that this is better, but not quite the level I want prior to prepping and etching for a ceramic coating.
The rear axle was every bit as bad as the front and pivot bolt, but I was able to salvage it better and buff it with the wire wheel.
The frame has proven a worthy adversary in the fight against time laden dirt and grime. More work and photos to come later this week. I have a plan for the chassis that I am very pumped to try!
On a side note, I began my graphics design process yesterday and the boys down under at SKDA came through again with a killer design. I am still waiting to hear the details on my SSS kit at FC in Oklahoma, but there is still plenty of time left in this build.
Tracking shows my freshly ICW maintenanced radiators set for delivery tomorrow and I will share photos immediately of the craftsmanship. I have to say that the rads are one of my top favorite features of this build since I have been drooling over the idea since I saw them in a build carried out by Jay Clark for Racer X a few years ago.
I want to thank Vital MX for featuring my 2003 YZ build from last year as the recent pick for "Bike of the Day"!!! Really made my week and supercharged my enthusiasm for this build!!!
That's all for now! Let me know what you think. Thanks for following! RK
The Shop
From a mechanical standpoint, I learned the hard way, on my 04 CR125 in 2015, not to trust a motor that's not your own. When I started it after picking it up off craigslist to warm up for a fluids change, it ran for 3 minutes before the piston skirt came apart and went straight into the crank. Ended up rebuilding the entire motor which turned out great.
Bearing that in mind, I have never personally started this motor. I will have to split the cases and check the overall condition and replace anything that's not 110% to fully trust the motor. Plus a build isn't really a build without splitting the cases.
As you can see the swingarm appears to have turned out perfectly. Being that this was my first go at spraying duracoat I was pleased to have no runs or thin spots. A paint booth would make life much easier.
As the day progressed things turned out pretty well until I decided to do the subframe in royal bronze as well. If I had done it in black I would have had two cans of bronze to devote to the mainframe, but that’s what makes building fun. I ordered two more cans tonight and added clear coat as well. I’m now on the fence about coating any motor parts. I will at least do the water pump cover and inner clutch if I have the paint.
In other news, my wheels are stuck in customs in Memphis Tennessee and seem to be moving out of there about as fast as Elvis is. I gave the vendor several opportunities to give me some detail on what they’re doing to fix the hold and get them on their way, but I had to open an eBay case this morning. Hopefully it’ll get resolved because I really don’t feel like lacing and truing a set of wheels right now.
Factory Connection finished and shipped my SSS kit. I was happy to find out that it was stock 2006 equipment and I truly had SSS components and no some other junk as happened to a good friend of mine.
I also decided to move my shop around a bit for more space and discovered that I have stainless brake lines brand new I can use on this build.
The goal now is to be putting on the final coats of Duracoat Thursday night, drop in swingarm and linkage bearings on Friday morning, and start reassembly thereafter. I’m going to attempt a time lapse video on the reassembly so we will see how that goes.
Swingarm, linkage, and suspension are ready and waiting. Let me know if anyone has a set of wheels with blue rims for sale.
At this point things are moving along well. Should have the wheels tomorrow. I ended up going with Tusk Black Rims and Blue Hubs as customs still hasn't released the others. I'm thinking they could be stuck in sorting purgatory for way longer than I am willing to wait.
Tonight I'm going to try and reassembly most everything else. I've decided to duracoat the top clamp of the triple tree black and the bottom royal bronze. It could end up looking stupid or be very unique. We shall see...
I also like how the swingarm turned out. At first I was thinking, "not another black swingarm" but the two-tone against the bronze frame looks solid.
Excellent job!
Pit Row
https://www.duracoatfirearmfinishes.com/products/duracoat-standard-colo…
As for the swingarm, I thought the same and almost went with the same color as the mainframe but I’ve seen a few examples of that in other colors and it almost made my eyes bleed lol (mainly the anodized red chassis).
I hope this build inspires others to try ceramic coatings on their chassis.
Since I really would have liked to have seen what Aaron Plessinger could have done on a 125 in one of the All Star races last year I decided to build a 125 replica of a bike that only existed in my imagination. I’m still not completely finished so stay tuned for additional updates.
I’m thinking of trying a crf rear caliper and/or master cylinder as well but we will see how the yz oem equipment pressures up first.
Aside from the sprocket adventure, I rejetted the carb and reinstalled it. My front brake caliper showed up and after juggling some brackets around I got that finished as well and ready for fluid. Once I bleed the front and rear I'll be filling the radiators, adding Yamalube to the transmission, and mixing some C12 for the break-in and maiden voyage.
I added this to my bike checks last night...check it out!
https://www.vitalmx.com/community/MotoRoss678,51018/setup,74129
I picked up a used 17' CRF450R complete front brake setup. Master cylinder, line and caliper. Ditch the CRF bracket and use the YZ bracket. Everything bolts right up. Night and day difference. Braking on par with the Brembo. I actually like the CRF Nissin modulation better than the Brembo.
Post a reply to: Fasthouse YZ125