

Posts
851
Joined
7/12/2014
Location
GB
Fantasy
986th

Edited Date/Time
4/24/2018 10:03am
In July 2017 whilst doing my weekly ebay browse I came across a super low hour 2008 RM250. It looked pristine in the pictures and with an asking price of £3100 I couldn’t say no. I went to view the bike and it looked even better than in the pics. Apart from graphics, different rear sprocket and a suspension re-valve, this bike was totally untouched. Right down to the cable retainer clips on the bars, this bike was bone stock and un molested. It even came with the original spares kit (piston, gaskets, rings etc). It was purchased new in 2011, used for a few days riding in Holland (hence the virtually new sand tyres fitted on it) and then parked. I took it home that day a happy man!


I tried out a few Enduro races in 2017 and absolutely loved them. So for 2018 I’ve entered the Rock Oil Hare and Hound championship. The original plan was to be a sheep and buy a KTM, but after browsing around at the eye watering 2nd hand prices I decided against it. I love building bikes and fancied a challenge so I decided to turn the new RM into an Enduro machine. Having owned an RM250 since 2010 (sold before I got the new one) I already had a huge stack of spares and performance parts for the bike, making this build relatively cheap to do.
The RM250 is renowned for its snappy, aggressive powerband and fast handling, so I knew I had a fair amount of work to do in order to get it smooth, comfortable and fast.
I was super lucky and managed to bag a mint condition light speed carbon sump guard and carbon frame guard set over winter. Super light and look awesome.
Finished off with Ti bolts.
With the engine out I rebuilt the top end using the OEM top end rebuild kit supplied. This was the first time this engine had been apart, there wasn’t a spanner mark to be seen on any of the bolts/nuts.
I took a squish measurement which came out at 1.38mm. Not bad, but I knew there were gains to be had. I rebuilt the top end using a 0.4mm Athena base gasket, which took the squish to 1.28mm. I’ve done this mod before on my last RM and it was good for a small overall boost in power and throttle response. I also fitted a V-force reed cage, Hinson Clutch Cover and to finish off I replaced majority of the steel OEM bolts with titanium bolts.
I had a Rekluse EXP disc left over from my RMZ450 build. I used it in the 450 for around 15 hours before deciding against it and removing it. Lucky for me the Rekluse EXP also works in the RM250. I changed out the tension springs to suit the engines speeds of the RM and fitted it. I then added a NEXT Components unbreakable clutch lever.
From previous Enduros I was burning up my clutch arm in slow areas on the course, the Rekluse clutch will allow me to leave the clutch lever alone and not have to worry about stalling.
I fitted a 13oz flywheel weight. I’ve always been a huge fan of the FWW on the RM and have always ran a 6oz and sometimes the 13oz for motocross. To further tame down the delivery a little I run an extra ¼-1/2 turn on the powervalve spring tension. This delays the opening and reduces the hit, which is perfect for the long enduro races.
I stripped the carb and changed the jetting a little. RM’s are rich from standard. I’ve gone with a 48 Pilot, NEDH needle in clip 3 and a 168 main to start with, going from previous experience this shouldn’t be too far out.
Finally I cleaned up and fitted a Boyesen Ignition Cover. This was originally the bronze colour, but was looking second hand so got it blasted up and then polished the letters
I tested the motocross set up before tear down and it works awesome. The KYB forks, paired with the 22.5mm offset clamps feel awesome and make for a calmer and more planted front end.
( * how the bike looked at the start of December, pre tear down * )
As anyone who has done so will know, MX valving for Enduro is brutal, so I had the stock RM forks and KYB shock revalved to suit. I worked with a good friend of mine who came up with valving stacks and spring rates the suit my weight and Enduro riding.
(mid valve stack)
(compression stack)
The Shop
Still loads more to come. The bike is actually nearly finished, I just need to get round to writing it all up and sorting through the pics! Expect more updates soon.
Sixeightone: Tell me about it, I'e been trying to get my hands on the Light Speed stuff for ages with no luck. So I was super happy when I was able to get both in the same month! The only piece I still haven't been able to get is a carbon chain guide.... the search continues.
I did the Weston Beach Race on this bike late last year and as you can see below, everything got stained really bad. I used an alloy wheel cleaner and a quick rub over with fine scotchbrite to bring everything back to looking new (ish)
Same, so much better than the stock white which turns yellow/orange after half a season!
I got a custom solid rear disc made by ABE, I mimicked the design used by the factory RM teams (Carmichael used a disc like this in the Anaheim 1 05 SX season opener). The solid disc should increase pad life and wet/muddy weather performance. For durability I fitted a steel RFX 51 tooth sprocket.
Finished off with Ti bolts, Ti chain adjusters, Ti axle nuts, Pro Circuit chain blocks, Metzler MC5 rear, Dunlop MX31 front and heavy duty tubes.
My RM wheels on the left, and fellow Vital MX member (and huge help with this build) 'Brunevals' 89 CR250 wheels
Out of interest did SFX do the wheels for you?? I am thinking of giving them a try, I want the bronze hub and yellow anodized rim
Exhaust wise, for the moment I am going to use a Pro Circuit Works plated expansion chamber, with a Pro Carbon carbon guard, held on with new stainless clips. I may buy a Pro Circuit 2 or FMF Gnarly pipe later on if I feel I need more low end grunt.
For the silencer I’m going to test between stock and an FMF Q Pipe. I polished up the stock pipe a bit and finished it off with a brushed look.
Pit Row
Hubs look great
Not much more left to do now, pretty much just waiting on graphics. Hopefully sorted a set of Ti Pegs and braided hoses too.
This should mean I only have to pit once now in a 3 hour event.
I ran the bike in at the weekend, pleased to say it all went well. Motor feels strong but smooth. The G2 cam and Rekluse make for awesome roll on power. You can leave the bike in 2nd, do a hairpin walking pace turn and just roll it on steady without touching the clutch.
I was hoping to use the Pro Circuit clamps on the bike. However the rearward positioned fork clamp bolts came into contact with the tank and drastically reduced the turning radius of the bike.
The stock clamps however clear the tank fine, so I gave them a clean and rub over with scotchbrite, swapped the steel bolts out for Ti and mounted them up with the revavled stock forks. Also fitted a set of Pro Carbon fork wraps for added protection.
I removed the stock bar mount bolts and replaced them with titanium bolts. I fitted longer 70mm bolts which gives more thread overhang under the clamp.The extra thread means I can experiment with some aluminium bar risers I had made up. Currently using some +5mm risers, along with the standard RM bend Renthal FatBars.
I used Ebay seller 'T7design' for the titanium bolts for this build. I've bought from a couple different sellers now and T7design is by far the best. Very good quality bolt at a great price and fast postage. Would recommend.
Just waiting on graphics now!
I made these at work the other day. Clutch spring seating washers. This is a fantastic little mod that I had previously done to my RMZ450 with great success. A standard flat washer on the clutch spring allows the clutch spring to float around within the pressure plate. This means that the clutch springs go off center and rub the pressure plate, causing a poor feel at the lever.
These seating washers hold the spring central with no contact to the pressure plate. The difference in feel at the lever is very noticeable, much smoother and more fluid.
These are a rough set I made just to prove the program and check the size.
Start out with a Renthal Soft Full Waffle. I install them with the top waffle edge angled into the middle of the bike slightly. I then cut off the top portion of the waffle, essentially creating a 3/4 waffle grip.
I absolutely love this set up and run it on every bike I own. Loads more grip and fantastic in wet muddy conditions as well, great for Enduro.
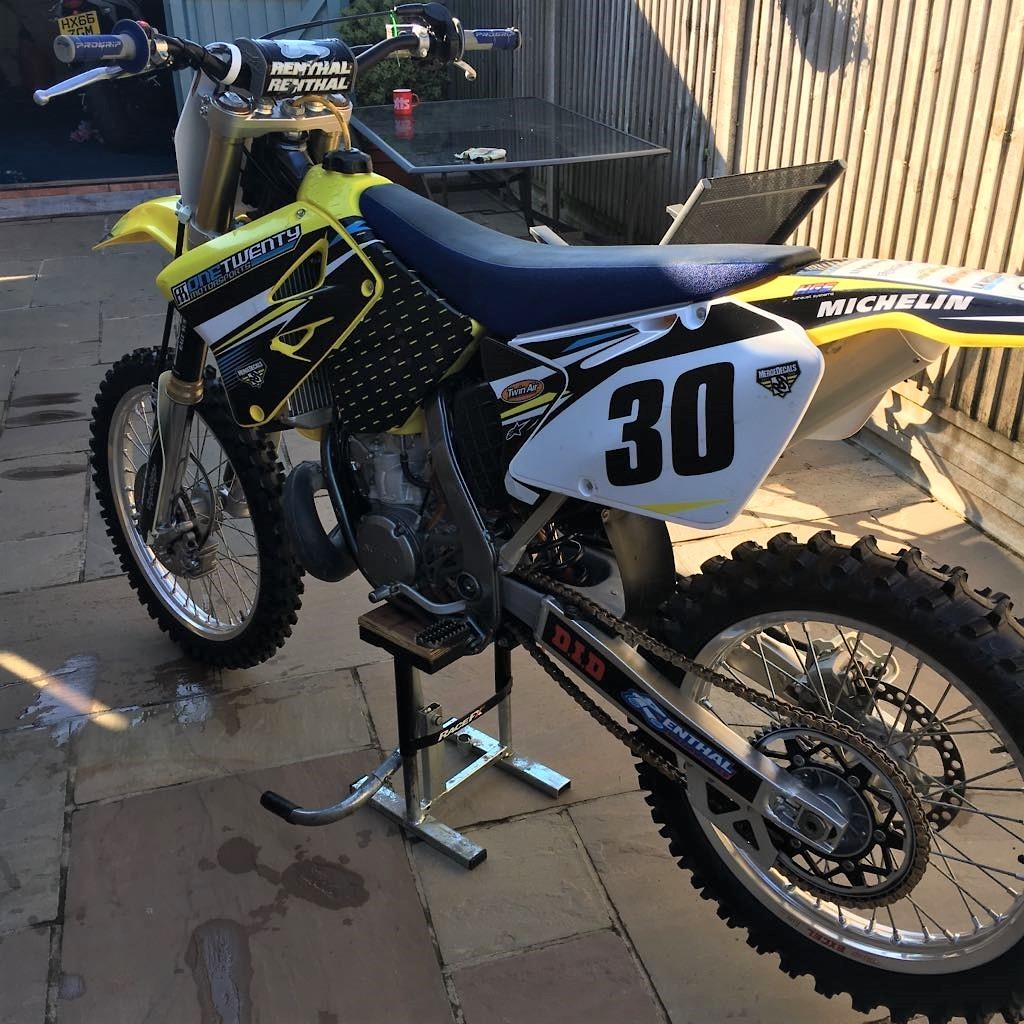
My graphics turned up this week and look awesome. Iv'e gone for an all black theme. Having previously done a Carmichael Replica RM250 and a JGR inspired RMZ450, I decided to do something completely unique this time around.
Will get some completed photos this weekend!
The bike looks great! These things rip and i'm looking forward to seeing the end result.
The hubs were done at SFX wheel, which are based in Wolverhampton, UK
Thanks!
Post a reply to: Suzuki RM250 Enduro Build - Complete with Pics