

Posts
641
Joined
5/30/2017
Location
Tucson, AZ
US

Edited Date/Time
11/4/2018 7:41am
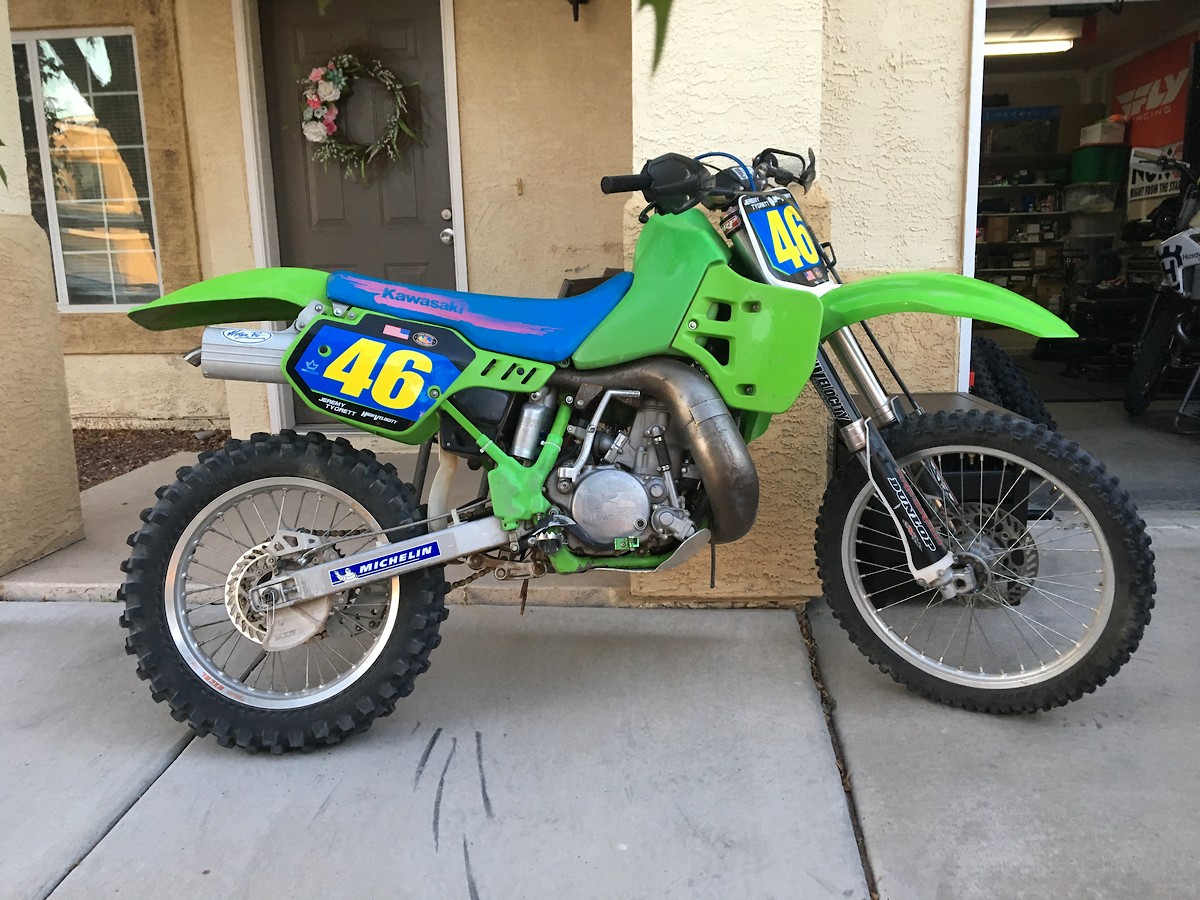
I've been wanting a 500 of my own for a long time. My late father had an 89 CR500 when I was a kid. He bought it so he could ride with me and we could spend more time together. When I left home, he sold it to a family friend, who offered to sell it to me years later. Being that I was a poor ass Senior Airman, I couldn't afford it. By the time I could, he got divorced, and his bitch of an ex-wife took all his bikes, including the 500.
I have been passively looking for a 500 of either red or green variety for the past 6 months. Almost all of them were either grossly overpriced, completely roached, or a combination of the two. Then I stumbled across this one on craigslist today. The bike is very clean for being 27 years old. The guy I bought it from didn't ride it a whole lot, and the guy who owned it before him owns one of the best shops here in town. Here's what I got with my purchase:
1991 KX500
- 06 KX450 Forks and front brake
- BRP Triple Clamps
- 90's Pro Circuit Works pipe and Spark Arrestor
- Original Wheels
- Fresh top end
- Boyesen Rad Valve
- A set of Warp9 Wheels with tires and bibs installed
- A set of new GPI radiators and Blue Hoses
- A bag full of new bearings
- Shop and owners manuals
- Probably some other stuff I can't remember
In total, I paid $2400. You guys tell me if I'm a sucker or if I got a decent deal. I feel that its the latter. I plan on pseudo-restoring it, IE replacing whatever I can with parts from new bikes that fit and make this one more enjoyable to ride. Obviously, powder coat, cleaning up the swingarm, new plastics/graphics/seat cover, ect. This is going to take me a while, but it'll be fun. If anyone has any advice or leads on parts and such, give me a holler. Without further ado, here's some pics.
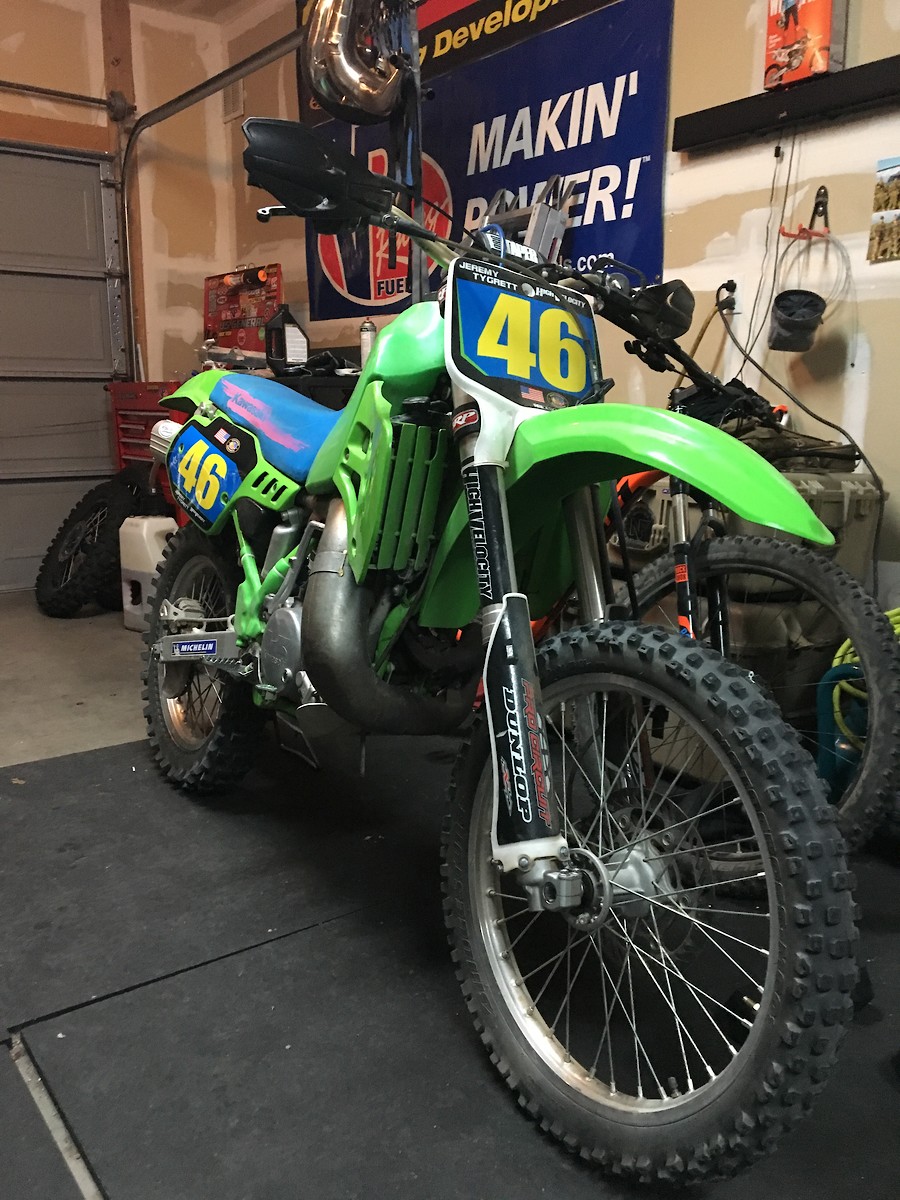
The Shop
I'm working on the cleaning part, so don't jump my case just yet. Powdercoating will probably be the last thing I do once I get everything else squared away. Seat cover is on the way from Guts. Ordered a new rear fender and I'll be putting a new IMS translucent tank on as well. The tank that came on it is a really weird shade of green and looks like shit. I'll be working on stripping the paint off of the swingarm and the subframe tomorrow. I'll be going with the brushed aluminum look. The pipe will get rust-busted as well. I have a spare 40mm Keihin PWK short body with STIC lying around that I am going to try and fit. It is a short body, but I think it may work since the reed cage has a spacer installed that is probably 4 or 5mm wide, if I had to make a guess.
Everything else should line up fine with the airbox.....I have the same setup - airstriker, rad valve, reed spacer.
What needle do you plan on using?
I’m just running the needle that came in the bike. I need to check and see what it is, but I think it’s a JD needle. Any needle suggestions? The bike had a 45 pilot and a 155 main, which seems a bit off to me. I’m sure these bikes jet a little differently though, with the stronger signal.
I cut off the area below the welch plug (yours looks to be cast in) and tapered it back to almost inline with the throttle cable (pie shaped wedge). Just stay above the o-ring to keep the integrity of the edge of the cap. Either weld in a little piece of aluminum to close off the hole, or do as I did and fill it with JB Weld. Finish off the edges and paint it with flat aluminum paint and it's hard to tell it's been modified. Since the tps is gutted out of the carb, it's unused space.
I don't have any solid jetting specs ( my 500 is a project bike like yours). I mainly messed with the jetting when I got it, but was never satisfied with the results. I haven't been on a bike in over a year (life happens) but hope to resume with it this fall.
What I remember...
8 slide
tried various RM and YZ 250 needles that I had (probably need a needle with a larger straight section)
down to 38-40 pilot ( and felt like I could go lower)
Main jet around 160 I believe
Like you mentioned, the signal is so strong with this carb (especially a 38) that jetting may be a little "out of the box".
BTW, I picked up a metering block from George at his shop last year (nice guy...lives nearby) so I'm definitely interested in your stic thread and any jetting info that you have. Plan to use it on this bike, but want to get the basics nailed down before I throw another variable in the equation.
The left fork seal was leaking, so I replaced them on both, along with the bushings. The oil was filthy. I don't think anyone has touched the forks in years. I think someone got some water in the right fork, as the piston had rusty-grunge on it, so I had to pull the piston and shim stack apart to clean it up. Someone put those shitty motion pro fork bleeders on them, so my guess is that's how the system got contaminated. I'll be getting the normal screws and throwing the others in the garbage where they belong.
I took the PWK short body off as I didn't want to do all the work quicken discussed to make it not rub a hole in the tank. I'll just buy a 92M STIC for the screw top from George in the future. I installed a 55 pilot, 168 main, and the N82P needle on clip 2. Its a little rich, but it still ran much better than before.
Got some shroud graphics off of eBay as placeholders until I can get RevDesigns to make me some custom ones. These shroud graphics are the shittiest things I've ever seen (but what can you expect from eBay?). Installed an 18 front fender and number plate. I had to make a little 90 degree bracket to make it work. Looks great. Guts seat cover installed, although the foam will need to be replaced at some point as its worn out and a little lumpy in some spots.
New chain guide and bar clamps coming from BRP next week. I'll be doing the weld-on Scott's damper at some point. New OEM clutch plates and frictions are coming in next week as well, along with a Pro X billet clutch basket (since you can't get a Hinson for it anymore).
Forgive the filthy garage. I've been jobbing on this thing for a week straight.
Pit Row
BRP sent me the wrong chain guide, so I’ll have to send that back for exchange.
Forks are at the local shop as they make a strange clunking noise at full extension. I thought the springs were a touch too short (negative preload), but the shop owner though the rebound felt way too fast and there could be a problem with the valve on top of the piston rod.
Since the last time I've posted, I cleaned up the stock hubs and rebuilt them with Excel A60s, Excel spokes, new bearings/seals, and Tusk brake rotors. They came out really well for my first set, I think. Threw on a fresh set of Nitromousses and Michelin Starcross 5 Meds.
I decided to get a new pipe since the one that came on it was bent in pretty bad. I went with a Pro Circuit Platinum 2. Threw on a Boyesen Ignition cover for fun, and some WC frame guards. The Chinese rads were giving me OCD fits knowing how badly they fit, so I bought a set from Myler's and installed them. They are very well made, and they fit as good as the OEM ones did. I also rebuilt the shock. New graphics in from Rev Designs.
Next on the list is new seat foam. The old stuff is roached, which makes the seat cover look lumpy in some spots. I'm also not digging the green cover, so I have a new black one coming from Motoseat. New Scott's Damper and weld-on tower is inbound.
It took me all day, grinding the tower to fit, and getting the post height just right. I'm not a pro welder, just a dude with a little spark box in his garage, so don't judge too hard! Overall, I am happy with how things turned out. Everything works perfectly, and will be looking good once I get the powdercoating done.
Treat those Riv Nuts on the subframe gently. They are weak as hell and are a total pain when they start to spin.
On the clutch cover... the brake pedal was famous for punching a hole in the clutch cover in a crash. I used to take a
piece of aluminum, shape it and JB weld it to the case to act as a guard by spreading out the impact. Worked great!!
Also, the chain is famous for sawing through the sub frame. All sorts of guards and home remedies were tried but the one I tried that worked the best was screwing a piece of plastic (about 1" tall and 4" long) into the chain slider on the swingarm. Looked like it would be flimsy as hell but totally worked great.
A Honda CBR 600 F2 front brake caliper can be made to fit on the rear of the KX500 and WAY better than the stock unit. Works killer.
There is a way to adapt a later year rear fender to this bike if you don't dig the scoopy rear fender.
Ignition coil mounting tabs would crack often. Keep an eye on them.
Have a blast on it!!!
Received an ARC clutch perch lever setup, brake lever and rotating bar clamp for the brake side. These things are butter smooth. The clutch action feels great on this bike. When I first got it, it was really stiff, and you could feel the notches in the basket through the entire range of the clutch pull. I also rebuilt the front brake master cylinder. Feels much better. All I need for the front end now is a new brake line.
Got the driveline installed. The original gearing was 14/47. I'm a huge fan of Dirt Tricks sprockets. They don't make a front sprocket for the 500, and the smallest rear they make is a 48. I ended up getting a 15T Renthal front and a 48T Dirt Tricks, with a DID Narrow X-Ring chain. I think this gearing will work well, especially with the STIC, and should be good for 100+ mph on fire roads. This is pretty much a bulletproof driveline. I had to trim the case guard back about 1/4" to make room for the larger C/S sprocket.
When I replaced all the chain rollers with All Balls rollers, I didn't realize that they are generic. The lower roller diameter is too big and pinches the chain, so I had to order a TMD roller that is made specifically for the 500.
Next up should be a Lightspeed carbon fiber front disc guard, Devol Skid Plate and Rad Guards, and a set of Rental KTM High Fatbars (my favorite bend).
Post a reply to: CSAR FE's 91 KX500 Build