Another 2004 KX125 rebuild? Yessir!

rylo67
Posts
19
Joined
7/9/2018
Location
Iowa City, IA US
Edited Date/Time 9/5/2018 5:23pm
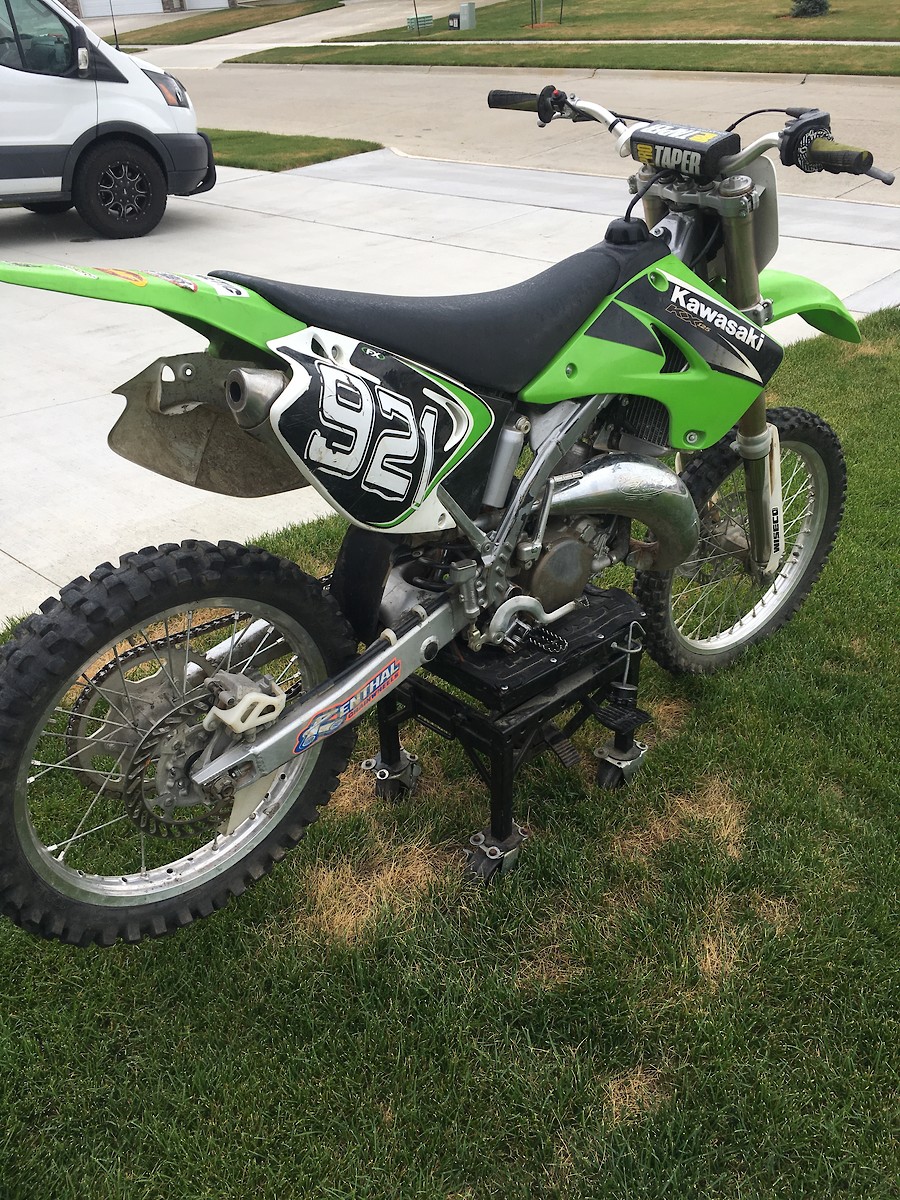
How did I end up with this green pile of shit in my yard? Well let's just start off by saying that my buddy Chase convinced me to buy this bike when I was 9 Budweisers deep at REDBUD. And this is actually Chase's yard.

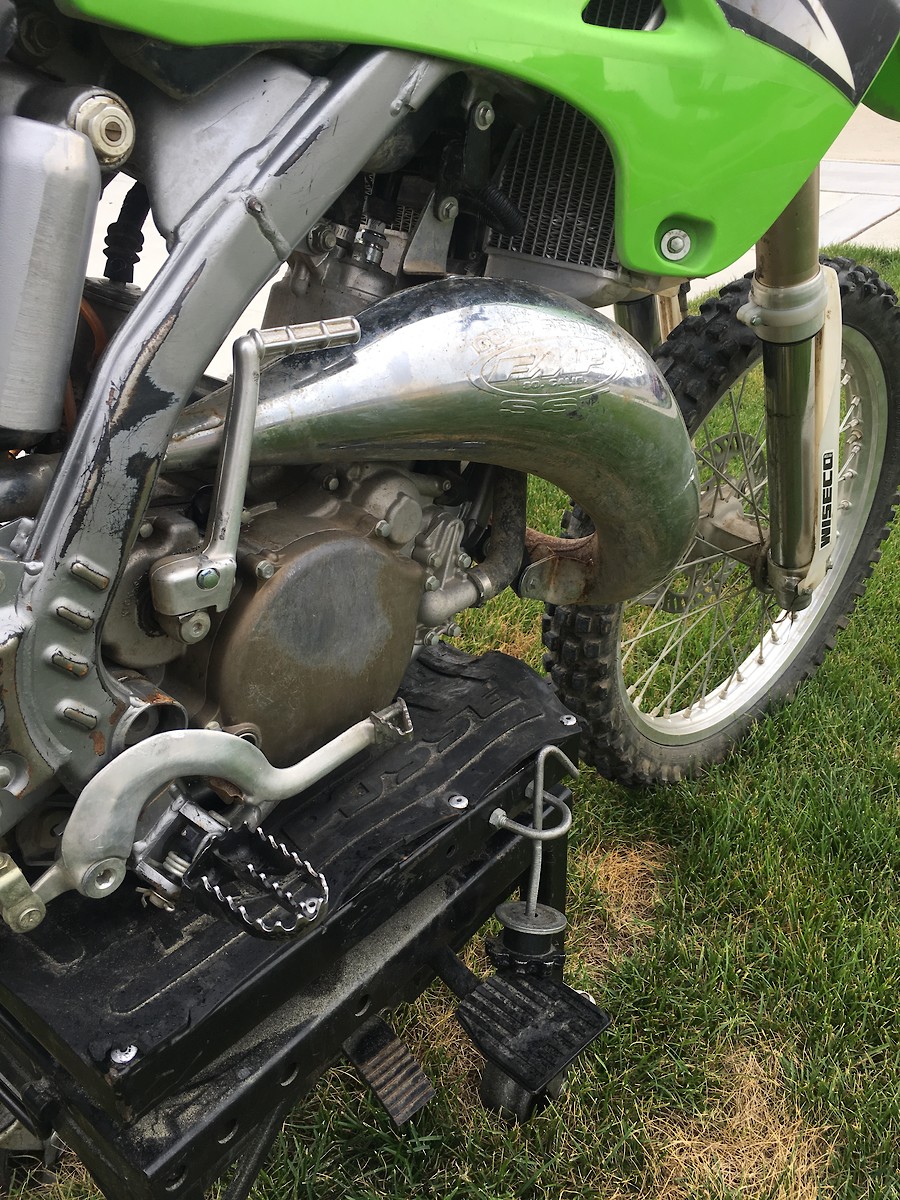
This 2004 KX 125 is going to be my second rebuild but my first build that I'm doing on vital. We ended up tearing this bike down to the frame today and we were able to take a quick look inside the motor. Unfortunately the piston looks like it melted and the cylinder walls were scored pretty good. On the bright side the clutch basket and plates looked brand new.

I don't know exactly what I want to do this bike yet but I think the plan is to get the frame and rims powder coated gloss black then cerakote the hubs and clutch cover a burnt bronze. I want to go with the 2005 factory Chevy bowtie look and 2018 front plate/fender.

If you guys got any other cool ideas let me know, I'm definitely not 100 percent set on just doing the '05 look.


|
rylo67
Posts
19
Joined
7/9/2018
Location
Iowa City, IA US
7/15/2018 10:23pm Edited Date/Time 7/15/2018 10:27pm
That's a pretty roached piston if I've ever seen one.


Notchless to say, that clutch is primo.

BobPA
Posts
8027
Joined
10/31/2013
Location
PA US
7/16/2018 6:14am Edited Date/Time 7/16/2018 6:15am
Whatever you do, do not put a 2018 front fender setup on. Modern fenders look like ass on the last gen two strokes.

Anodizing stock hubs will be very hard. It will turn out flat in color, unless you turn them on a lathe and polish them.
1
1
7/16/2018 6:31am
BobPA wrote:
Whatever you do, do not put a 2018 front fender setup on. Modern fenders look like ass on the last gen two strokes. Anodizing stock hubs...
Whatever you do, do not put a 2018 front fender setup on. Modern fenders look like ass on the last gen two strokes.

Anodizing stock hubs will be very hard. It will turn out flat in color, unless you turn them on a lathe and polish them.
He meant Cerakote, he's just learning!
1
Shredder
Posts
182
Joined
9/25/2006
Location
Concord, NC US
Fantasy
1194th
7/16/2018 7:53am
BobPA wrote:
Whatever you do, do not put a 2018 front fender setup on. Modern fenders look like ass on the last gen two strokes. Anodizing stock hubs...
Whatever you do, do not put a 2018 front fender setup on. Modern fenders look like ass on the last gen two strokes.

Anodizing stock hubs will be very hard. It will turn out flat in color, unless you turn them on a lathe and polish them.
Whatever else you do, leave the swingarm silver.
3

The Shop

rylo67
Posts
19
Joined
7/9/2018
Location
Iowa City, IA US
7/16/2018 7:59am
BobPA wrote:
Whatever you do, do not put a 2018 front fender setup on. Modern fenders look like ass on the last gen two strokes. Anodizing stock hubs...
Whatever you do, do not put a 2018 front fender setup on. Modern fenders look like ass on the last gen two strokes.

Anodizing stock hubs will be very hard. It will turn out flat in color, unless you turn them on a lathe and polish them.
He meant Cerakote, he's just learning!
Rookie mistake.
BobPA
Posts
8027
Joined
10/31/2013
Location
PA US
7/16/2018 6:17pm
BobPA wrote:
Whatever you do, do not put a 2018 front fender setup on. Modern fenders look like ass on the last gen two strokes. Anodizing stock hubs...
Whatever you do, do not put a 2018 front fender setup on. Modern fenders look like ass on the last gen two strokes.

Anodizing stock hubs will be very hard. It will turn out flat in color, unless you turn them on a lathe and polish them.
He meant Cerakote, he's just learning!
rylo67 wrote:
Rookie mistake.
All good bro. If you’ve got any questions, I’ve built a few of those Kawi’s from the ground up.
rylo67
Posts
19
Joined
7/9/2018
Location
Iowa City, IA US
7/20/2018 9:13pm Edited Date/Time 7/20/2018 11:09pm
Sending the frame and rims off to get a gloss black powder coat.


rylo67
Posts
19
Joined
7/9/2018
Location
Iowa City, IA US
7/20/2018 9:21pm
Cleaned the hubs up with a wire wheel on a bench grinder and used a dremel wire wheel in the tighter areas. They came out pretty sweet.


rylo67
Posts
19
Joined
7/9/2018
Location
Iowa City, IA US
7/20/2018 9:26pm
Exhaust pipe and silencer got the scotch brite and steel wool treatment.


KDXGarage
Posts
2562
Joined
12/16/2010
Location
AL US
7/23/2018 10:00am
Off to a good start!

2005 was not Chevy Trucks.
rylo67
Posts
19
Joined
7/9/2018
Location
Iowa City, IA US
7/26/2018 12:41pm
I want to mint this swing arm out but this is the first time I'm dealing with a painted swing arm. Do any of you have recommendations? Do I strip the paint with a paint stripper or just hit it with the scotch brite pads right away to remove the paint? My plan is to use 80 grit up to 220 once paint is stripped.

7/26/2018 1:17pm
rylo67 wrote:
I want to mint this swing arm out but this is the first time I'm dealing with a painted swing arm. Do any of you have...
I want to mint this swing arm out but this is the first time I'm dealing with a painted swing arm. Do any of you have recommendations? Do I strip the paint with a paint stripper or just hit it with the scotch brite pads right away to remove the paint? My plan is to use 80 grit up to 220 once paint is stripped.

You want to use scotch brite to remove the pain then use sand paper?? Little bass ackward if you ask me...

Use the sand paper to remove the paint, work your way to higher and higher grit then repaint it.

rylo67
Posts
19
Joined
7/9/2018
Location
Iowa City, IA US
7/26/2018 1:25pm
rylo67 wrote:
I want to mint this swing arm out but this is the first time I'm dealing with a painted swing arm. Do any of you have...
I want to mint this swing arm out but this is the first time I'm dealing with a painted swing arm. Do any of you have recommendations? Do I strip the paint with a paint stripper or just hit it with the scotch brite pads right away to remove the paint? My plan is to use 80 grit up to 220 once paint is stripped.

You want to use scotch brite to remove the pain then use sand paper?? Little bass ackward if you ask me... Use the sand paper to...
You want to use scotch brite to remove the pain then use sand paper?? Little bass ackward if you ask me...

Use the sand paper to remove the paint, work your way to higher and higher grit then repaint it.

I was just wondering if that's the most efficient way. I read a lot of guys have used aircraft paint remover or soft abrasive pads to knock the paint off. Was wondering if paint would fill the grit too quick and potentially take more time.
Theneil300
Posts
68
Joined
2/16/2018
Location
Georgetown, CA US
7/26/2018 2:24pm
Drop it at a powder coater to have blasted and powdercoated, I think the common color used for swingarms is a BMW silver
spode262
Posts
33
Joined
12/29/2017
Location
CA
7/27/2018 6:15pm
There's a company called Protocol that makes a non chemical paint stripper, in Canada it's sold through Praxair but not sure about the US. I stripped my '03 KX swingarm and it worked exceptionally well without attacking the aluminum
Paul_Pitzonka
Posts
694
Joined
5/1/2018
Location
Grand Terrace, CA US
7/27/2018 7:13pm
rylo67 wrote:
I want to mint this swing arm out but this is the first time I'm dealing with a painted swing arm. Do any of you have...
I want to mint this swing arm out but this is the first time I'm dealing with a painted swing arm. Do any of you have recommendations? Do I strip the paint with a paint stripper or just hit it with the scotch brite pads right away to remove the paint? My plan is to use 80 grit up to 220 once paint is stripped.

You want to use scotch brite to remove the pain then use sand paper?? Little bass ackward if you ask me... Use the sand paper to...
You want to use scotch brite to remove the pain then use sand paper?? Little bass ackward if you ask me...

Use the sand paper to remove the paint, work your way to higher and higher grit then repaint it.

rylo67 wrote:
I was just wondering if that's the most efficient way. I read a lot of guys have used aircraft paint remover or soft abrasive pads to...
I was just wondering if that's the most efficient way. I read a lot of guys have used aircraft paint remover or soft abrasive pads to knock the paint off. Was wondering if paint would fill the grit too quick and potentially take more time.
I’d second the aircraft remover used it a bunch pretty effortless
rylo67
Posts
19
Joined
7/9/2018
Location
Iowa City, IA US
7/31/2018 10:07am
Subframe is dialed.


rylo67
Posts
19
Joined
7/9/2018
Location
Iowa City, IA US
7/31/2018 10:13am
First time throwing fasteners in a tumbler. They came out pretty decent. Anyone else use tumblers?


8/1/2018 11:01am
Stevehrc wrote:
I'd like to know more about tumblers?
This is the tumbler used
https://www.cabelas.com/product/shooting/reloading/case-cleaning/pc/104…

This is the media and polish used
https://www.cabelas.com/product/shooting/reloading/case-cleaning/pc/104…

You can find the above items cheaper but my old man had cabela's points to use up so that is the reason for the cabela's plug.

This was my second experience with the tumbler, I did my personal hardware on my CR. I did not thoroughly clean the hardware, to be honest I just took the hardware off the bike and through it right into the tumbler with no polish. My results were okay after about 5 hours but the corn cob media stuck to the grease and didn't clean those areas well.
I purchased an ultrasonic cleaner for $120 on ebay and I am going to try putting all the hardware in the cleaner first then the tumbler. The results seen above were about 7 hours and 3-4 cap fulls of the polish. Only so long because I honestly had it running on the side of my house so I didn't have to listen to it and I forgot about it and left.
1
Stevehrc
Posts
90
Joined
8/24/2017
Location
AU
8/1/2018 11:30am
Thanks for the info mate. Don't want to hi-jack your thread mate but I have a 2000 model kx125 I'm building and I'm struggling to find any info on what pro circuit works pipes fit, do you have any answers?
rylo67
Posts
19
Joined
7/9/2018
Location
Iowa City, IA US
8/1/2018 7:35pm
Radiators are looking solid. Dremel abrasive wheels doing the trick.


1
8/2/2018 2:32am
They're actually a fun old bike, parts are dirt cheap and easy to obtain. I did one, went a little over the top, but, there you go. If you wanna different look, we can handle it, not too difficult, scrubdesignz.com...


3
1
rylo67
Posts
19
Joined
7/9/2018
Location
Iowa City, IA US
8/7/2018 7:29am Edited Date/Time 8/7/2018 7:53am
Ended up going with the aircraft paint stripper on the swing arm. Then I proceeded to hit it with the 220-grid/scotch brite combo. Thing came out cleannnn.


1
rylo67
Posts
19
Joined
7/9/2018
Location
Iowa City, IA US
9/5/2018 5:20pm Edited Date/Time 9/5/2018 5:23pm
Finally got my cylinder back from Millennium Technologies after getting it honed and replated. Dropped a new Wiseco piston kit in it as well. Top end is looking cherry.

Next steps will probably be cleaning the cases and starting to put this bad boy back together. Unfortunately now that classes have started back up I definitely won't be working on this puppy as much as I'd like too so have patience with me! Haha


2

Post a reply to: Another 2004 KX125 rebuild? Yessir!

The Latest