

Posts
73
Joined
6/30/2017
Location
Austin, TX
US

Edited Date/Time
8/19/2018 5:00pm
Hey guys. I'm a little late on doing this as I'm already at the last step (waiting on suspension) but I figured I could still do a step by step of how this went. Hopefully I took enough pics to tell the story. Not really sure how the formatting will be so be patient with me (popping my vital build cherry). My scope of work is trying to get this thing to look a modern version of the 05/06 Factory Honda bikes without spending more money than i’d spend buying a brand new bike. I’m cutting a few corners because i plan on actually riding it rather than keeping in a showcase and would rather not mess up a one-off factory part. 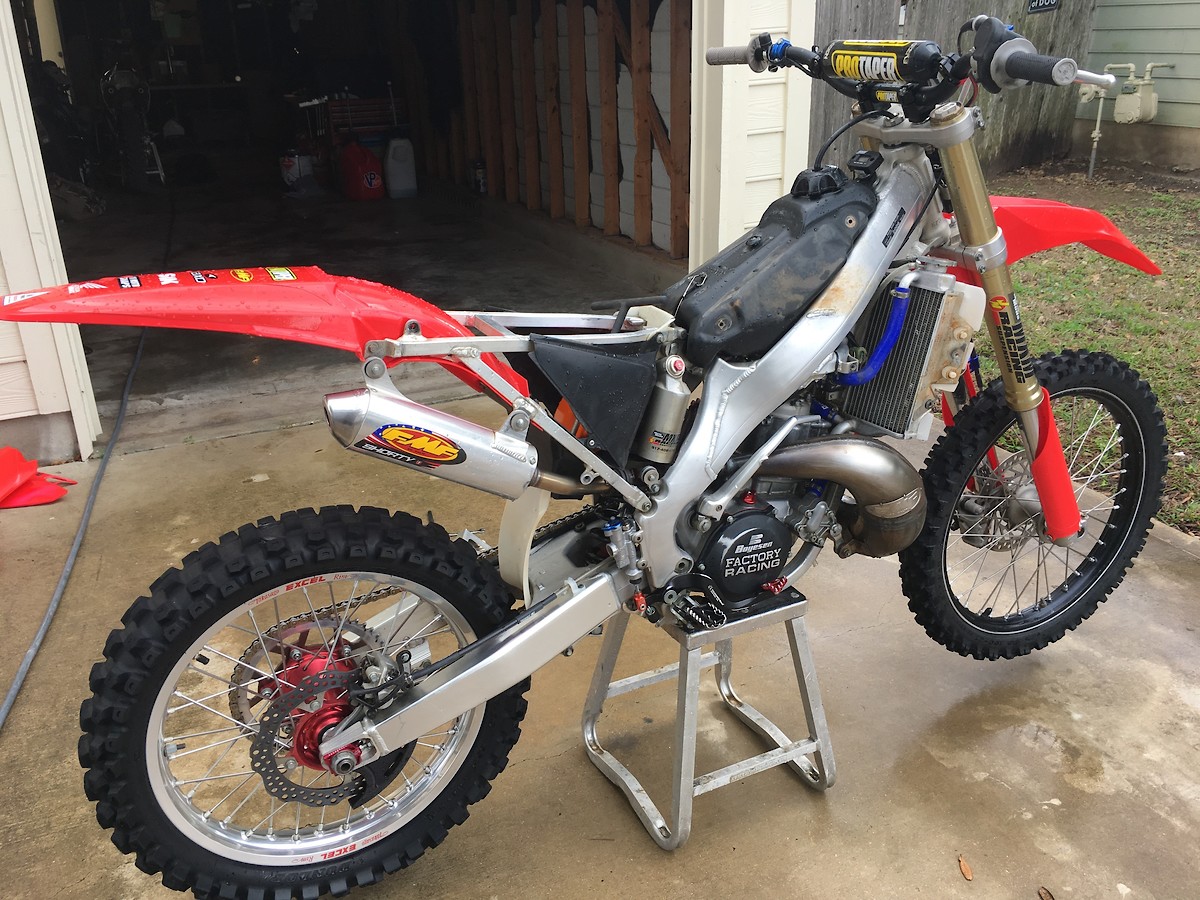

Here is how I got her. She had "12 hours on the reframe" but that was definite BS. I rode it once and it just felt sloppy so I immediately framed it.

My first step was bearing and seal replacement on the whole bike. Along with scuffing the hard parts.

Here is how I got her. She had "12 hours on the reframe" but that was definite BS. I rode it once and it just felt sloppy so I immediately framed it.
My first step was bearing and seal replacement on the whole bike. Along with scuffing the hard parts.
I skipped a few steps in the pics. I cleaned and scuffed the frame with the stuff Cameron N. uses on youtube. such a great finished product. for some reason it didnt really work on the engine cases. It left a dark residue throughout, so i just scuffed and scuffed and scuffed. You see the finished product. i took most of the visible bolts off of this bike and polished them individually. it was at this moment that i realized the time and effort put into these builds cannot be reflected by any dollar amount. I didnt take a pic of the other side because im going to get the Boyesen cover stripped and scuffed as well since the powdercoat is worn on it.
Next I broke the carb down and cleaned it and reset the float level. Going to be putting it on the dyno as soon as I get it put back together and have it jetted and tuned for the PC pipe. I'm waiting on the plastic renew kit and ill use that on the airbox. Went ahead and replaced the mudflap.
next was standing the clear anodize off the swing arm. Would not recommend doing this in the slightest bit. Tried to take it to the shop to get stripped but the bearings were already installed and you can’t put steel in the bath. I also tried oven cleaner and it didn’t work. Probably bought the wrong kind but it’s all water under the bridge. Also took apart both brake calipers and replaced seals and sanded pistons and slider bolts.
The Shop
Here are a few of the parts that will be going on the bike. i guess i forgot to mention that pretty much every part that was taken off was taken apart, cleaned, scuffed, and/or greased. i figured that could go without mentioning but i don’t want people to think i half assed it haha. Currently waiting on plastics/graphics/seat cover, pipe, triple clamps, and pegs to come in. Getting tired of waiting.
sneak peek
Pit Row
Did you have them made strictly for the plastics to bolt up from the newer CRF's or are you planning on using a different set of forks?
Ill bet these newer "A-Kit" replica style forks that came on the 2018 CRF450's would be sooooo sweet to run on these last gen CR 2 strokes.
I for one would really like to know the upper tube outer diameters as compared to the 47mm showa twin chamber spring forks that were used from 1997/1998- up ....with the last real generation being on the 2002-2008 CR/CRF's
Post a reply to: [FINISHED] ‘06 CR250 Factory Honda Build