

Posts
4080
Joined
1/2/2015
Location
DFW, TX
US
Fantasy
442nd

Edited Date/Time
1/16/2018 10:11pm
I got this bike from CrGuy2t in mid build. I wasn't planning on getting another race bike to build (I still have and love my Splitfire bike) but I have a sweet spot for Plano Honda bikes. CrGuy2T offered to sell the bike to me and I didn't want to miss the opportunity. Luckily for me, my wife gave me the green light to do it.
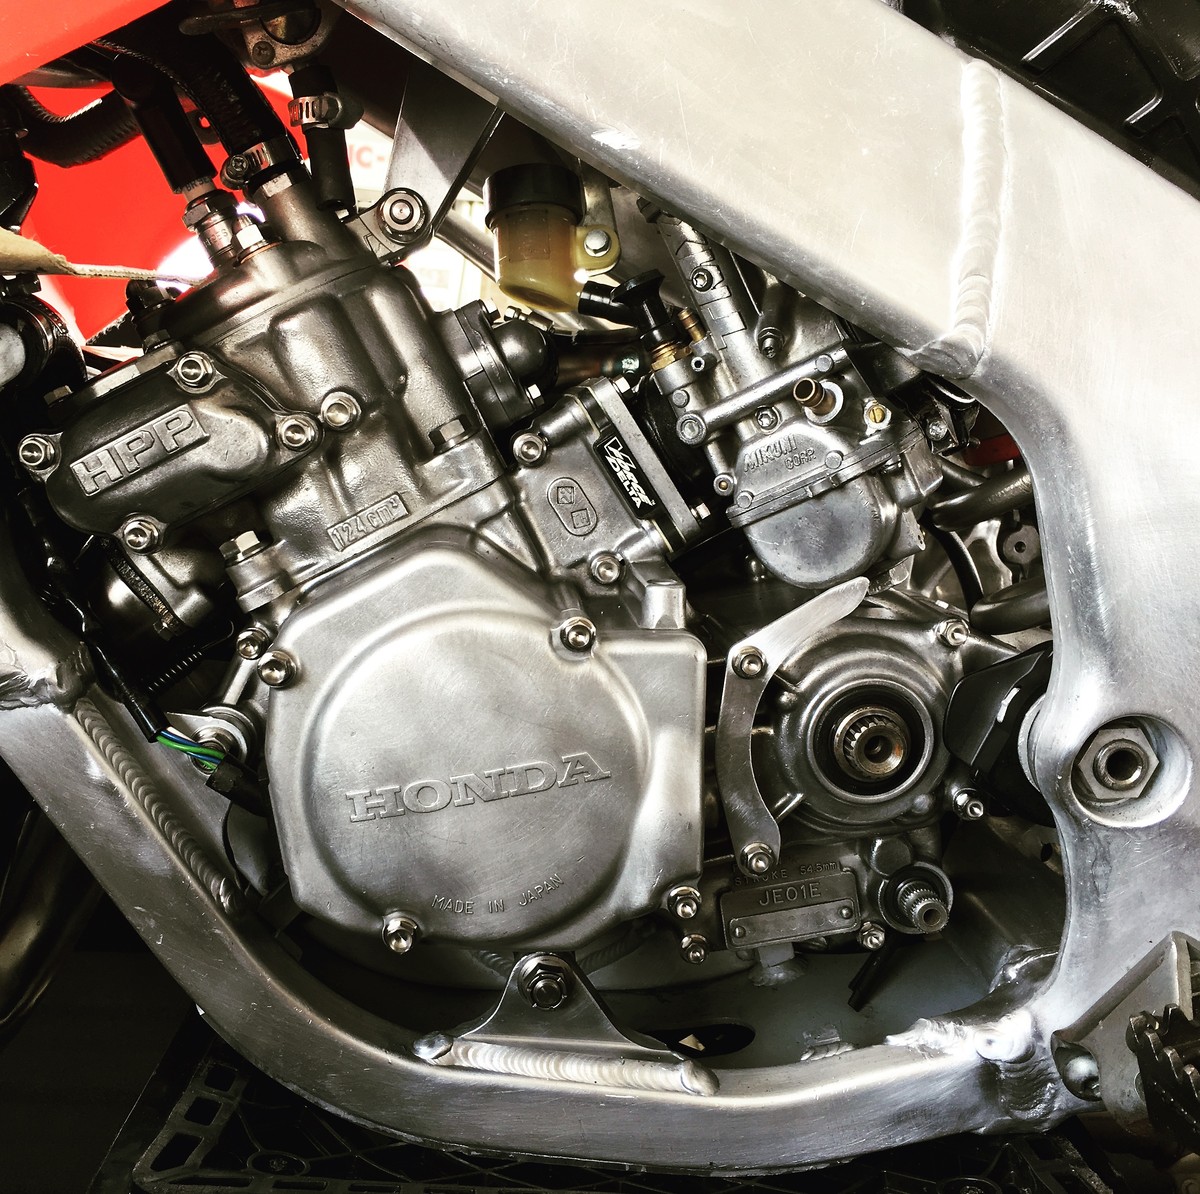
CrGuy2T has already put a lot of love into this bike and it shows. The frame and swingarm look incredible. It is obvious how much time he spent getting the bike to the point it was at when I bought it. Every bolt on the bike is titanium along with the axles. Even the banjo bolts for the brakes are titanium! The motor is a 2001 bottom end with a 95 cylinder and head. The subframe on the bike has been lowered 10mm and fortunately, CrGuy2T was able to source and restore a Pro Circuit pipe custom made for this setup.
Here is the bike when I picked it up. There were a ton of parts that came along with it as well. There were original, nos Plano Honda graphics on the shrouds but the adhesive had gone bad and they wouldn't stick so we removed them before loading the bike up as the drive home would surely have blown them off.

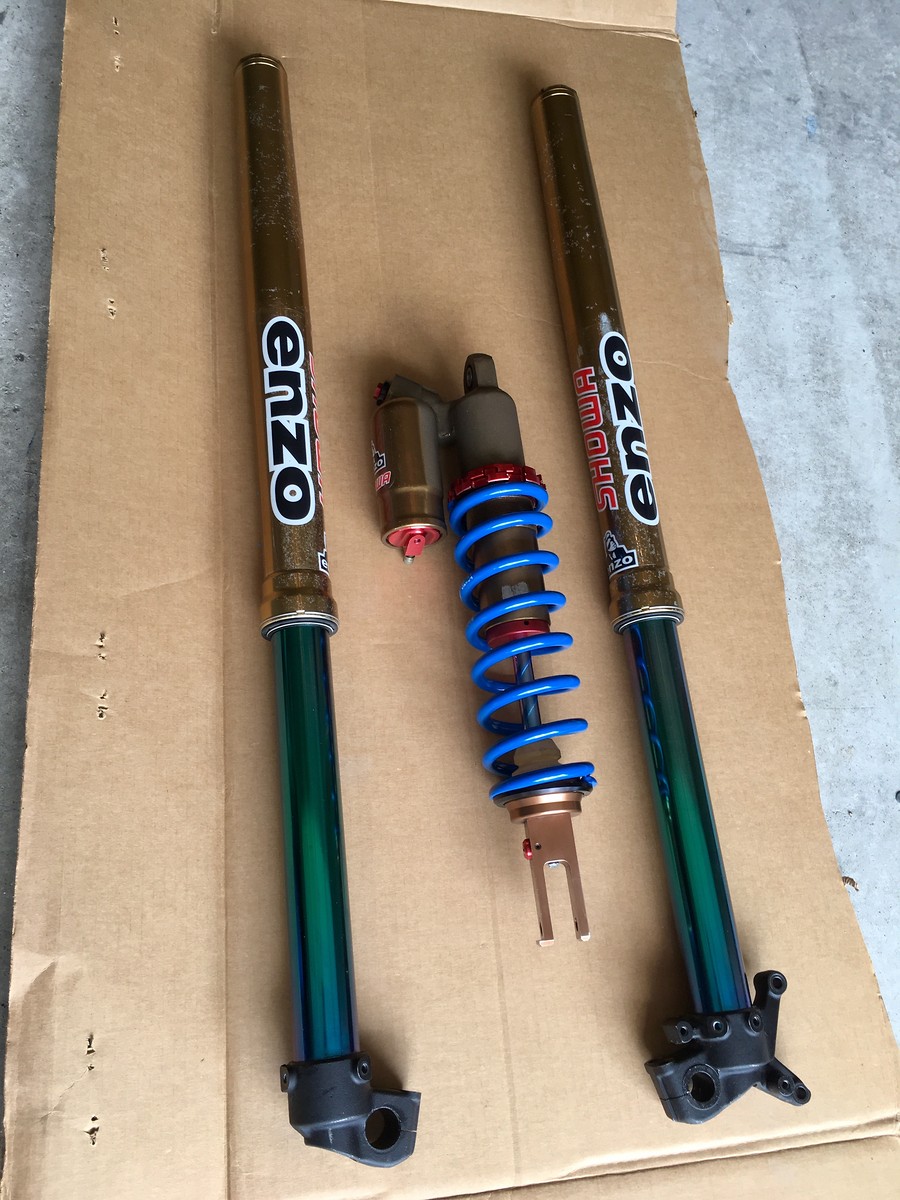
The suspension is 47mm Showa A Kit. The suspension was from another bike and sprung way too stiff so I knew I needed to get it sprung for me. The kashima coating on the forks is also pretty rough on the outside so I was thinking about getting that redone as well. I took the suspension to Craig Decker at Enzo to have it serviced and re-sprung. I decided to go ahead and order new tubes and have them kashima coated but that means the tubes have to first come from Showa (in Japan) and then sent back to Japan to for the kashima coat. Needless to say, it will be a while before I have the new tubes but I've already got the suspension back with the original tubes and the damage to the kashima coat is purely cosmetic.
So at this point I've already spent more money than I ever planned to. CrGuy2T gave me enough parts to almost finish the bike and I told him I probably wouldn't do anything to the bike for a while. That is also what I told the wife. Unfortunately, once I got the bike in my shop... I just couldn't help myself from ordering parts, busting out the steel wool, sos pads and, quite frankly, the desire to ride this bike. My dad bought me my first dirt bike from Plano Honda. When Plano Honda had their team, I use to go up there to look at their race bikes that they'd have on display at times. It is funny what you remember about certain things and for some reason what I remember the most about drooling over these bikes is the smell. As a kid, I didn't know what I was smelling when I'd look at the bikes but I knew my bike never smelled like that and it made these bikes special. I know now it was just simply the fuel but because of that memory you better believe I will be mixing up a couple gallons of VP's finest when she is all put back together again.
I have a rear hub orignal to the bike that the team had turned down. I've ordered a stock DID rim and new spoke/nipple kit to lace it to. I got a stock front wheel in surprisingly great shape. I think I am going to unlace it and have that hub turned down to match the rear. The motor has a Hinson clutch hub and pressure plate but stock basket so I got a new Wiseco forged basket. I could've gone Hinson but I think the Wiseco is just as good and a better price. I've ordered a bunch of other parts but won't drag on about that as I'm sure nobody has read this far anyways. The bottom line is that every part of this bike will be new or fully rebuilt when it is done.
Last night I decided to tackle the rear suspension linkage bearing. CrGuy2T had already cleaned the link up but the needles had come out of the bearings so I was going to pop the old ones out and press in the new ones. I have the motion pro bearing tool kit and have done bearings many times so no problem, right? Wrong. Sometimes I am just a dumbass and rush into doing something before thinking it through. I set the bearing removal tool up, find the right size collet and start to press the bearing through the link. I'm thinking I'll press the bearing down to the backside of the other bearing and will press them both out one side. I'm tightening the tool and it won't budge. I put it in my vice and get a breaker bar for more leverage. I pull so hard I start stripping the tool... I'm heated. Now stupidity turns dangerous. I think it must just be stuck, I need more power! I put the parts in my truck and head over to my parent's where my old man has a 12-ton press. I set it up and start cranking... and cranking... and POP! What was the pop? Oh just the sleeve of the bearing race breaking. At this point I've been defeated by the linkage and as I've mentally deescalated from the situation, I have a moment of clarity. I realize these bearings can't be pressed out, they have to be pulled out - pulled out with the other part of my motion pro tool designed just for this job. Well the problem is that with the needles gone and the lip of the race now F'd, the tool won't spread out far enough to grab on tight enough to remove it. I'm so stupid it hurts sometimes. I'm going to try to put some duct tape on the inside of the race to decrease the inner diameter in an attempt to get them out later today but I'm thinking it will just pull the tape out of the race.

Here is the bike as she sits currently.

CrGuy2T has already put a lot of love into this bike and it shows. The frame and swingarm look incredible. It is obvious how much time he spent getting the bike to the point it was at when I bought it. Every bolt on the bike is titanium along with the axles. Even the banjo bolts for the brakes are titanium! The motor is a 2001 bottom end with a 95 cylinder and head. The subframe on the bike has been lowered 10mm and fortunately, CrGuy2T was able to source and restore a Pro Circuit pipe custom made for this setup.
Here is the bike when I picked it up. There were a ton of parts that came along with it as well. There were original, nos Plano Honda graphics on the shrouds but the adhesive had gone bad and they wouldn't stick so we removed them before loading the bike up as the drive home would surely have blown them off.
The suspension is 47mm Showa A Kit. The suspension was from another bike and sprung way too stiff so I knew I needed to get it sprung for me. The kashima coating on the forks is also pretty rough on the outside so I was thinking about getting that redone as well. I took the suspension to Craig Decker at Enzo to have it serviced and re-sprung. I decided to go ahead and order new tubes and have them kashima coated but that means the tubes have to first come from Showa (in Japan) and then sent back to Japan to for the kashima coat. Needless to say, it will be a while before I have the new tubes but I've already got the suspension back with the original tubes and the damage to the kashima coat is purely cosmetic.
So at this point I've already spent more money than I ever planned to. CrGuy2T gave me enough parts to almost finish the bike and I told him I probably wouldn't do anything to the bike for a while. That is also what I told the wife. Unfortunately, once I got the bike in my shop... I just couldn't help myself from ordering parts, busting out the steel wool, sos pads and, quite frankly, the desire to ride this bike. My dad bought me my first dirt bike from Plano Honda. When Plano Honda had their team, I use to go up there to look at their race bikes that they'd have on display at times. It is funny what you remember about certain things and for some reason what I remember the most about drooling over these bikes is the smell. As a kid, I didn't know what I was smelling when I'd look at the bikes but I knew my bike never smelled like that and it made these bikes special. I know now it was just simply the fuel but because of that memory you better believe I will be mixing up a couple gallons of VP's finest when she is all put back together again.
I have a rear hub orignal to the bike that the team had turned down. I've ordered a stock DID rim and new spoke/nipple kit to lace it to. I got a stock front wheel in surprisingly great shape. I think I am going to unlace it and have that hub turned down to match the rear. The motor has a Hinson clutch hub and pressure plate but stock basket so I got a new Wiseco forged basket. I could've gone Hinson but I think the Wiseco is just as good and a better price. I've ordered a bunch of other parts but won't drag on about that as I'm sure nobody has read this far anyways. The bottom line is that every part of this bike will be new or fully rebuilt when it is done.
Last night I decided to tackle the rear suspension linkage bearing. CrGuy2T had already cleaned the link up but the needles had come out of the bearings so I was going to pop the old ones out and press in the new ones. I have the motion pro bearing tool kit and have done bearings many times so no problem, right? Wrong. Sometimes I am just a dumbass and rush into doing something before thinking it through. I set the bearing removal tool up, find the right size collet and start to press the bearing through the link. I'm thinking I'll press the bearing down to the backside of the other bearing and will press them both out one side. I'm tightening the tool and it won't budge. I put it in my vice and get a breaker bar for more leverage. I pull so hard I start stripping the tool... I'm heated. Now stupidity turns dangerous. I think it must just be stuck, I need more power! I put the parts in my truck and head over to my parent's where my old man has a 12-ton press. I set it up and start cranking... and cranking... and POP! What was the pop? Oh just the sleeve of the bearing race breaking. At this point I've been defeated by the linkage and as I've mentally deescalated from the situation, I have a moment of clarity. I realize these bearings can't be pressed out, they have to be pulled out - pulled out with the other part of my motion pro tool designed just for this job. Well the problem is that with the needles gone and the lip of the race now F'd, the tool won't spread out far enough to grab on tight enough to remove it. I'm so stupid it hurts sometimes. I'm going to try to put some duct tape on the inside of the race to decrease the inner diameter in an attempt to get them out later today but I'm thinking it will just pull the tape out of the race.
Here is the bike as she sits currently.
Went back to the press with the new bearings and this time went much smoother. The linkage is all done and on the bike now.
The Shop
I took the wheels to Scotty Hanes. He is going to turn the front hub down to match the rear one that I got with the bike. Scotty was a mechanic on the Plano Honda team for those that might not know.
I cleaned up the chain guide and replaced the rubber insert with a new one. I actually took the aluminum chain guide body up to 800 grit on my belt grinder and then went at it with 1400 grit on a sanding block but it is hard to tell. This first photo is after I had just cleaned it with an SOS pad before I took it to the belt grinder.
I also fixed the airbox that was broken. Part of where the box is riveted together is broken so re-riveting wouldn't work. I epoxied it together where the repair was needed. I've never fixed an airbox like this but I think it is going to work just fine. I also took the airboot out, cleaned and resealed it with 3M weatherstrip adhesive.
I started rebuilding the clutch as well. I took advantage of my drill press to get the old basket's rivets out.
After getting the cushions out along with the main gear I went back to the 12-ton press to press the kick start gear out. It was a piece of cake. Then to get the gear in the new basket I heated my oven to 400 degrees and put the basket in for 15 minutes. After I took it out I immediately put the gear in which slid right into place. The manual tells you to do it this way and to put some sort of weight on top of it to keep it all the way in while the basket cools back to room temperature. So tonight while my wife was making dinner on the stove, I was making a clutch basket...
I finished building the basket by putting the cushions in, screwing on the backing plate and peening the screws into the basket.
I'm waiting on a new clutch hub before I assemble it all back into the motor.
I've got a new seat cover and new seat foam to rebuild the seat which will probably be the next thing I do. The bike has black twin walls but I have a serious nitpicking problem and ordered a set of the titanium color bars like the team ran. I'm going to replace the enzo stickers with Pro Circuit ones in order to match the graphics when I get the new fork tubes back from being kashima coated. The bike isn't far off from being done.
I also installed new Renthal twinwalls in the titanium color which the team used and replaced the new pro circuit clutch perch with a Turner one. Turner?!? On this bike, WTF? Well the team used the old Works Connection Pro Perch which Works Connection has since replaced with their Elite Perch. I've been able to find a Pro Perch, in fact I think I have one on my 03 KX250, but they all have an anodized red perch where as the ones on the Plano bikes were all silver. So, this turner one looks like the part and I'm pretty sure it is an exact copy of the Pro Perch which would explain why Works Connection came up with a new design in the Elite Perch.
Also, for anyone that may see the trophy in the background on my bench. That is a trophy I got at Lake Whitney on my 80. The photo next to it is an old photo from the finish line at Mosier Valley. Both circa 2001 and both tracks now only remain in the history books.
Oh and if anyone follows the photos closely you'll notice the bike is now sitting on a Pro Circuit stand. I'm trying to get the side panels for the stand but the only place I can find them on is Pro Circuit's website and they're on backorder.
Coming together great!
Pit Row
SLOWTIME, that bike was listed for sale on here recently. It could be a good starting point for somebody but will need quite a bit of work. Those are 01 graphics though which dont match the bike if it is a 00.
Scotty Hanes of Performance Factory MX built the wheels and did a fantastic job turning down the front hub. I think I said it before but the rear hub was original to the bike and had already been turned down. The team ran turned down stock hubs. I also bought a set of Pro Circuit works stand side panels but, as you can see in the photo, have only installed one side so far.
Robert came through as always and found me a Pro Circuit ignition cover which I spent some time cleaning up with a scotch-brite pad.
I still have a few other small things to do after the carb and rear caliper (like the chain) but it is very close to being done. The last thing to be done will be to install the new, freshly kashima coated fork tubes but that is probably still two months out.
New...
-piston
-retainers/clips
-seals
-boots
-pin
-pin cap
-pads
-copper washers
Reinstalled...
-Titanium bleeder
-Titanium caliper pin
-Titanium banjo bolt
The front brake is fine but I'll probably do it next the same way because I have all of the parts already minus a new piston.
I'm probably going to race this bike at Rio Bravo next November at their Old School Reunion/Ahrma weekend in their 125 race and then "retire" the bike. I raced that this year with my Splitfire bike and it was a blast.
I picked it up earlier from Scotty Hanes (Performance Factory MX) who went through a lot of things on the bike including the motor and got it running well. A couple of things we changed are the upper fork tubes. The kashima coat was roached so we got a set of stock CR250 tubes and put those on. They don't look quite as cool as a fresh kashima coat but they are actually period correct for the bike. I plan on taking some nice photos of the bike along with the matching gear and helmet I have acquired but, for now, here is the bike.
There are a few small things I may change over time but for now I can rest easy knowing she is ready to be ridden and she looks spectacular!
Post a reply to: 2001 Plano Honda