1998 YZ250 budget build (my first smoker)

calcoast
Posts
498
Joined
10/11/2016
Location
Elk Grove, CA US
Edited Date/Time 1/8/2019 11:41am
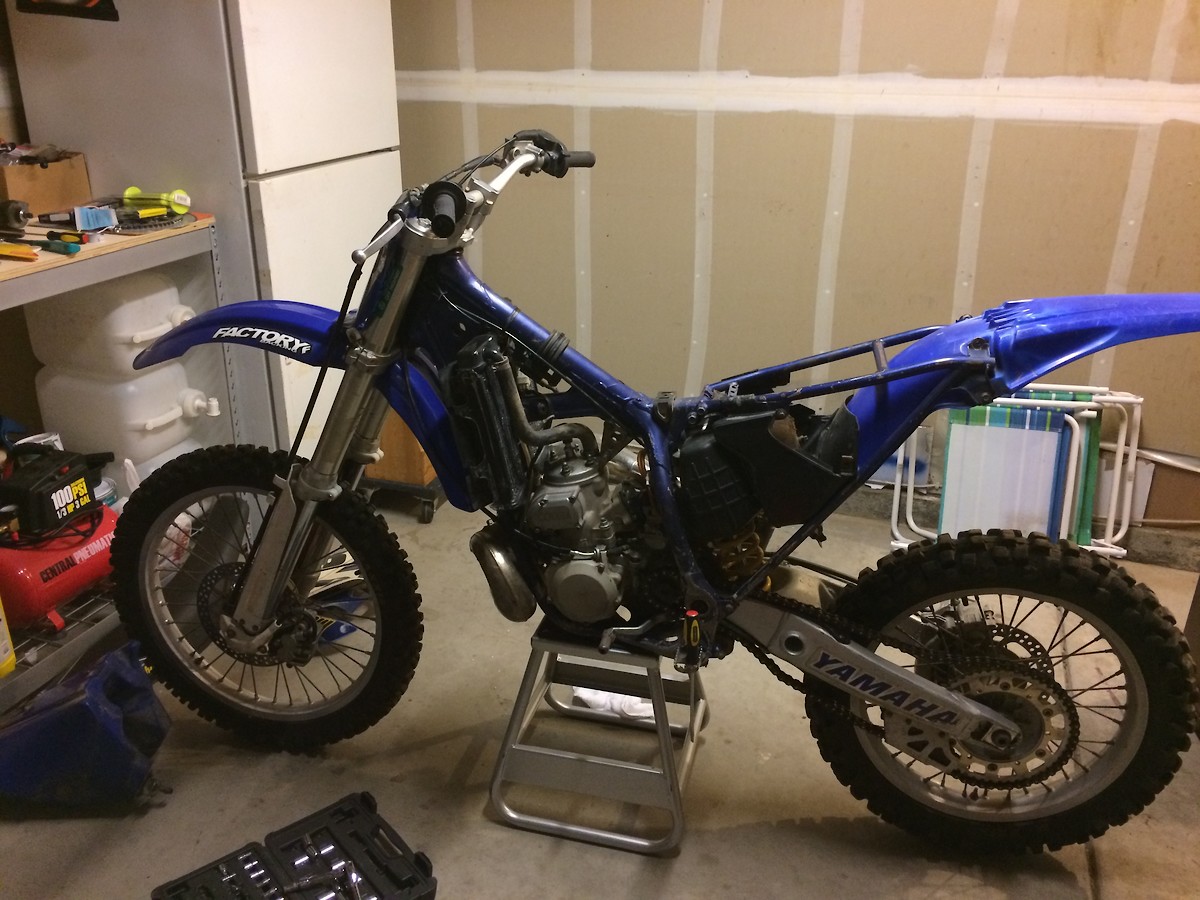
Hey everybody I picked up this 98 YZ250 for a cool $500. The previous owner told me it needed the top end redone and a couple parts here and there. I wanted somthing I can work on during the winter. My plan is to get it running, clean it up really good, new plastics etc. Basically have it looking like it did in 98. Then eventually get some cool trick parts for it.

I’m taking the top end off and plan to ship it out to PowerSeal this week.


Bonus: Does anybody know why the P.O. would put a zip tie in the valve assembly? Maybe to act as a spacer or somthing? Lol


|
Micahdogg
Posts
1267
Joined
1/3/2011
Location
US
12/4/2017 7:37am
Nice score. Whats with the zip tie in the powervalve linkage though?
calcoast
Posts
498
Joined
10/11/2016
Location
Elk Grove, CA US
12/4/2017 1:04pm
I have no idea. I plan on taking the rest of the linkage apart and finding out.


Also I noticed this small crack on the cylinder head. Does anybody know if this is going to a problem that needs fixing or is it not that big of a deal?


Micahdogg
Posts
1267
Joined
1/3/2011
Location
US
12/5/2017 6:52am
Looks like it could have been a ground strap from spark plug that broke off. For something like that I would take a sharp exacto knife and scrape away at it to get the rough spots off. If you can get it 50% gone with no sharp edges then I wouldn't worry about it.
calcoast
Posts
498
Joined
10/11/2016
Location
Elk Grove, CA US
12/6/2017 3:02am
Got the cylinder jug off. This is what the inside looks like. It’s a nice sized gouge


When I got the power valve out I noticed some scoring on it. Will this cause any major problems running the bike with it like that or does it need to be replaced? (Those things aren’t cheap lol)


The Shop

calcoast
Posts
498
Joined
10/11/2016
Location
Elk Grove, CA US
12/23/2017 10:03am
Progress has been slow. I mailed the cylinder to Powerseal USA. They quoted me the same prices on their website for a weld and replate job. The turn around time is going to be 1-2 weeks. In the mean time I removed the subframe and rear fender. The air filter was completely eroded and turning to dust.

After removing the top end


calcoast
Posts
498
Joined
10/11/2016
Location
Elk Grove, CA US
12/23/2017 10:06am
How she’s looking right now


sandman768
Posts
6071
Joined
3/21/2014
Location
Saratoga Springs, NY US
12/23/2017 3:18pm
Powervalves will clean up with carb/choke cleaner & red scotchbrite pad....any plans for the bottom end? Good idea to replace main bearings, seals & inspect everything else...good luck with the build, bike looks pretty clean...
calcoast
Posts
498
Joined
10/11/2016
Location
Elk Grove, CA US
12/24/2017 2:41pm
Yeah, my next step is to take the engine out and go through the bottom end. Ive never split cases before but that’s why I bought the bike.
calcoast
Posts
498
Joined
10/11/2016
Location
Elk Grove, CA US
12/31/2017 6:30pm Edited Date/Time 12/31/2017 6:31pm
Got the engine out yesterday along with the rear shock. Gonna need some bigger sockets for the swing arm linkage.


Also noticed this big ole glob of what I assume is jb weld or something.Unsure


1
mattyhamz2
Posts
10866
Joined
7/6/2015
Location
So Cal, CA US
Fantasy
767th
12/31/2017 7:07pm
Funny! I paid $500 for mine also. Can’t wait to see how this turns out. Next time I head up your way I’ll bring mine so we can ride together
JWACK
Posts
2485
Joined
8/7/2009
Location
NM US
1/1/2018 7:53am
It's coming along! I had a buddy with a 98 and I spent quite a bit of time on it. The motor was very smoth without a hit and it turned good. Looking forward to the rest man!
calcoast
Posts
498
Joined
10/11/2016
Location
Elk Grove, CA US
1/18/2018 10:57pm
Progress has been super slow.

My focus has mainly shifted to my new 2017 model. Due to the constant oil changes shes keeping me pretty busy.


Got some parts in the mail. I was able to snag the turbine core for $20 off eBay. Just needs some elbow grease.


Also got my cylinder back from Powerseal USA. It looks pretty great and the nikaseal(sp?) is silky smooth.


At first I thought it was just cleaned and blasted but upon further inspection it looks as if it’s been spray painted. Does anybody know if this is what they do? I actually plan on calling them tomarrow and finding out because If it is painted I want to know the name and color so I can match the rest of the engine.


1/19/2018 8:05am
That doesn't look like spray paint to me - that looks like its been vapor blasted/honed Wink . Its bare aluminum, which is a good thing - I'd be pretty unhappy if someone had spray painted my cylinder.
mattyhamz2
Posts
10866
Joined
7/6/2015
Location
So Cal, CA US
Fantasy
767th
1/19/2018 8:42am
Congrats on the new 2017 model! Enjoy every second of it. They grow fast!!! My daughter will be 5 next month and my son will be 2 in April. It feels like just yesterday I was holding them for the first time in the hospital.

The cylinder looks awesome! How much longer until She's all back together?
DTR830
Posts
964
Joined
8/14/2017
Location
Mountain Top, PA US
Fantasy
1105th
1/19/2018 8:48am
congrats on the addition. Moto is my therapy from my twins (3yrs old)
calcoast
Posts
498
Joined
10/11/2016
Location
Elk Grove, CA US
4/2/2018 12:47pm
Progress has been pretty slow. I paid all my family to sign up for MXA and dirtbike mag. So I can get the RMATVMC giftcards. ($200 in giftcards for like $72) I’ve been waiting forever for the rest of the giftcards to come in. I plan on picking up some black tusk rims, crank bearings, seals and some random little parts.

I’ve taken out the flywheel and stator.
And I removed the compound the P.O. used to seal up the chunk of case the chain took out. My uncle is a welder by trade so I’ll see what he can do. The bike shifted fine before.


Chunk missing


mitch199
Posts
112
Joined
11/20/2013
Location
AU
4/3/2018 4:26am
Awesome idea with the MXA subscrition! LOL! I wonder if that would work for someone living in Australia.... like me.
calcoast
Posts
498
Joined
10/11/2016
Location
Elk Grove, CA US
10/12/2018 12:39am
Sup everybody. I know I haven't posted anything in this thread in hella long. As I mentioned many times before with a newborn progress was very slow. The last couple of months we've gotten into a grove and I've actually had some regular time to work on the bike. I've always taken pics along the way.

First off for fathers day my wife surprised me with a HF tool cart and shop cart. I've been amassing plenty of specialty tools during this rebuild and had nowhere to put them. I also had all the parts spread around on my garage floor.


I got the bike down to the bare frame


I then washed it, hit it with airplane paint stripper, the took a wire wheel to the whole frame.


As you can see I built a little spray booth inside of my garage. After stripping the entire frame I hit it with 3 coats a self etching primer, a whole can of Duplicolor Dark Blue Metallic and half a can of clear (All light coats of coarse)


I went with rattlecan over powder coat because I'm a cheap mofo.

I also split the cases cleaned everything inside. Replaced the bearings and seals and got the hole in the left case welded over.


So that's basically everything so far. I got the crank and transmission back in but before I seal the cases I wanted to run something by you guys.

The manual says to make sure the transmission is in neutral before putting the cases back together. How does neutral look in the shift drum. Everything shifts smoothly. If I have the two left side forks hitting their stops is that first gear?

Basically how should the transmission be aligned for it to be in neutral?
Micahdogg
Posts
1267
Joined
1/3/2011
Location
US
10/12/2018 9:14am
Frame looks good for a rattle can.

As for the trans, I usually install the trans in the stator side case. Then you can install the star gear thing to the shift drum and spin it around to make sure your gears are all engaging correcting (check the speed of the output shaft to make sure it spins slower through each gear). And the star gear thing has a noticable detent for neutral.

It looks like you pulled the crank into the clutch side already, so you could still install the star gear thing, but you'll be looking at it upside down on the bench. Generally, I've viewed transmissions as a puzzle. It goes together easily, and almost always goes together only one way. If you are fighting something, then something is probably not installed right.
1
sandman768
Posts
6071
Joined
3/21/2014
Location
Saratoga Springs, NY US
10/12/2018 12:27pm
I never used to perform my bottom end rebuilds until a few years ago. Between this site & utube I have learned how to do it. I"m still not 100% confident in my ability, so I get my cases prepped & all bearings installed, before I install the crank, I install all the gearbox parts & put cases together & make sure it shifts through all the gears correctly, you will see it can really only go together one way. I will also add,I take a lot of before photos & lay everything out just as it came apart, so I don't screw up the order of parts on the shafts. I get better with each one I do, I just did my 89cr250 bottom end & it was the easiest, one to date, every thing just slipped right together. I also like the heat/freeze method, crank just drops right into the cases....
2
calcoast
Posts
498
Joined
10/11/2016
Location
Elk Grove, CA US
10/12/2018 12:48pm
That's actually a pic of when I first split the case.

Right now I have everything in on the other side as per the manuals instructions.

All of the gears and forks shift smoothly and move as they should I just dont know where they should be lined up to be in neutral.

I took a bunch of pictures on my old phone. I gotta look for it and charge it because I know i took pics of how the transmission looked.
Micahdogg
Posts
1267
Joined
1/3/2011
Location
US
10/15/2018 12:57pm Edited Date/Time 10/15/2018 12:59pm
Once you attach the star gear thingy to the drum, you will be able to use it to find neutral since there is an obvious detent. Not that I think it really matters though. I don't know what would prevent you from assembling it with any of the gears engaged.
JWACK
Posts
2485
Joined
8/7/2009
Location
NM US
10/15/2018 3:20pm
Nice work on the frame! Coming along really good. ?
calcoast
Posts
498
Joined
10/11/2016
Location
Elk Grove, CA US
1/8/2019 12:46am
Update: Ive been steady working on the bike since my last post but since the holidays came I havent done much.

I got the motor back together and in the frame

Then I got to work on the swingarm, taking the old decals off and using a scotchbrite pad to bring some shine back to it


Got some new decals for the swingarm and got it back on the bike


The old steel subframe was still good but I wanted an aluminum one. I was able to snag this one off ebay for $25 shipped. I stripped the old paint off and hit it with some silver

I know I originally said it was going to be a budget build but with everything looking clean and new those old bent up rads looks out of place so I had to get some new ones


I shouldve taken a picture of the pipe before I cleaned it up and hit it with WD40 and a scotchbrite


I also cleaned up the triples and bars, got a new barpad, grips, and hoses


I bought a cheap gripper off ebay and replaced the old motoworld one.


Picked up some new shrouds and evo graphics while I was at it


Its starting to actually look like a bike now. Next I plan on cleaning up the carb and replacing the linkage bearings. Still needs a chain, sprockets, rims, etc. but those will all come in time.
2
FWYT
Posts
3308
Joined
5/25/2014
Location
San Diego, CA US
1/8/2019 11:41am
Looking good!

"I know I originally said it was going to be a budget build but with everything looking clean and new those old bent up rads looks out of place so I had to get some new ones"

HAHAHHAHAHHAHHAAHAHA
Holy hell, if we all haven't said that before!!! Famous last words - "I'm gonna keep this simple...."
2
bugnboo
Posts
58
Joined
1/24/2014
Location
CA
1/10/2019 10:29pm
I bought one of these brand new,awesome bike,figuring I needed a new bike,I went looking for a 00 yz 250,but they were sold out.bought a 00 cr 250,that was a step backwards...all the Honda lovers can suck it,lol
Excellent job bringing it back?

Post a reply to: 1998 YZ250 budget build (my first smoker)

The Latest