

Posts
1935
Joined
3/11/2013
Location
Tacoma, WA
US

Edited Date/Time
10/7/2021 5:21pm
I picked up this 1990 KX500 in September of 2019. It shifted like a new bike, the frame, cases, etc were all 100% intact and it ran like it was full of diesel fuel instead of gasoline.
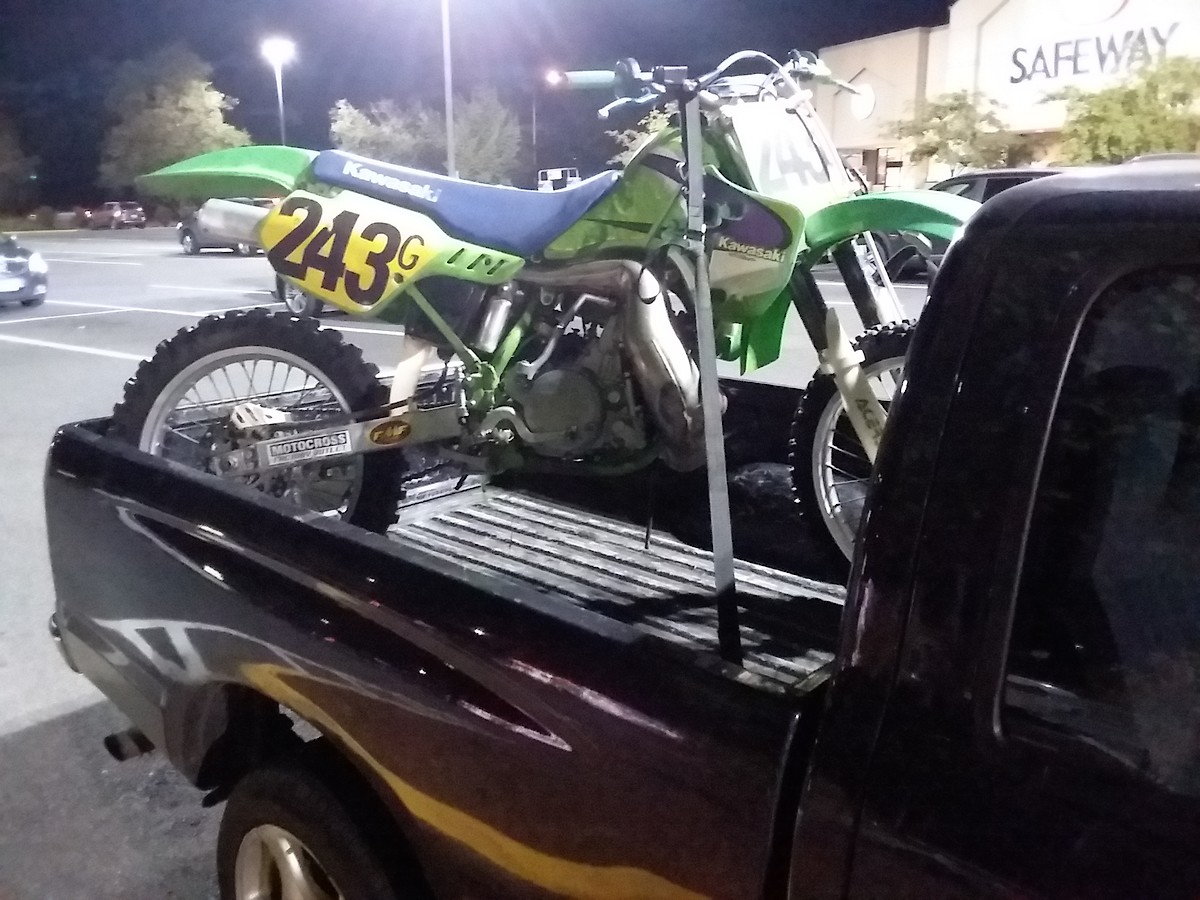
When i brought the bike home I welded up all the cracks in the pipe, tie-wired the busted exhaust mounts and dug into the carburetor. There was no main jet in the bike. I popped in some leaner jetting and some fresh race fuel and went out on my little track to feel out the bike.
The 41mm forks with 0.39kg/mm spring rate are just not safe on a modern track. The rear felt like a couch with the stock shock and about six inches of seat foam. The bar bend (CR High Pro Tapers made by Easton) felt old-school and the seat felt low relative to the pegs.

I made a list of all the things I wanted to do to this bike and started looking for the parts I would need.
I bought all the basics including every bearing in the engine, gaskets, seals, shock seal kit, etc. I found a set of UFO plastic and some graphics, etc. I knew I wanted to keep the classic looks and have a fresh engine and chassis with some suspension and brake upgrades.
So I found a set of very low hour YZ250 forks from another Vital member. I grabbed a Honda CRF-450R front brake on ebay. I have run a Honda brake on all my YZ250s since about 2008. I also picked up a 270mm Galfer rotor. So that's the plan, somehow I need to make a set of KYB forks work on the old green chassis without cutting up the bike.
I thought about grabbing some later model Kawi or Yamaha four stroke clamps, but the steering stems on these old KX500s are smaller and so are the bearings. Next I considered maknig a steering stem that would cross me over to some modern clamps for the KYB forks. The steering stops and the front number-plate fitment changed my mind. I run a little machine shop, so I decided to build a set of custom clamps that work with the original stem. I gathered a bunch of reference parts for measurements, planned out the job on a notepad and started working on a CAD model.


At this point, I should mention that I'm a full-time student at WSU in the mechanical engineering program. I bought the bike in September and I had too many irons in the fire with my machine shop and my studies, so the bike went on pause for a while. I kept ordering parts, including a chunk of 7075 aluminum.

When school was out for 2020 Summer, I was able to make fixtures and programs, then machine the lower clamp.


By the time the Washougal National was cancelled, then we went and raced the amateur event at the end of August, my summer was over and school kept me busy through the spring. The WSU engineering program required me to take a manufacturing course. I talked the professor into accepting an upper clamp as my final project. Two birds, one stone...


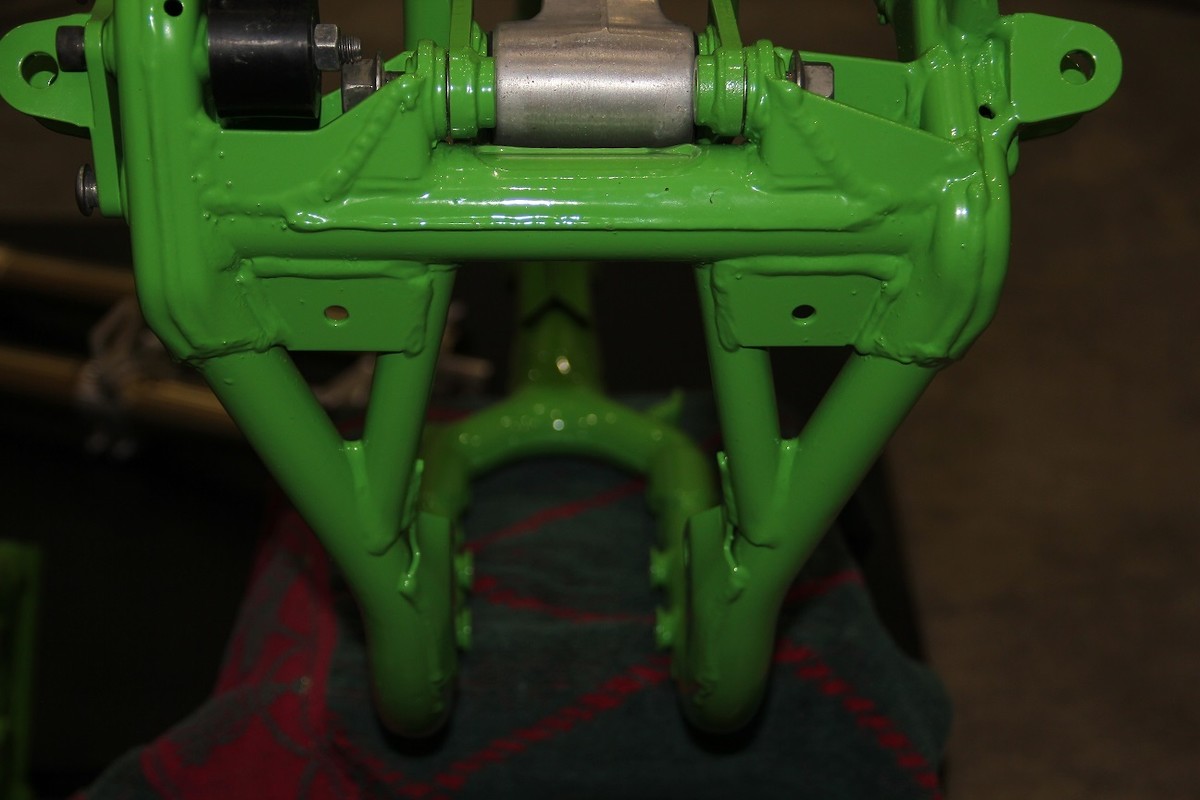
Next, I started on the frame. During the first year of this project, a buddy of mine who owns a couple 1989 KX250s offered me a spare tank and frame. I decided to grab build on that 1989 frame in case I made some bad changes and I wanted to revert back to the original 500 frame. I added a bunch of gussets around the linkage mounting tabs, upper shock mount, exhaust mount, etc. I think these are pretty well established mods for a KX500.


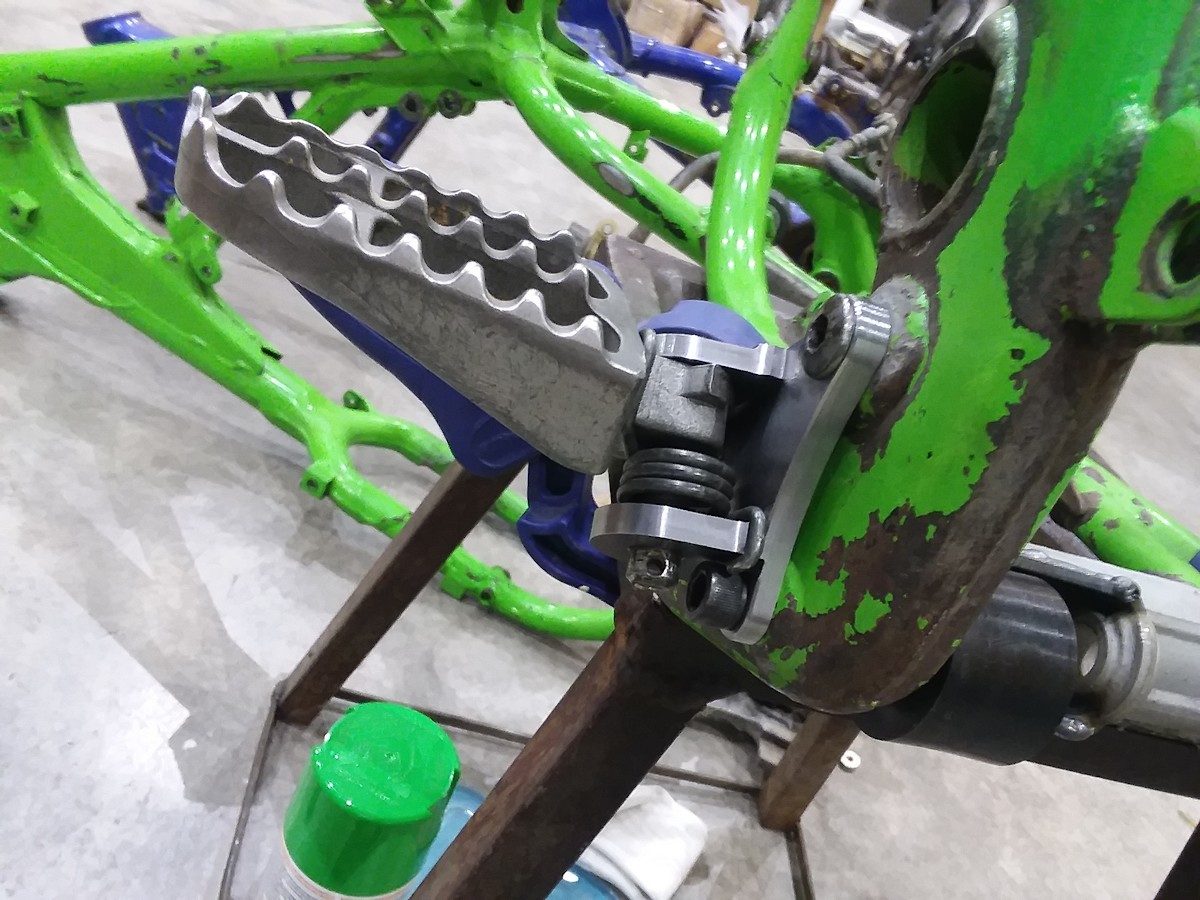
I ground off the right side foot peg mount and milled a batch of new ones from some 4340 steel. These accept any YZ foot peg and spring from 2002 up. The left side foot peg mounts on the KX500 always bend and there are a few people making beefy versions, but I can't figure out why nobody ties in the chain-roller bolt as a third mounting point to prevent bending. So I milled one from some 4340 steel for the left side also. Don't worry, those old pegs aren't here to stay, I just wanted to check the fit & alignment. It doesn't look good in the photos, but I blasted the paint off of all the modification areas prior to welding. The can of pain you see is Grabber Green engine paint. I wasn't sure if I'd have time to coat this frame before the end of August 2021 for the 125 Dream Race at Washougal.

The last frame mod was the addition of a couple gussets with skid-plate mounting points at the rear, then sandblasting. These holes are not threaded, they are set up oversized for what's called a U-nut with the M6-1.0mm thread pitch.


Next, I powder coated everything Kawasaki Green.
The color match is damn near perfect when compared to my original 500cc frame.


To be continued...
When i brought the bike home I welded up all the cracks in the pipe, tie-wired the busted exhaust mounts and dug into the carburetor. There was no main jet in the bike. I popped in some leaner jetting and some fresh race fuel and went out on my little track to feel out the bike.
The 41mm forks with 0.39kg/mm spring rate are just not safe on a modern track. The rear felt like a couch with the stock shock and about six inches of seat foam. The bar bend (CR High Pro Tapers made by Easton) felt old-school and the seat felt low relative to the pegs.
I made a list of all the things I wanted to do to this bike and started looking for the parts I would need.
I bought all the basics including every bearing in the engine, gaskets, seals, shock seal kit, etc. I found a set of UFO plastic and some graphics, etc. I knew I wanted to keep the classic looks and have a fresh engine and chassis with some suspension and brake upgrades.
So I found a set of very low hour YZ250 forks from another Vital member. I grabbed a Honda CRF-450R front brake on ebay. I have run a Honda brake on all my YZ250s since about 2008. I also picked up a 270mm Galfer rotor. So that's the plan, somehow I need to make a set of KYB forks work on the old green chassis without cutting up the bike.
I thought about grabbing some later model Kawi or Yamaha four stroke clamps, but the steering stems on these old KX500s are smaller and so are the bearings. Next I considered maknig a steering stem that would cross me over to some modern clamps for the KYB forks. The steering stops and the front number-plate fitment changed my mind. I run a little machine shop, so I decided to build a set of custom clamps that work with the original stem. I gathered a bunch of reference parts for measurements, planned out the job on a notepad and started working on a CAD model.
At this point, I should mention that I'm a full-time student at WSU in the mechanical engineering program. I bought the bike in September and I had too many irons in the fire with my machine shop and my studies, so the bike went on pause for a while. I kept ordering parts, including a chunk of 7075 aluminum.
When school was out for 2020 Summer, I was able to make fixtures and programs, then machine the lower clamp.
By the time the Washougal National was cancelled, then we went and raced the amateur event at the end of August, my summer was over and school kept me busy through the spring. The WSU engineering program required me to take a manufacturing course. I talked the professor into accepting an upper clamp as my final project. Two birds, one stone...
Next, I started on the frame. During the first year of this project, a buddy of mine who owns a couple 1989 KX250s offered me a spare tank and frame. I decided to grab build on that 1989 frame in case I made some bad changes and I wanted to revert back to the original 500 frame. I added a bunch of gussets around the linkage mounting tabs, upper shock mount, exhaust mount, etc. I think these are pretty well established mods for a KX500.
I ground off the right side foot peg mount and milled a batch of new ones from some 4340 steel. These accept any YZ foot peg and spring from 2002 up. The left side foot peg mounts on the KX500 always bend and there are a few people making beefy versions, but I can't figure out why nobody ties in the chain-roller bolt as a third mounting point to prevent bending. So I milled one from some 4340 steel for the left side also. Don't worry, those old pegs aren't here to stay, I just wanted to check the fit & alignment. It doesn't look good in the photos, but I blasted the paint off of all the modification areas prior to welding. The can of pain you see is Grabber Green engine paint. I wasn't sure if I'd have time to coat this frame before the end of August 2021 for the 125 Dream Race at Washougal.
The last frame mod was the addition of a couple gussets with skid-plate mounting points at the rear, then sandblasting. These holes are not threaded, they are set up oversized for what's called a U-nut with the M6-1.0mm thread pitch.
Next, I powder coated everything Kawasaki Green.
The color match is damn near perfect when compared to my original 500cc frame.
To be continued...
The Shop
I forgot to include this above: I added a little thickness to the steering stop to prevent it digging into the clamps in a tip-over.
With the frame coated and ready to go, I disassembled the engine. I planned to replace the connecting rod and all bearings, then go through the gearbox to see what condition it was in. That turned out to be a pleasant surprise. The gears and dogs, shafts and forks all look great for a 30 year old bike.
Prior to splitting the cases, I noticed that they were different heights at the cylinder mating surface. Once everything was apart and I confirmed the case-alignment dowels were in place I knew I needed to correct that. I made a crude fixture from some scrap steel plate and surface-milled the cases as a matched pair. The mismatch was a step about 0.003 inch high at the parting line. I shaved off 0.004 inch of material from the highest area on the surface and maintained parallel to the crank centerline. I didn't want to mess up the port timing or compression, just correct the gasket surface.
The original intake manifold was old dried up rubber with several tiny cracks on the outside surface. It was still air-tight, but there are a few options out there to replace it including the OE part. I purchased the Boysen RAD-13 model Rad Valve and machined a spacer from some 1/4 inch aluminum plate. The spacer seems to have a good reputation for adding some low end torque. There's nothing significant about the 1/4 inch (≈6.5mm) thickness, I just had that material in the shop. I think most people are running 8mm (5/16 inch) spacers since that's what is available...
I don't have a bunch of photos of the engine assembly process. That work happened pretty late at night. After measuring the bore, piston, ring gap, rod bearing clearance and inspecting everything closely, I re-assembled with new seals and gaskets including a stock thickness (0.500mm) copper base gasket. I have heard these big KX's are prone to sucking base gaskets. With a nice flat surface, the copper and a thin layer of Permatex Ultra-Gray, I don't expect any problems. I will get back inside this engine later once I've decided if I love it or want to make some changes. At that point I'll press the new Wossner rod into the crank, swap in the new piston and make sure the balance factor is as close to stock as possible.
Stay tuned for more...
I also applied some paint stripper to a pristine OE exhaust pipe that I bought a year or so ago.
It was dent free, but it had a few hours and the stock gray coating was scratched up pretty bad along the bottom.
I cleaned up a bunch of stuff like the radiators and other parts that I was keeping and worked my way around the bike checking everything for fit and tidying up all the little details that bug me. I planned to take the bike out for a practice day to get the jetting and chassis to a point where I could race it at Washougal, so I put on the old plastic and started peeling off the numbers to slap a #31 on there for that test day. Yes, that's the elusive 1989 KX250 tank. It came from the same buddy who gave me the frame I built the bike on.
I decided to run a spare front wheel from my YZ125 and YZ250 until I decided what I was going to do long term for a set of wheels for this Kawi. When I washed up the rear wheel to take off the old dry-rotted tire I found this crack in the rim.
At that point it was an easy decision to just build a new set of wheels, so I ordered some new hoops, a set of spokes for the 19 inch KX rear and a YZ front, then stripped down the rear and grabbed a spare YZ hub. I don't have a vapor blaster setup yet, and I was pinched for time. So I scuz-brushed the bare hubs with a steel wire brush and Zep purple degreaser. The wire brush makes aluminum look too shiny, so to bring back the dull look I used a tooth-brush and some Naval Jelly followed by a thorough water rinse. The acid in the Naval jelly dulls aluminum to a matte finish that looks exactly like a new OE part. Use that trick at your own risk and if you try it on a cylinder, keep it far away from the plating.
While assembling all the bodywork, I noted the length of fasteners and replaced most of them with flanged mini-head M6 screws. They look decent and I can use the same 8mm T-handle I use on my other bikes.
I also spent some time machining aluminum sleeves for all the holes in the UFO plastic kit and the fuel tank. A lot of the OE stuff was steel on this 1990 model and the washers weren't built in. I may have added as much weight with new sleeves as I saved replacing steel with aluminum, but I can torque the bolts down firmly against metal, so they're less likely to vibrate loose and fall out. The sleeves are slightly shorter than the thickness of the plastic so there's a bit of compression on each panel when they're installed.
At this point I re-packed the stock silencer and assembled the last few things on the bike with the old plastic, a front wheel from a YZ and went to a place called Riverdale MX with a few different sprockets, a mess of jetting, needles and a sag-scale.
Something I should mention at this point is that I actually pulled the clamp offset in 2mm to correct for the 32mm Yamaha axle lugs (1990 KX500 was 30mm) and then one more millimeter to hopefully add a bit of front end bite. It all worked way better than I expected. The original clamps were 25mm offset and mine are 22mm. The total stock offset stem to axle was 55mm and my bike has 54mm.
On the first ride I had also felt a bit of a burble rolling through 1/8 to 1/4 throttle like the pilot or the straight part of the needle was too rich and a tiny bit of a lean condition at wide open throttle. I tried a step leaner on the pilot from #52 to #50 and it improved that area a bit. In a corner, without crashing I felt something weird in the knee I had injured a month before at the Oregon Old-Timers race, so I called it a day.
That week I stripped the plastic off the bike and installed the new stuff. The Rad Valve came in, so installed that along with the spacer I made. Somewhere along the way I also installed a new kick-starter. Kawasaki makes just about the worst kick-starters. I plan to remedy the issue, but they are sagged down after just a few rides on every green two stroke I've ever ridden. On the other hand, this bike loves to start on the first kick. I always hear people grumble over how hard 500s are to start... Not this one.
It's also a good time to point out an error I made. I tore the bike down in the summer of 2020 and built up the frame a year later... I forgot to add the rear 500cc exhaust mount to the KX250 frame. I'll add that later on as I want to re-coat the frame anyway and already bought another five pounds of that awesome Kawasaki green powder to do my other frame and a couple for a friend. While we're talking about exhaust mounts, I wasn't impressed with the OEM mounts, or their cost. I found some rubber isolation mounts with M6 threads and made a batch of my own tabs. They're steel for now, but I'll be doing another batch in aluminum.
With the bare bike sitting in the shop and the mechanical work done, it was time to make this bike look a little better. Fusion Graphix did a nice quick turnaround on some number plate backgrounds and I think they did a good job on getting me close to the old-school yellow for the 500cc class. The other stickers came from EVO MX in the UK who make just about every year and model of old KX graphics and other neat vintage stuff. These old, flat panels are so easy to stick graphics on that it should be a crime. I was waiting on a repro 1990 seat cover when these photos were taken...
After everything was done and I installed some new bars in SX-Race bend, I sat on the bike to adjust the levers and the corrosion-stained OEM steering nut was staring right at me... I had thought of doing a flanged aluminum nut and it was time to make that happen. I loaded up a 1.0mm pitch thread-mill in a tool holder and buzzed out a real basic hex nut on the CNC.
When the new seat cover came in I had already raced the bike at the Dream Race. I decided I wanted to try a tall seat foam to bring the seat to peg height inline with a modern bike. I picked up the Guts 30mm taller foam and I'll be installing that soon.
The seat and rider triangle is my next task. If the replica seat-cover doesn't have enough extra material to stretch over the tall foam, I'll have some panels stitched in by a good upholstery guy that's local to me.
The shock is the main thing on my mind. I just ordered some parts that I will use to develop my own shock body with a high speed adjuster and a larger piston. My old 1990 shock has a 44mm piston and 16mm shaft. My first version will probably have a 46mm piston and 18mm shaft. I considered building a 50mm body with an 18mm shaft, but most of my springs and other stuff won't be compatible, so I'll wait until I know which spring-rate I want to stick with. Also, there may be some niche commercial viability for a KX shock body kit that accepts the OEM 16mm shaft and valving but adds a high speed adjuster and comes with an 18mm option.
I may also build a couple of sets of linkage pull-rods in different lengths to test. I think the length everyone offers is 132.5mm for these old KXs.
If you have the free time and want to learn, go down to the local tech school or community college and take a course in manufacturing and machining to test the waters. I had to take one last spring and coming from a pro perspective I thought the professor and the school did an excellent job. My final project was the top clamp for this KX build.
Honestly if you pair a couple of hands-on machining classes with a beginner level drafting or CAD class you can teach yourself the rest if you're motivated. It's all out there on the internet these days and there are lots of little garage-sized hobby machines available.
Give me a buzz if you still have my # as I a few things I wanted to run by you 😎 (I thought for sure I would see a yz-ebike build)
Sweet build too.
I'm not a fan of Kawasaki build quality after trying to race a KLX450R and getting the most DNFs ever in my 20+ racing years. The metal they make things of just seems a grade lower than Honda and Yamaha.
The newer shocks aren't much different than the current shock in that bike. Coatings is the big one and having more adjustment with the compression side is another. Your kyb shock should accept a newer dual adjuster if it doesn't already have one. If you have to dabble with making a new one then consider 16/46 ratio or 18/50 ratio. For whatever reason it seems to work better than an oversized rod and small piston.
Interesting idea on the MV for the forks. I can't tell how it functions based on the picture but have often thought a two port valve should have a better feel/response than the 3 or 4 port designs as the shim will bend more naturally on one pivot. I've got a set of first generation KYB cartridge forks on my vintage woods racing IT200 and it is very much an active MV setup with spring loaded BV bypass. It actually works really well just not so great bottoming resistance.
Keep up the good work!
Regarding the leaf-spring mid-valves, there's a topic going on about that on the tech-help section of the forum. I gave a little description and some disassembled photos of the parts:
https://www.vitalmx.com/forums/Tech-Help-Race-Shop,42/YZ-Leaf-spring-mid-valve-conversion,1394807
On the KX500 shock, I don't think there are any options out there for a high-speed adjuster since the diameter of the adjuster body is so small. I considered making an adjuster for the original 44mm shock, but I'm pretty much decided on building a new shock body. I agree with you 100% about the ratios of damper to shaft. 46/16 gives a little more rebound damping than 46/18. Also, the 18mm shaft in my Yamahas makes the high-speed adjuster too sensitive. To solve that, I'm running the softer high-speed adjuster springs from SDI.
For simplicity of the prototype, I can use the 18mm shaft to reduce the number of custom parts that I need to make. I may end up just turning a new seal-head in 16mm and running the OE KX500 shaft. I have a few various shocks and one more on the way to scavenge parts and dimensions from. When I have all the dimensions I'll make a decision.
Cdoggy81, Thanks dude!
I'll try to get in touch on the weekend. I have a homework problem to finish before midnight tonight.
Incredible build… functional and looks great.
Pit Row
Looks like your buddy's Kawi is pretty clean and lots of fun too!
I just got a couple of things I needed to build a custom shock body along with a titanium 5.5kg/mm spring.
Next step is to start making a 3D model and some programs to machine the parts.
I finished school a year ago and have been busting my ass in my machine shop.
I'm about to launch a suspension parts company and I thought it might be a good time to update this build thread since I plan to offer a few of my KX developments in low volume just for "love of the game".
I went for the GUTS racing 30mm taller seat foam and a replica cover from some outfit in Thialand that I bought through eBay.
The cover looks and feels as close to an OE replica as I have ever seen. My buddy's wife stitched on some extra material to give me something to grab while stapling things together. I used stainless staples and took my time. It's not perfect, but does the job and the extra height brings it much closer to a modern rider triangle.
Here are a few photos in the shop just before heading to the Washougal National a few weeks ago.
One of my buddies grabbed this photo at the '23 Washougal national during the Veteran MX parade lap. I wore some mountain biking pants and a US Marines shirt from my old infantry unit to "fly the flag" of the Corps a bit. Unfortunately we're told by the AMA and asked by our Veteran MX foundation to stay wheels on the ground... I wanted to throw a big whip on the road jump and blitz the whoops on this old girl.
I posted a video of that parade lap. It's really cool to get this perspective on the track after the first 250 and 450 pro motos.
Thank you for your service. Like someone else said, a true works bike with all your handmade parts.
Good stuff buddy on the new business & glad to see you’re doing well!
LMK when you will be ready to punch out some of the YZ parts😎
In the past few weeks I came up with a way to build a KX500 shock that includes a high speed compression adjuster. A younger local pro friend and I each built a new shock for our old Kawasakis. I built mine with a shim-stack setting I've used on some other bikes as a baseline and reduced the length by 1.5mm to drop the rear end and run less race-sag.

Early this week I did a few test laps at my own small track and it's a massive improvement. The rear end feels so much more modern and matches the YZ forks and improved ergonomics. I still need to get to a bigger, faster track with some real bumps to get it dialed in.
I'll elaborate on specific details later... I may be able to put together a few complete shocks or build-kits for these by summer.
I'm also planning to do a small run of the foot peg mounts on my bike.
Nice mod !
Awesome👍
Great job on that beast!...and even more all the details designed and machined by you.
Sick build. What unit were you with?
Post a reply to: 1990 KX500 Classic Looks & Modern Handling ?